
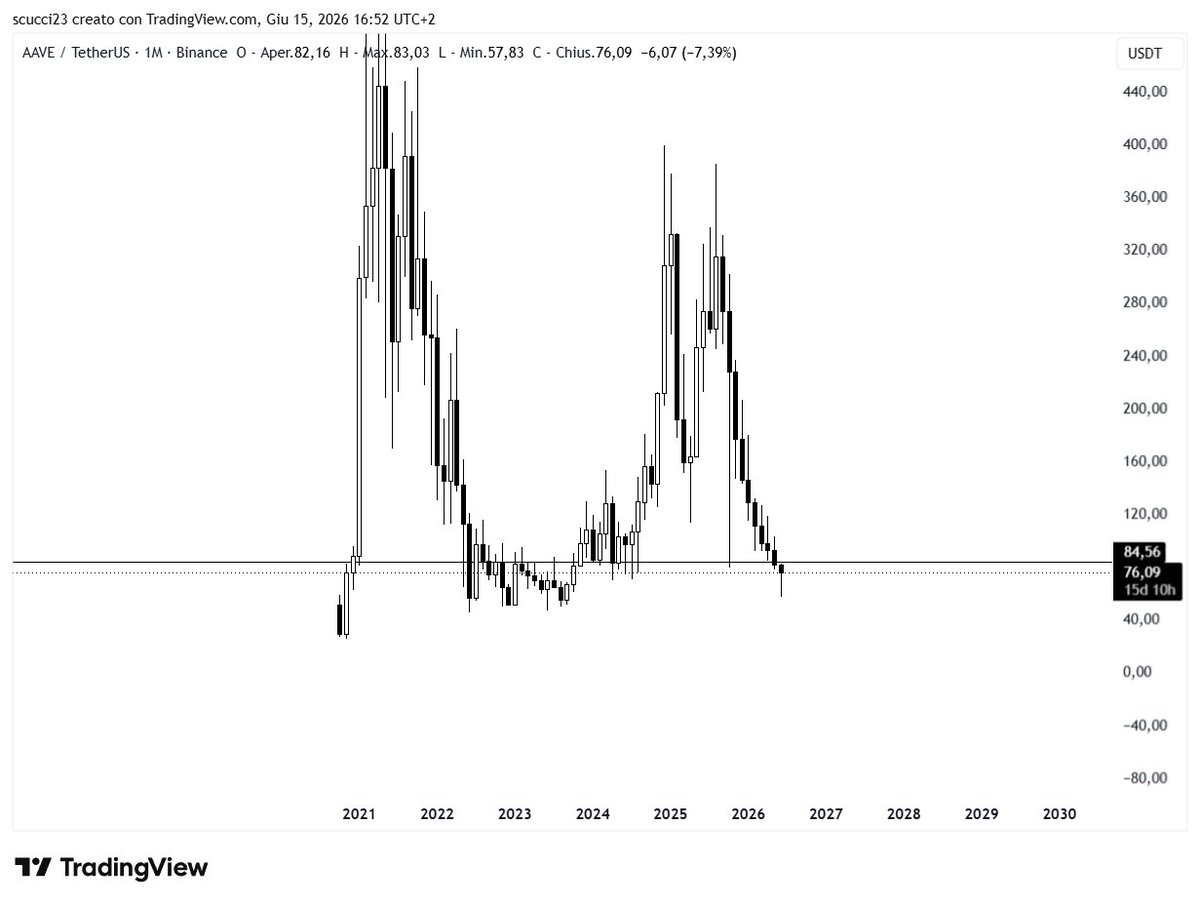
pinbar on this monthly and i think this could set up a nice rally into this bear trap ethereum:0x7fc66500c84a76ad7e9c93437bfc5ac33e2ddae9
2
125
Ali Bangash retweeted

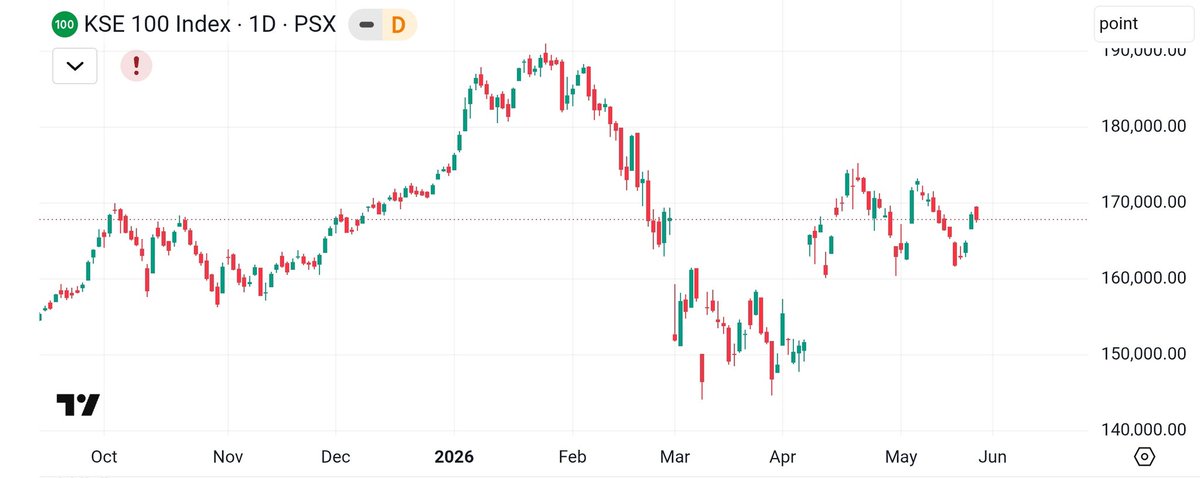
#KSE100 has made a beautiful bullish pinbar today. Resistence levels crossed with good volume.
190000 coming.
#PSX

May 23

#KSE100 is at resistence level. If US & Iran deal is reached, index might give strong move and cross 174000 level. Crossing this level will open the target of 185000. Psx is waiting for just 1 good trigger.
2
1
27
1,394


Drunk trader retweeted

May 27
BTC loves the bait people into those strong pinbar closes only to shove all that late positioning out.
2
4
20
12,548

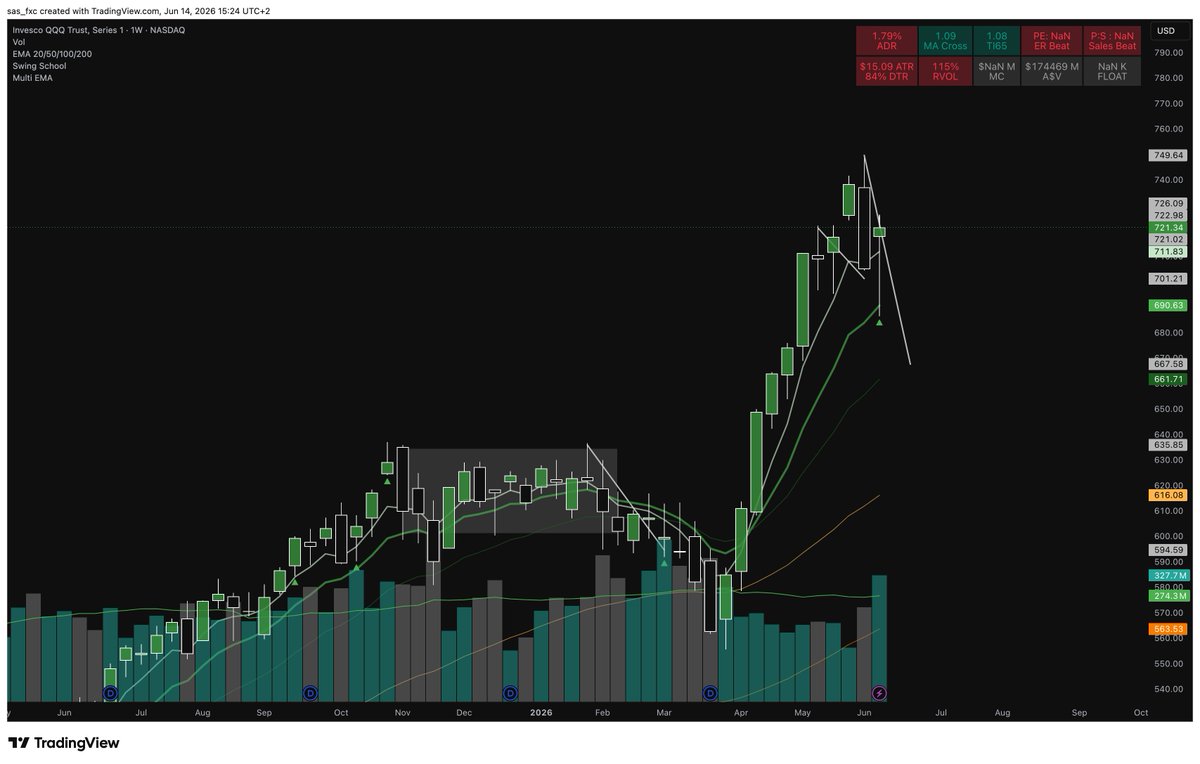
Jun 14
#QQQ weekly chart, reaction of 10 EMA, Pinbar candle, looking loaded for the week ahead.
Ideal case scenario for the week ahead would be
1/ finalization of the Iran deal
2/ rate hike odds decreasing so a more dovish or at least less hakwish Fed on Wednesday
#stocks #bullcase #equities #chartanaylsis #trading
57

Jun 14
$NOW massive pinbar candle being formed on 3M time frame. If price can hold above $104 to close out qtr, it'll be primed for a 30% rally in 2H of the year
Top 5 holding of mine and likely to add if we dip under $100

1
182


Inside the 1D chart. From the heavy supply absorption pinbar to a low-volume retail impulse, we break down the market psychology of the last 8 daily bars. Traders are closely watching the extremes of this tight 7-bar compression range. bitacademyweb.com/2026/06/12…
26

Jun 12
Herkezin bi tarzi var. Ob,fvg ,gap boşlugu ,kati kanal ,minor trend vs vs pinbar Takascilar zaten teknik vs bilmez ... Hocam ben takip edecem sizi ogrenmeye çalişacam . Beni aman yanliş anlamayin
1
1
11

Jun 12
mnq
2108 進多
價格於5分掠奪完前方低點流動性後
出現明確帶大量之反轉,於5分k收盤確定後嘗試進單
由於1分k走勢已經掠奪完第一個流動性
後續不斷出現上下影線代表目前無推進動能
評估後提前平倉止盈出場
2135進多
價格於開盤後,下跌至前方有效fvg空間,該fvg空間距離盤勢過遠
所以當出現止跌pinbar後,才嘗試入場,止盈僅為前方k線高點
後續全數止盈
98


Jun 11
Support and resistance (S&R) are the market’s memory — zones where supply/demand battles create turning points. Beginners draw lines. Pros trade zones with confluence, role reversals, and order flow context. Here’s the slick, high-level playbook.
Core Mindset ShiftNot lines — zones: Price respects areas (not exact prices). Draw thick zones around swing highs/lows with multiple touches.
Strength factors (rank levels by these):Multiple tests (2–3 touches)
Higher timeframe alignment
Volume clusters / time spent at level
Round numbers / psychological levels
Fibonacci confluence (38.2/50/61.8%)
Weak levels get swept (stop hunts). Strong ones flip and hold.Advanced Concept 1: Role Reversal (Polarity Flip)When price breaks a level with conviction:Broken resistance → new support (bulls who missed the breakout defend it on retest)
Broken support → new resistance (sellers who got trapped defend it)
Pro trade: Wait for the retest (pullback) price action confirmation (pin bar, engulfing, absorption volume). This is higher probability than chasing the initial break.
Advanced Concept 2: Confluence Zones = Money PrintersStack multiple factors at one price area for 70-80% reaction probability:Horizontal S/R Dynamic (moving average / VWAP)
Volume Profile High Volume Node (HVN)
Fib retracement/extension
Trendline / order block
Candlestick rejection
Trade only at confluence. One factor alone = noise.
Advanced Concept 3: Breakout vs. Bounce Volume ContextBounce strategy (range/range-bound): Buy support / sell resistance on rejection candles rising volume. Target opposite side of range.
Breakout strategy: Wait for decisive close volume expansion. Then retest of broken level (now flipped) for entry.
Volume tells:High volume small bodies at level = absorption (institutions defending)
Low volume break = fakeout likely
Climax volume on break = exhaustion (possible reversal)
Slick Pro Setups (Trade These)Flip Retest: Price breaks resistance → retests as support → bullish PA volume. Long. Stop below zone. Target next resistance or measured move.
Confluence Rejection: Multiple indicators align at zone hammer/doji/pinbar. Enter on close of confirmation candle.
Higher TF Alignment: Daily/Weekly zone respected → trade 4H/1H signals in that direction only.
False Break Trap: Price briefly breaks level on low volume → snaps back. Fade it when it re-enters the zone with momentum.
Risk & Psychology Rules (Non-Negotiable)Always place stops just beyond the zone (not inside).
Risk 0.5–1% per trade. Reward at least 2:1.
Avoid trading S/R in high-impact news unless you fade the reaction.
Mark levels from higher timeframes first.
Zones weaken after too many tests — respect “exhaustion.”
Common Pitfalls to AvoidOver-drawing lines everywhere (chart spaghetti).
Trading every touch without confirmation.
Ignoring trend context (S&R works best with the higher TF trend).
Revenge trading after a fakeout.
Mastery tip: Combine with price action (naked chart) and volume/profile. S&R alone is good — S&R confluence context is elite.
priceaction
1
547
When institutions smashed the 116-bar support at $0.2030, a mini downtrend channel opened. However, capitulation concluded with an impeccable pinbar at $0.1700. Whales stepped in, actively absorbing floating supply to print a solid bottom: bitacademyweb.com/2026/06/10…
13

bullish pinbar dememiz için fitilli mumun yeşil kapatması gerekmiyor mu efe abi
1
1
762

Selamlar brocum.
Mutlaka takip etmişsindir raporu ama ben yine de rapordaki yazdıklarımla birlikte olan grafiğimi atayım.
$ETHBTC: tradingview.com/x/bxmipeEP/
Burada belirttiğim üzere benim için güzel bir yerden döndü fiyat. Şimdilik o dönüş mumunun bullish pinbar olarak kalmasını ve fiyatın genel anlamda pozitif seyre erişmeye çalıştığını düşünüyorum.
2
22
803

Jun 11
tunggu closing weekend, hari ini udah ada tanda mau turun. yg ngerti analisa grafik perhatikan timeframe 1D. Tapi belum sepenuhnya akan downtrend, bisa jadi di cancel lanjut sideways, di timeframe 1W hari ini membentuk bullish pinbar, see and wait closing weekend
4
690

Jun 11
🗓️ Čtvrtek 11. 6. 2026
Ve středu
🇪🇺/🇺🇲 Forex pár EURUSD vytvořil ve středu druhý málo volatilní medvědí pinbar v řadě
🇪🇺 EUR ve středu 0,16 %
🇺🇲 USD ve středu 0,20 %
Dnes
🇪🇺 Euro dnes aktuálně pokračuje v růstu
🇺🇲 Dolar také posiluje
🇪🇺/🇺🇲 EURUSD v pohybu do strany
#Forex #EURUSD #EUR #USD #Trading #ForexZone

24