
May 29
"Kenneth's looking for a gap in the Python ecosystem—something that could become a popular "for humans" library in the style of Requests. The pattern is taking something from the stdlib or existing libraries that's powerful but clunky, and making it elegant and intuitive for everyday use. This is a creative brainstorm where I should think about what's genuinely missing and what would resonate with developers.
I'm considering whether I need to search for the latest library popularity data, but I have solid knowledge of both the stdlib and major ecosystem libraries. My understanding of what's painful to use and what's been successfully "humanized" is strong enough to have a substantive conversation here—Kenneth will appreciate real thinking over surface-level suggestions.
Before I propose anything, I should do a quick sanity check on my candidate ideas to make sure I'm not suggesting something that already shipped in 2024-2025. That's the responsible move.
Let me think through the actual gaps by reasoning about what makes a good "Requests-style" library: the underlying capability exists but the API is hostile or verbose, there's a human mental model that doesn't match the current interface, it's small and focused, and people hit it constantly. I'm brainstorming candidate pain points in the stdlib and ecosystem, starting with datetime and durations—though that space is already well-covered by libraries like pendulum, arrow, and humanize.
Subprocess is another obvious candidate since subprocess.run is notoriously clunky, and while there are alternatives like sh, plumbum, and delegator, none of them have really "won" yet. Logging is the canonical example of a hostile stdlib API, but loguru has already filled that gap and is extremely popular. Now I'm looking at argparse and CLI tools as the next candidate.
CLI argument parsing is already well-covered by click, typer, and fire. For config files and settings, there are several options like pydantic-settings, dynaconf, and environs, but the space is crowded without a clear winner. File and path operations beyond pathlib is interesting — while pathlib handles basic operations, there's a real gap around atomic writes and high-level file operations like copying and moving, where people often get the os.replace and tempfile dance wrong.
For retries and backoff, tenacity dominates but is verbose, leaving room for something simpler. Caching has multiple solutions (functools.lru_cache, cachetools, diskcache) and is fairly crowded. Parallelism and concurrency for humans is still being evaluated.
Parallelism has a real gap — the boilerplate around ThreadPoolExecutor and ProcessPoolExecutor is tedious for the common case of mapping a function over a list in parallel, though joblib.Parallel and multiprocessing.Pool.map already address this. Temp files are handled adequately by the stdlib. Email sending, though, is genuinely painful — constructing multipart emails with attachments using smtplib and email.mime requires assembling multiple MIME objects, encoding, and setting headers manually, which feels like a classic opportunity for a "for humans" library.
There are some options like yagmail (popular but Gmail-focused), redmail, and envelopes, but they're either Gmail-centric or less widely adopted, so the pain point isn't decisively solved despite the stdlib being genuinely awful. For reading structured data files generically across formats like JSON, YAML, TOML, and CSV, there's anyconfig and srsly that attempt to address this.
Hashing and checksums used to require manual chunked reading loops, but Python 3.11 added hashlib.file_digest() so that gap has closed. HTTP is well-covered by requests and httpx, progress bars by tqdm, terminal output by rich, and validation by pydantic. Money and currency handling (dealing with Decimal, rounding, and exchange rates) is genuinely tricky and has libraries like py-moneyed and money, while units are handled by pint — these are somewhat niche but do exist.
For parsing human-friendly input like "1.5k" or "3 GB" or "2 hours", humanfriendly with its parse_size and parse_timespanfunctions handles it, and humanize does the reverse conversion. It's covered but humanfriendly is surprisingly underknown. Environment variable management via .env files is straightforward with python-dotenv, and for scheduling there's schedule(which literally markets itself as "Python job scheduling for humans") for simple cases and APScheduler for more complex scenarios.
For visualization, matplotlib, plotly, and seaborn all work well. State machines can be handled with transitions though it's pretty niche. Comparing nested structures is clunky with the standard difflib, but deepdiff fills that gap nicely. Clipboard access is simple with pyperclip, and for notifications across multiple platforms apprise is the clear winner since it can send to nearly all services. Pluralization and English inflection are covered by inflect and humanize, and I'm still working through the remaining categories.
For archives, the standard library has shutil.make_archive and unpack_archive which are solid, plus zipfile and tarfile for more granular control—though there's a small gap when you need to read from an archive without knowing its type upfront, which patool can help with.
Now I'm thinking about the real gaps in the ecosystem. Looking at what causes genuine pain and hasn't been decisively solved yet, email sending stands out as a major one—the standard library's MIME assembly is genuinely painful to work with, and while libraries like yagmail, redmail, and emails exist, none has become the obvious go-to the way requests is for HTTP.
The ideal API would be dead simple: just specify the recipient, subject, body, and any attachments, with SMTP configuration pulled from environment variables. The catch is that email-sending feels like a somewhat solved space, and SMTP itself is becoming less relevant as people migrate to SendGrid, SES, and Resend APIs. But that's actually an argument for a unified wrapper that handles both SMTP and the popular HTTP email services behind a single human-friendly interface—something genuinely missing and useful, though it risks creeping toward being another "apprise for email."
For atomic file writes, the real pain point is correctness: partial writes and crashes mid-operation leave corrupted files behind. The library would be tiny in scope, letting you write data atomically without worrying about half-written files. The objection is that it's niche and experts already know the os.replace pattern, but that's exactly the point—this is for people tired of retyping the same recipe.
Parallel execution is probably the single most common concurrency need: map a function over items, collect results, show progress, and handle errors gracefully. Right now that either means wrestling with concurrent.futures boilerplate or pulling in joblib as a heavy scientific dependency. A minimal library could offer threads by default with an option to switch to processes, returning ordered results with sensible error handling.
tqdm already has thread_map and process_map buried in tqdm.contrib.concurrent, which does almost exactly this, but it's obscure and feels bolted-on. There's real room for a clean, focused standalone alternative.
For subprocess, that's Kenneth Reitz's domain with delegator, so I'll skip it as not novel enough. Config loaders are crowded. The last angle is unifying size and duration parsing—humanize handles output formatting while humanfriendlyhandles input parsing, but they're split across two libraries with different design philosophies.
A single library that does both directions cleanly for sizes, durations, and numbers could win on taste and cohesion, though humanize is already pretty solid. Temp/scratch spaces feel weak. Reading any tabular file with a single call like load("data.csv") is a real niche for scripts—srsly and anyconfig exist but are obscure, though the scope gets fuzzy. Cross-process file locking for humans is another angle, but I'm running into the same pattern: the capability exists somewhere, but there's an opening for something cleaner and more delightful.
Pretty error context is niche. A tiny library answering human questions about the runtime—am I on macOS or Linux, how much RAM, am I in Docker or CI or a venv—would be cute but narrow. Date ranges and iteration are more interesting: pandas.date_range is heavy, dateutil.rrule is powerful but cryptic, so there's room for something that lets you iterate Mondays in March or days between two dates with a simple, human-friendly API."
2
8
1,441

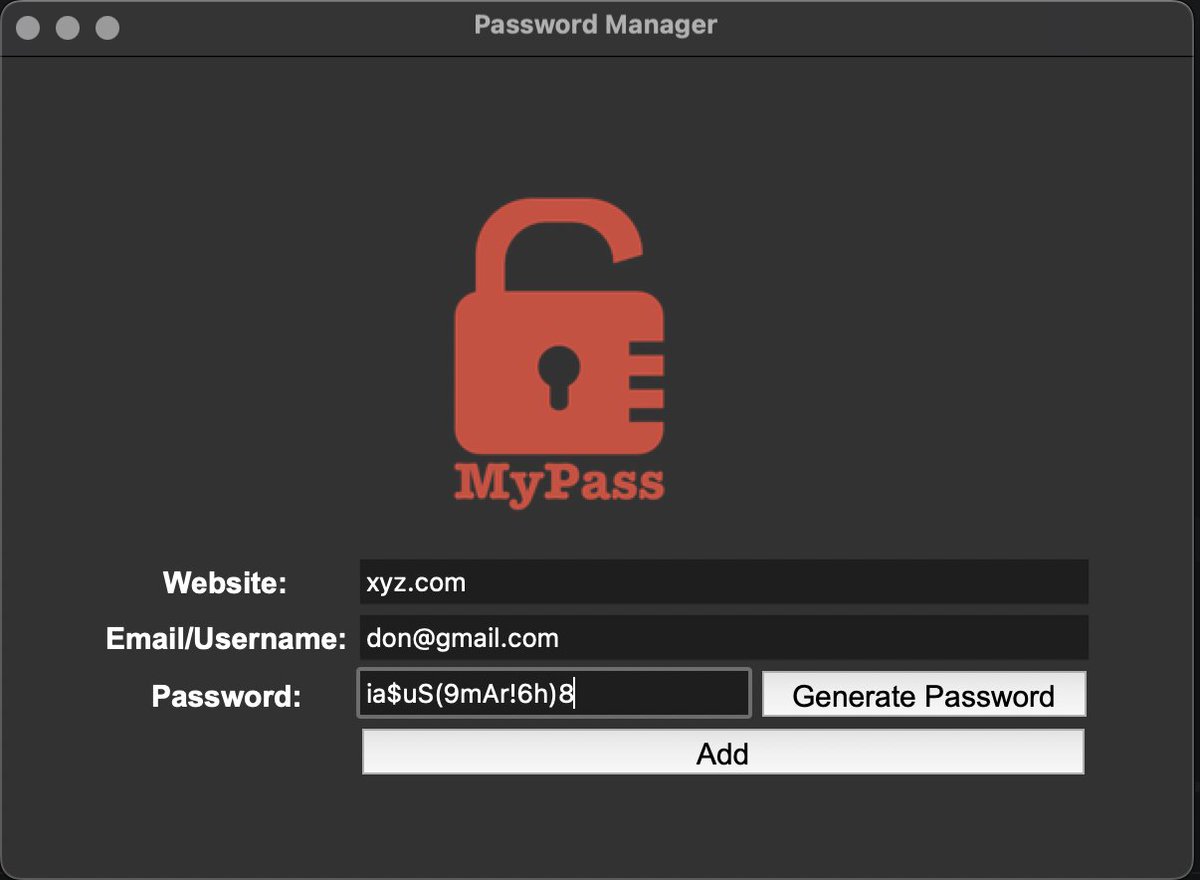
Day 29 /100
> 12k steps done
> Locked in for 3hrs (coded a Password Manager using tkinter, learned about the messagebox module, pyperclip module, .join() method and more)
> chest day
#100DaysOfCode #Python #CodeNewbie #Fitness #Gym
2
77


Apr 2
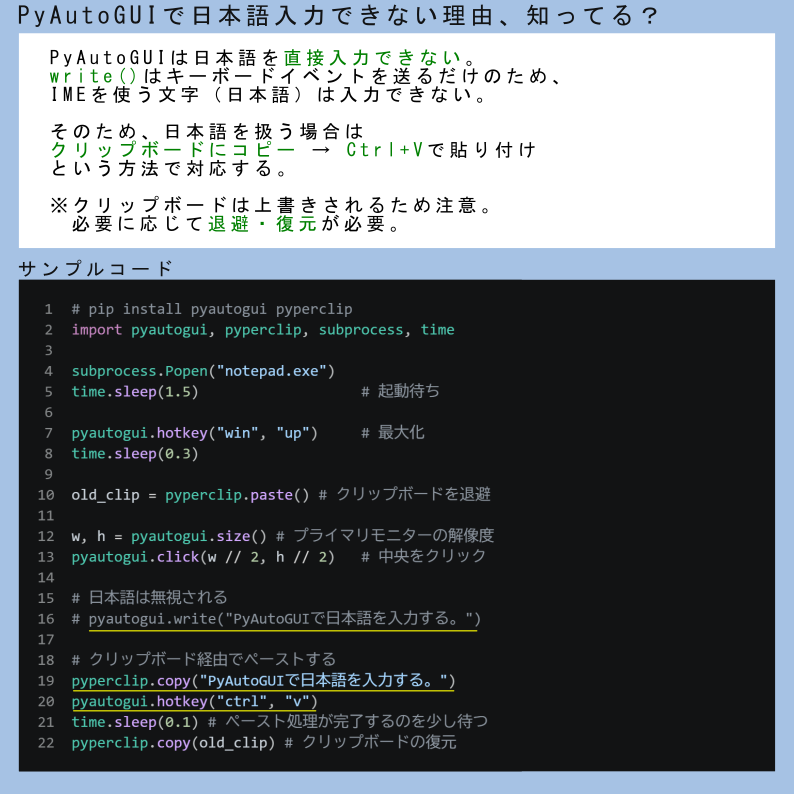
🦞甩给AI即刻生成版本!
作为资深 Python 极客,请帮我生成一个名为「ObsidVoice」的 Windows 本地极速语音输入法。
特性:纯离线、0延迟、CPU推理(不占显存)、按 F8 录音/松手粘贴。 请严格按以下 5 步输出完整代码与执行指南:
一. 环境依赖 仅需提供此安装命令: `pip install funasr_onnx modelscope soundfile pyaudio keyboard pyperclip pyqt6 pyyaml numpy torch torchaudio`
二. 下载脚本 (download.py) 写一个脚本:用 `AutoModel` 连网下载 `paraformer-zh`, `fsmn-vad`, `ct-punc` 到 `./models_cache`。提醒我运行后将下载的 `iic` 文件夹移至项目根目录的 `models` 中。
三. 配置文件 (config.yaml) 直接输出以下完整内容(用于实现纯离线 相对路径加载):
```yaml hotkey: "f8" mic_device_index: null sample_rate: 16000 asr_model: "./models/iic/speech_seaco_paraformer_large_asr_nat-zh-cn-16k-common-vocab8404-pytorch" vad_model: "./models/iic/speech_fsmn_vad_zh-cn-16k-common-pytorch" punc_model: "./models/iic/punc_ct-transformer_cn-en-common-vocab471067-large" device: "cpu" model_dir: "./models"
四. 主程序 (main.py)
输出完整代码,必须严格包含以下 7 个极客级优化:
1.CPU锁:开头注入 os.environ["OMP_NUM_THREADS"] = str(max(1, os.cpu_count() or 4))
2.防爆锁:音频采集最大限制 30 秒,超时强制 paComplete。
3.向量化:用 np.sqrt(np.mean(samples**2)) 计算音频 RMS。
4.模型加载:必须带 disable_update=True 避免冷启动连网卡顿。
5.推理接口:核心识别严禁使用 chunk_size,必须用 self.model.generate(input=audio_data, fs=16000)。
6.UI动画:PyQt6 无边框 32px 纯黑胶囊窗,5 根随 RMS 动态跳动的波形柱。
7.输出注入:保存原剪贴板 -> copy新文本 -> 延迟 0.02s -> 模拟 ctrl v -> 恢复原剪贴板。
五. 打包命令
输出此命令,并提醒用户打包后必须手动将 models 文件夹和 config.yaml 移入 dist 目录: pyinstaller --onedir --name "极客语音输入法" --collect-all="funasr" --collect-all="jieba" --collect-all="onnxruntime" --collect-all="torch" --hidden-import="torchaudio" main.py

Apr 2

做了一个Windows 版本的语音输入。
也给开源了,随便用。
链接:
github.com/lingge66/Lingge_V…
🔒 完全离线:
声纹数据与识别模型全部运行在本地,无需联网,彻底杜绝隐私泄露。
⚡ 极速响应:
集成 Paraformer-zh FSMN-VAD CT-Punc 管道,CPU 环境下端到端延迟稳定在 0.25∼0.35s。
🎛️ 全局热键:
默认 F8 键,按下开始录音,松开自动上屏,无缝融入现有工作流。
🖥️ 极简 HUD:
$32\text{px}$ 黑色磨砂悬浮窗,实时显示音量波形与识别状态,不遮挡主窗口。
🛠️ 深度优化:
PyTorch 线程独占绑定、向量化音频 RMS 计算、剪贴板时序压缩、防爆内存保护。
📦 开箱即用:
首次运行自动下载,支持 config.yaml 热配置与系统托盘控制。
1
6
4,349

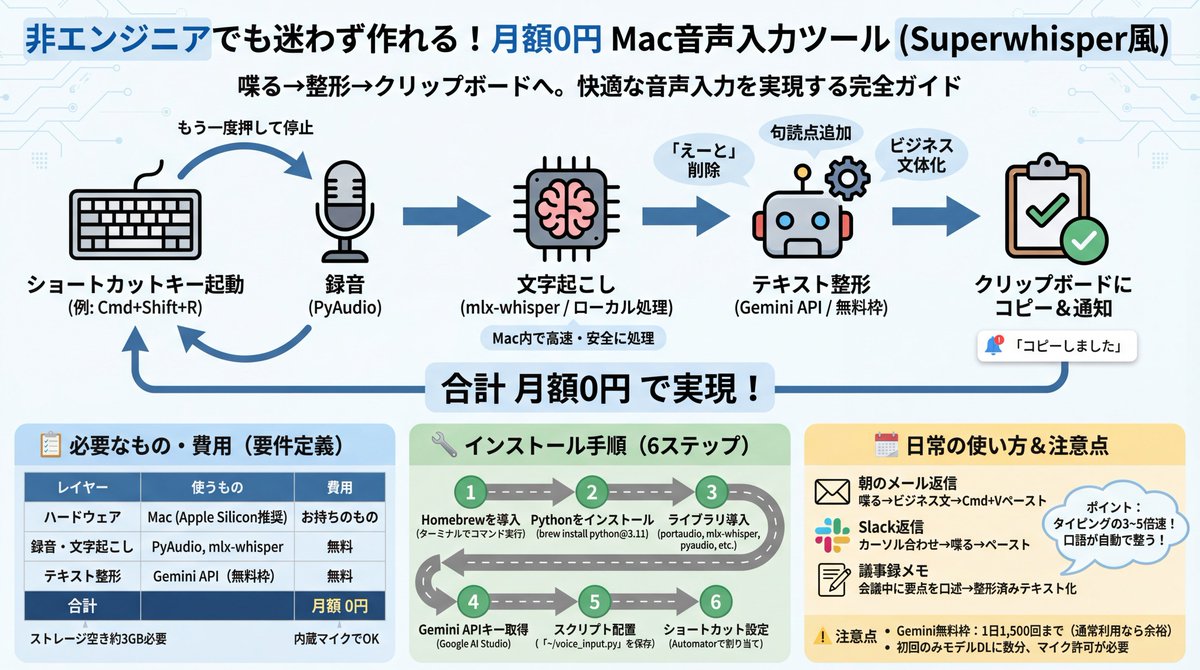
創るか?
---
勝さん、了解です。「非エンジニアでも迷わず作れる」レベルまで落とし込みますね。
まず要件を整理してから、完全なセットアップガイドを作ります。
🎯 プロジェクト概要
何を作るか: Mac用の音声入力ツール(ショートカットキーで起動→喋る→整形されたテキストがクリップボードに入る)
誰が使うか: 勝さんのようなMacユーザー(エンジニアでなくてOK)
ゴール: 月額課金ゼロで、Superwhisperのような快適な音声入力を実現
📋 要件定義
ハードウェア要件
∙Mac(Apple Silicon:M1/M2/M3/M4)推奨
∙Intel Macでも動くが速度が落ちる
∙内蔵マイクでOK(外付けだとなお良い)
∙ストレージ空き:約3GB(Whisperモデル分)
ソフトウェア構成
|レイヤー |使うもの |費用 |
|------|-----------------|--------|
|録音 |PyAudio |無料 |
|文字起こし |mlx-whisper(ローカル)|無料 |
|テキスト整形|Gemini API(無料枠) |無料 |
|UI/起動 |キーボードショートカット |無料 |
|**合計**| |**月額0円**|
機能要件
1.ショートカットキーで録音開始(例:Cmd Shift R)
2.もう一度押すと録音停止
3.自動で文字起こし(Whisperがローカルで処理)
4.Geminiが自動整形(「えーと」除去、句読点追加、文章化)
5.整形テキストをクリップボードにコピー
6.通知で「コピーしました」と表示
🔧 インストール手順(ゼロから)
STEP 1:Homebrewを入れる(Macのパッケージ管理)
ターミナルを開いて(Cmd スペース →「ターミナル」と入力)以下を貼り付け:
/bin/bash -c "$"
STEP 2:Pythonを入れる
brew install python@3.11
STEP 3:必要なライブラリを入れる
brew install portaudio
pip3 install mlx-whisper pyaudio google-generativeai pyperclip
STEP 4:Gemini APIキーを取得
1.Google AI Studio にアクセス
2.Googleアカウントでログイン
3.「Create API Key」をクリック
4.出てきた文字列をコピーして保存
STEP 5:スクリプトを配置
以下のPythonスクリプトを ~/voice_input.py として保存(これは私が作ります)
STEP 6:ショートカット設定
Macの「Automator」または「ショートカット」アプリで、キーボードショートカットにスクリプト実行を割り当て
🗓 日常の使い方イメージ
朝のメール返信
1.メールを開く
2.Cmd Shift R を押す
3.「山田さん、昨日の件ありがとうございます。見積もりの件ですが、来週月曜までに回答しますのでよろしくお願いします」と喋る
4.もう一度 Cmd Shift R を押す
5.2〜3秒後、整形されたビジネス文がクリップボードに入る
6.メール返信欄に Cmd V でペースト → 送信
Slack返信
1.Slackのメッセージ欄にカーソルを合わせる
2.Cmd Shift R → 喋る → Cmd Shift R
3.Cmd V で貼り付け
議事録メモ
1.ミーティング中に Cmd Shift R
2.要点を口頭でまとめる
3.停止 → 整形済みの議事録がクリップボードに
ポイント
∙タイピングの3〜5倍速で入力できる
∙「えーと」「あのー」は自動削除される
∙口語が自動的にビジネス文体に変換される
∙ネット不要の文字起こし+Gemini整形のハイブリッド
⚠️ 注意点・制限
∙Gemini無料枠は1日1,500リクエスト(普通の使い方なら余裕)
∙初回のWhisperモデルダウンロードに数分かかる
∙録音中はマイクへのアクセス許可が必要(初回のみ確認ダイアログが出る)
勝さん、この構成でよければ、実際に動くスクリプト一式を作ります。何か「こういう機能も欲しい」とか「ここがわからん」があれば、先に言ってもらえると組み込めますよ。
56
10,565


Jan 25
Not to be too dramatic, but pyperclip has greatly improved my quality of life.
pypi.org/project/pyperclip/
4
109

21 Dec 2025
■ プロンプト
以下の要件でPythonアプリを作って
【概要】
iOSショートカットからHTTPリクエストを受けて、PCのCursorエディタを操作するツール
【技術スタック】
- Flask(HTTPサーバー)
- pyautogui(キー操作)
- pyperclip(クリップボード)
- pystray(システムトレイ常駐)
- win32gui(ウィンドウ操作)
【エンドポイント】
- GET /health - 生存確認
- GET /windows - Cursorウィンドウ一覧(hwnd, title)
- POST /paste - テキスト送信(window_id, text, mode, ai, send_enter)
- POST /enter - ウィンドウ選択→Enter送信
- POST /focus - 任意ウィンドウを前面化
【操作ロジック】
1. モード切替: Ctrl Alt A(Agent), Ctrl Alt Q(Ask), Ctrl Alt I(Plan), Ctrl Alt T(Debug)
2. モード切替後は必ず Ctrl Alt ; を送る(チャット欄にフォーカスを戻す)
3. AI選択: Ctrl / でモデルピッカーを開き、モデル名を検索してEnter
4. テキスト入力: クリップボード経由でCtrl V
【重要な注意点】
- pyautogui.typewrite()は使わない(日本語キーボードで文字化けする)
- 必ずクリップボード経由でペーストする
- Ctrl Alt ; が状態依存を回避する要(モードキーはトグル動作で閉じることがある)
これをWindows用に実装して
↑これをCursorにコピペしてください
需要あればiOSショートカットも共有します
3
115

16 Nov 2025
𝗢𝗰𝘁𝗿𝗮'𝘀 𝗖𝗟𝗜 𝘀𝗲𝘁𝘂𝗽: 𝗚𝘂𝗶𝗱𝗲 𝗳𝗼𝗿 𝗠𝗼𝗯𝗶𝗹𝗲 𝗗𝗲𝘃𝗶𝗰𝗲
I made a simple, quick guide the last time showing how you can generate your octra wallet. If you're seeing this post but haven't done the needful on that yet, you can check the quoted post and follow the guide through to generate your wallet on mobile.
This guide will focus on how to setup the Command Line Interface (CLI), the direct route to interacting with @octra testnet. This may be a bit technical but if you carefully follow me, you won't miss your way.
Step by Step Guide:
→ Open the USERLAND app and get to the terminal just like I explained in my last guide
→ Copy the following commands just as it is without modifying and enter
sudo apt install python3 python3-pip python3-venv python3-dev -y
★ Again, allow to complete it's installation before entering the next command
sudo apt update
sudo apt install -y xclip xsel
★ Enter the next command after second installation
pip install pyperclip
→ After running these first 3 commands successfully, write "CLEAR" and enter.. for the terminal to refresh
→ If that sounds confusing, an alternative is to close the USERLAND app and exit session
→ Re-open the app, get to the terminal and run the remaining commands accordingly
git clone https://github(.)com/octra-labs/octra_pre_client.git
cd octra_pre_client
★ Remove the brackets between the dot before you paste this command
→ Enter this next command copying from "python to wallet.json"
python3 -m venv venv
source venv/bin/activate
pip install -r requirements.txt
cp wallet.json.example wallet.json
→ Now enter the next command
nano wallet.json
★ Here, a new interface will pop-up and you will need to carefully enter your wallet information
Example of what you'll see:
{
"priv": "BASE64_PRIVATE_KEY",
"addr": "octxxxxxxxxxxxxxxxxxxxxxxx",
"rpc": "octra.network"
}
→ On the "priv" section, you need to carefully erase the details in-between the quotes and replace with your B64 private keys
→ On the "addr" section, erase the details in-between the quotes and replace with your octra wallet address
★ You must do these carefully
→ Once done, exit the interface by clicking the in-built button "Ctrl" on the terminal and press X on your keyboard, a question will be asked.. then press Y on your keyboard
→ Enter the next command
python3 -m venv venv
source venv/bin/activate
python3 cli.py
★ This will open up a new interface that has a blue background theme
→ Now you can view your wallet address and your Oct token balance.. and you can send tx to any octra address
→ On the left hand side of the interface, you will see a menu containing numbers 1-9 and 0 commands labeled with different function
→ Enter command 1 to send oct tokens to my address
oct2x7r59HkyQqnfsP9a1XoUT3PXX5zsD1YUsTfSHi5NoUx
→ You can also test out the other functions on the menu by using their commands
Now, you have just completed your first task on the Octra testnet. Continue to make more transactions and join Octra's discord server to interact with fellow Octra chads and share your address to also receive tokens from others.
With these guides, you have both generated your octra wallet and also setup the octra CLI. To re-visit the CLI, you don't need to re-do everything you have just done.. just enter these 4 commands below and run them one after another.
1. cd octra_pre_client
2. git pull
3. python3 -m venv venv
source venv/bin/activate
pip install -r requirements.txt
4. python3 cli.py
Now, operating the Octra testnet has gotten a lot easier on mobile device with this guide. If you get stuck anywhere or have any questions, you can send me a dm and I'll help you out.
If this guide helped you; please give me a follow.. and like, comment, & repost this post for others that may need it.
Thanks for reading up to this point, I'll see you on the next one.
Octra Coded


14 Nov 2025

𝗢𝗰𝘁𝗿𝗮 𝗧𝗲𝘀𝘁𝗻𝗲𝘁 𝗚𝘂𝗶𝗱𝗲: 𝗠𝗼𝗯𝗶𝗹𝗲 𝗨𝘀𝗲𝗿𝘀 𝗛𝗮𝗰𝗸
@octra officially launched it's testnet in June, 2025 and while some octra chads have been able to find their way around it; others haven't.
On this guide, I will show how you can generate your Octra Wallet. This guide is for the mobile phone users, android precisely.
If you don't have a PC like me but you have an android device, then I'm happy to tell you that you can also run the Octra testnet.
First of all, let's generate our Octra Wallet.
Step by Step Guide:
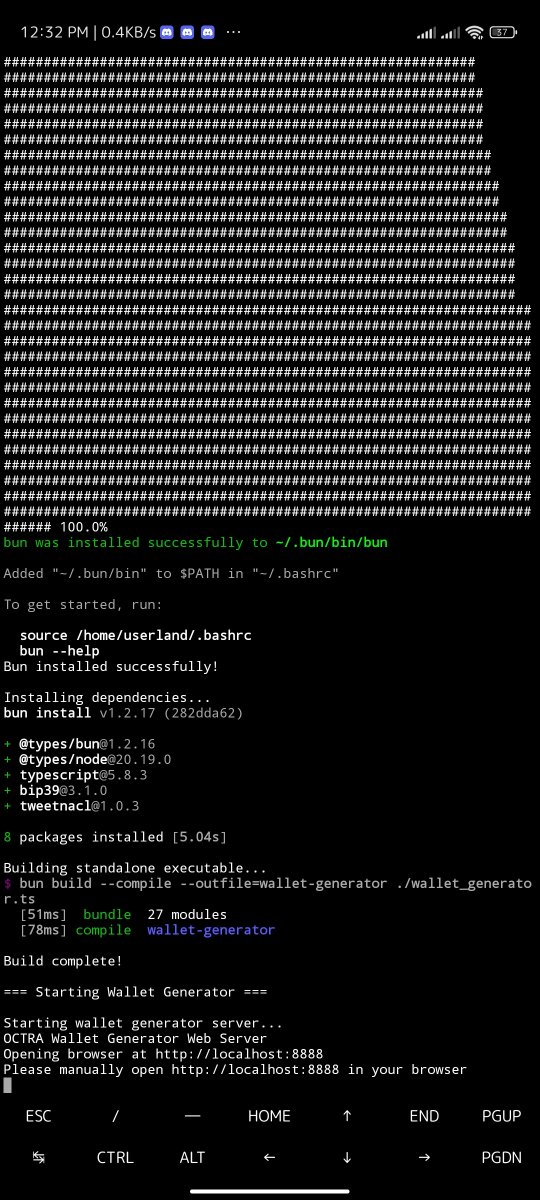
→ Install USERLAND app from your Google play
→ Open app, select UBUNTU.. and choose "minimal" as your desktop environment
→ Select "terminal" as connection type.. click NO on the next message pop-up and allow the needed resources to download for a few minutes
→ Once terminal is opened (you'll see a black interface), run these commands below accordingly
★ Copy everything exactly as it is and paste on the terminal, then click enter on your keyboard for it to run
sudo apt update && sudo apt upgrade -y
sudo apt install screen curl iptables build-essential git wget lz4 jq make gcc nano automake autoconf tmux htop nvme-cli libgbm1 pkg-config libssl-dev libleveldb-dev tar clang bsdmainutils ncdu unzip libleveldb-dev -y
★ You'll have to hold on for a couple of minutes for all resources to finish Installing.
→ After it's done, enter the next command below
★ Remove the bracket between the dot in githubdotcom before you paste this command
git clone https://github(.)com/0xmoei/wallet-gen.git
cd wallet-gen
→ After running it, enter next command below
chmod x ./start.sh
./start.sh
→ When you reach this step, you should have successfully installed every needed resources and it should generate the website for your wallet generation automatically
★ You have to copy and paste it on your browser
here's is what it looks like: http://localhost:8888
→ On the website, click on GENERATE NEW WALLET and you will have an octra wallet generated for you within a few seconds, together with your wallet seedphrase, and your public & private keys
★ It's important that; you copy your wallet address, your public and private keys (RAW & B64), your mnemonics, and store in a safe place
★ Do not loose it and do not share it with anybody
→ Finally, head over to faucet.octra.network and request for some test tokens.
This is a simple, short and quick guide on how to generate your Octra Wallet using your mobile device.
On my next guide, I will show how to set up your Command Line Interface (CLI), the lightweight interface for developers and early users to interact with the Octra testnet directly.
Stay Tuned Octra chads and remain Octra Coded
1
2
11
451

19 Jul 2025
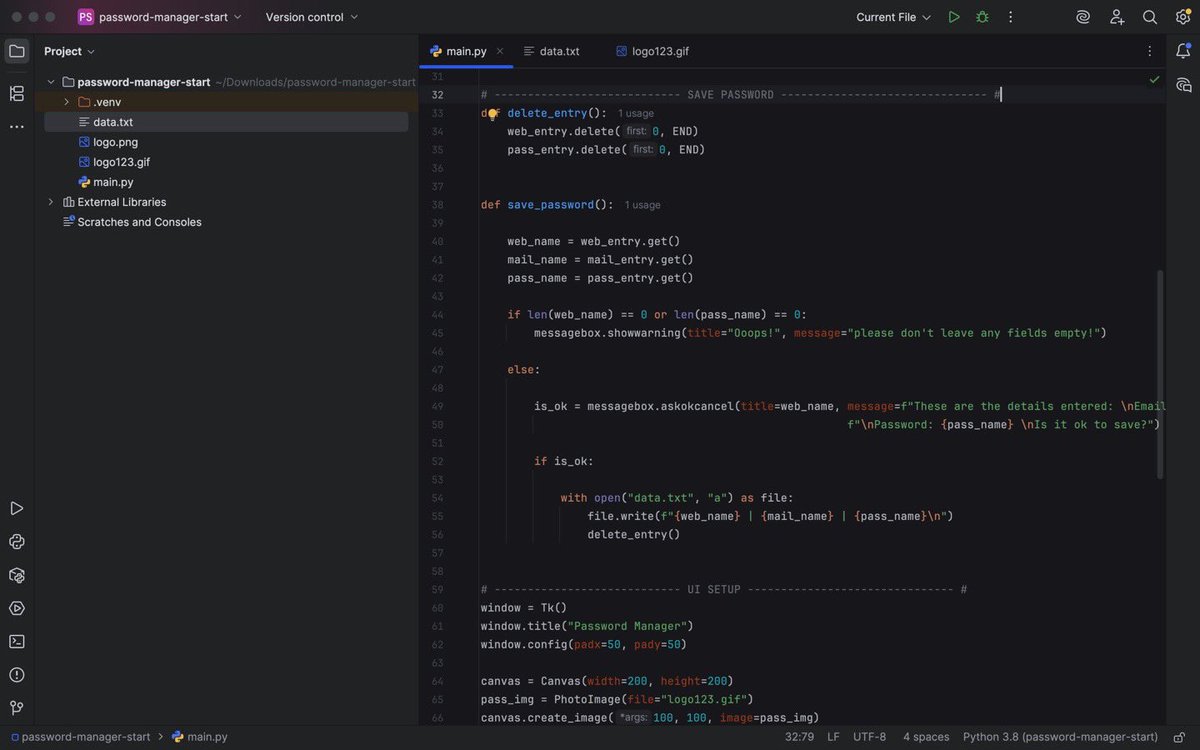
Day 29/100 of my Python Journey
Worked on a GUI password application manager
Worked with dialog boxes and pop-ups to give the user some sort of feedback
Learnt about the Join method and used pyperclip to copy the password generated to clipboard.
#100DaysofCode #Python
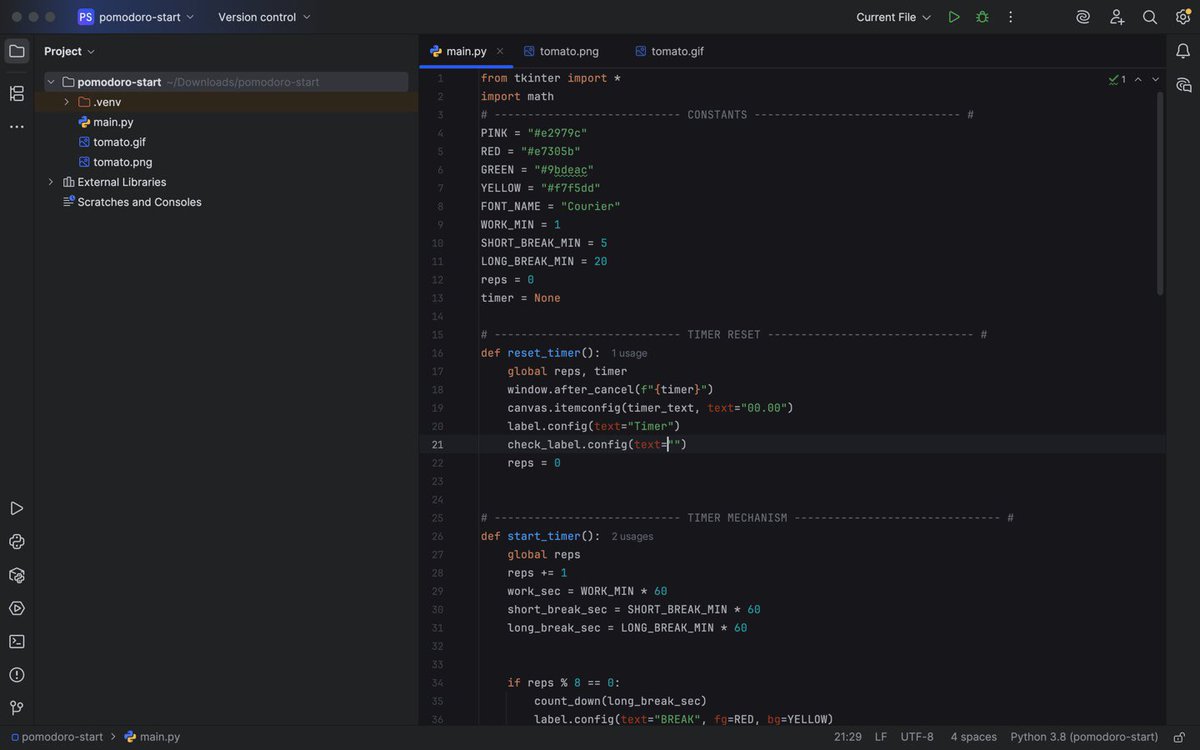
18 Jul 2025

Day 28/100 of my Python Journey
Learnt about Python dynamic typing
Worked on a Pomodoro GUI application
#100DaysofCode #Python
3
218

30 Jun 2025
OCTRA WALLET TASK 1 for mobile
If you used the guide i dropped then it's straightforward from here, just copy the commands 1 by 1 as usual. DO NOT MODIFY, just copy as is
1. sudo apt install python3 python3-pip python3-venv python3-dev -y
2. sudo apt update
sudo apt install -y xclip xsel
3. pip install pyperclip
CLOSE USERLAND APP(scroll down your notifications, click on exit sessions)
OPEN the app and continue
4. remove the bracket after "github" before pasting this:
git clone https://github(.)com/octra-labs/octra_pre_client.git
cd octra_pre_client
python3 -m venv venv
source venv/bin/activate
pip install -r requirements.txt
cp wallet.json.example wallet.json
5. Yes copy command number 4 exactly as it is, including the spaces.(The copying stops at 'wallet.json') Move to next command 👇
6. nano wallet.json
👆this will open a screen, carefully replace this sentences in quotes with your values (video below as guide to text)
i.e. "private-key-here": replace with your privatekey in B64 format in between the quotes
"octxxxxxxxx...": Octra address starting with oct...
to exit screen after editing, press ctrl X and a question will be asked, press Y (you'll find ctrl in-built in the Interface on top of your keyboard)
7. python3 -m venv venv
source venv/bin/activate
python3 cli.py
👆this will open a blue interface like the picture below
8. use the number command on the left hand side and send transactions to my address: oct7j8RfFPB8VaGaW1sHyDVJH8AC3anrkpLZMKxMQcUujGf (2nd Video is guide, you'll have to manage because of screen size)
9. Finally, share feedback on @octra discord.
10. Special Thank you to @0xMoei for the guide 🤝🤝
11. Kindly follow me, i'll be updating as more tasks drop
30 Jun 2025

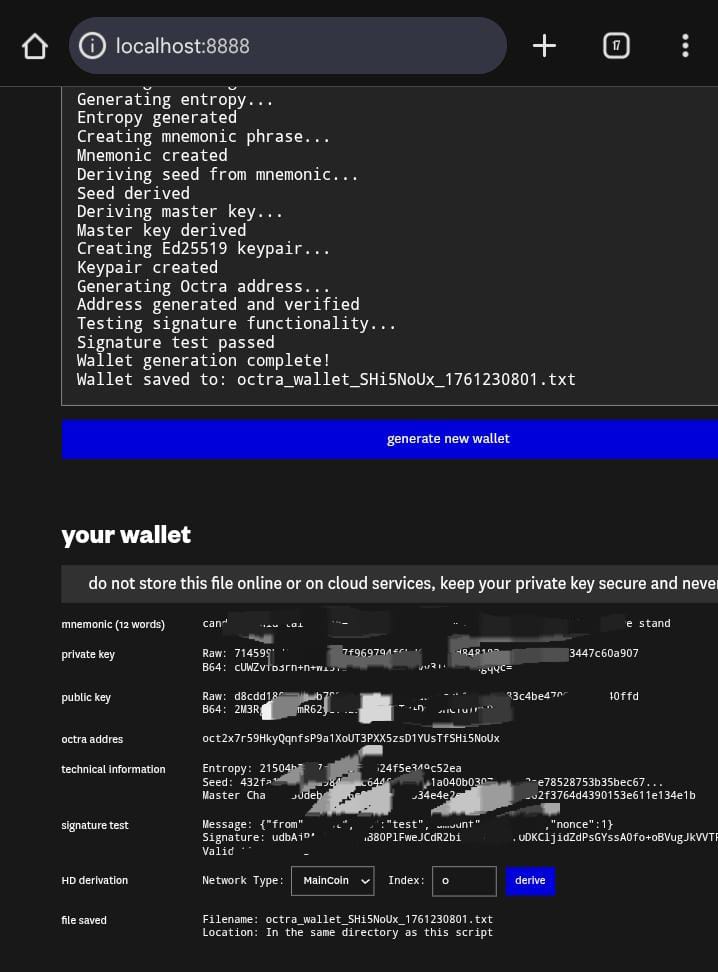
STEP BY STEP GUIDE TO GENERATE OCTRA WALLET ON MOBILE
1. Download 'USERLAND' from playstore
2. Select Ubuntu and choose minimal as desktop environment, select terminal as connection type, needed resources will be downloaded
3. run this commands in the following order
4. sudo apt update && sudo apt upgrade -y
sudo apt install screen curl iptables build-essential git wget lz4 jq make gcc nano automake autoconf tmux htop nvme-cli libgbm1 pkg-config libssl-dev libleveldb-dev tar clang bsdmainutils ncdu unzip libleveldb-dev -y
5. REMOVE the brackets after 'github' before pasting this command 👇
git clone https://github(.)com/0xmoei/wallet-gen.git
cd wallet-gen
6. chmod x ./start.sh
./start.sh
7. Manually enter http://localhost:8888 into your browser
8. Click "GENERATE NEW WALLET" and watch the real-time progress
Save ALL the details of your Wallet including private and public key in all formats
9. finally, go to: faucet.octra.network/ claim tokens, done
24
8
28
2,217

28 Jun 2025
#100DaysOfCode
Day 29
Built a Password Manager App using Python & Tkinter!
- Random password generator
- Clipboard copy with pyperclip
- Data saving to file
- Dialog boxes with validation
#Python #GUI
27 Jun 2025

#100DaysOfCode
Day 28
Project: Built a functional Pomodoro Timer using Tkinter in Python!
- Countdown mechanism
- Start/Reset buttons
- Dynamic checkmark tracker
- Learned about canvas, after(), and timer logic
#Python #Tkinter
2
3
249

27 May 2025
The malicious payloads are downloaded from 196.251.81[.]229 (2.txt, clippa.txt, and svchost.bat). clippa.txt is a clipper that uses the Pyperclip library to replace clipboard content with attacker-controlled addresses from its config.

1
4
12
1,170

手動で泥臭い方法ですが、汎用性があるので、ログの一部を使い回したいときなどはたまに使います。
(以前書いた記事ですが、pyperclipのAPI変更で使えなくなっていたので修正しました)
AI ログの取得補助
qiita.com/7shi/items/7f9c8ea…
5
7,537
pyperclipで`waitForPaste`が削除されたことに気付いた。コアライブラリが持つ機能ではないという理由らしい。
必要に応じて自前でポーリングするようにとのこと。
github.com/asweigart/pypercl…
1
2
1,056

21 Feb 2025
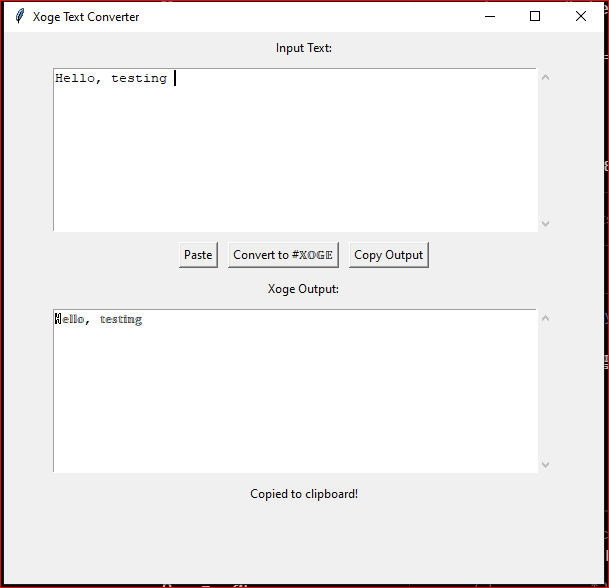
ℍ𝕖𝕝𝕝𝕠, 𝕥𝕖𝕤𝕥𝕚𝕟𝕘
make sure to get your pip installs done.
powershell/
pip install pyperclip
- full code.
file name: Xogetext.py
import tkinter as tk
from tkinter import scrolledtext
import pyperclip
# Mapping of regular characters to double-struck Unicode equivalents
xoge_map = {
'A': '𝔸', 'B': '𝔹', 'C': 'ℂ', 'D': '𝔻', 'E': '𝔼', 'F': '𝔽', 'G': '𝔾', 'H': 'ℍ',
'I': '𝕀', 'J': '𝕁', 'K': '𝕂', 'L': '𝕃', 'M': '𝕄', 'N': 'ℕ', 'O': '𝕆', 'P': 'ℙ',
'Q': 'ℚ', 'R': 'ℝ', 'S': '𝕊', 'T': '𝕋', 'U': '𝕌', 'V': '𝕍', 'W': '𝕎', 'X': '𝕏',
'Y': '𝕐', 'Z': 'ℤ',
'a': '𝕒', 'b': '𝕓', 'c': '𝕔', 'd': '𝕕', 'e': '𝕖', 'f': '𝕗', 'g': '𝕘', 'h': '𝕙',
'i': '𝕚', 'j': '𝕛', 'k': '𝕜', 'l': '𝕝', 'm': '𝕞', 'n': '𝕟', 'o': '𝕠', 'p': '𝕡',
'q': '𝕢', 'r': '𝕣', 's': '𝕤', 't': '𝕥', 'u': '𝕦', 'v': '𝕧', 'w': '𝕨', 'x': '𝕩',
'y': '𝕪', 'z': '𝕫',
'0': '𝟘', '1': '𝟙', '2': '𝟚', '3': '𝟛', '4': '𝟜', '5': '𝟝', '6': '𝟞', '7': '𝟟',
'8': '𝟠', '9': '𝟡'
}
def convert_to_xoge():
try:
input_text = input_box.get("1.0", tk.END).strip()
output_text = ""
for char in input_text:
# Convert if in mapping, otherwise keep original (for special symbols)
output_text = xoge_map.get(char, char)
output_box.delete("1.0", tk.END) # Clear output box
output_box.insert("1.0", output_text) # Insert converted text
except Exception as e:
output_box.delete("1.0", tk.END)
output_box.insert("1.0", f"Error: {str(e)}")
def paste_from_clipboard():
try:
clipboard_text = pyperclip.paste()
input_box.delete("1.0", tk.END) # Clear input box
input_box.insert("1.0", clipboard_text) # Paste clipboard content
except Exception as e:
input_box.delete("1.0", tk.END)
input_box.insert("1.0", f"Error pasting: {str(e)}")
def copy_to_clipboard():
try:
output_text = output_box.get("1.0", tk.END).strip()
pyperclip.copy(output_text)
status_label.config(text="Copied to clipboard!")
except Exception as e:
status_label.config(text=f"Error copying: {str(e)}")
# Set up the GUI window
root = tk.Tk()
root.title("Xoge Text Converter")
root.geometry("600x600")
root.resizable(True, True)
# Input box label and widget
input_label = tk.Label(root, text="Input Text:")
input_label.pack(pady=5)
input_box = scrolledtext.ScrolledText(root, width=60, height=10, wrap=tk.WORD)
input_box.pack(pady=5)
# Buttons frame
button_frame = tk.Frame(root)
button_frame.pack(pady=5)
paste_button = tk.Button(button_frame, text="Paste", command=paste_from_clipboard)
paste_button.pack(side=tk.LEFT, padx=5)
convert_button = tk.Button(button_frame, text="Convert to #𝕏𝕆𝔾𝔼", command=convert_to_xoge)
convert_button.pack(side=tk.LEFT, padx=5)
copy_button = tk.Button(button_frame, text="Copy Output", command=copy_to_clipboard)
copy_button.pack(side=tk.LEFT, padx=5)
# Output box label and widget
output_label = tk.Label(root, text="Xoge Output:")
output_label.pack(pady=5)
output_box = scrolledtext.ScrolledText(root, width=60, height=10, wrap=tk.WORD)
output_box.pack(pady=5)
# Status label for feedback
status_label = tk.Label(root, text="")
status_label.pack(pady=5)
# Start the GUI loop
root.mainloop()
1
1
2
154
21 Feb 2025
And just like that with 10 seconds, grok and I made a py for #Xoge text conversions. GG -
import tkinter as tk
from tkinter import scrolledtext
import pyperclip
# Mapping of regular characters to double-struck Unicode equivalents
xoge_map = {
'A': '𝔸', 'B': '𝔹', 'C': 'ℂ', 'D': '𝔻', 'E': '𝔼', 'F': '𝔽', 'G': '𝔾', 'H': 'ℍ',
'I': '𝕀', 'J': '𝕁', 'K': '𝕂', 'L': '𝕃', 'M': '𝕄', 'N': 'ℕ', 'O': '𝕆', 'P': 'ℙ',
'Q': 'ℚ', 'R': 'ℝ', 'S': '𝕊', 'T': '𝕋', 'U': '𝕌', 'V': '𝕍', 'W': '𝕎', 'X': '𝕏',
'Y': '𝕐', 'Z': 'ℤ',
'a': '𝕒', 'b': '𝕓', 'c': '𝕔', 'd': '𝕕', 'e': '𝕖', 'f': '𝕗', 'g': '𝕘', 'h': '𝕙',
'i': '𝕚', 'j': '𝕛', 'k': '𝕜', 'l': '𝕝', 'm': '𝕞', 'n': '𝕟', 'o': '𝕠', 'p': '𝕡',
'q': '𝕢', 'r': '𝕣', 's': '𝕤', 't': '𝕥', 'u': '𝕦', 'v': '𝕧', 'w': '𝕨', 'x': '𝕩',
'y': '𝕪', 'z': '𝕫',
'0': '𝟘', '1': '𝟙', '2': '𝟚', '3': '𝟛', '4': '𝟜', '5': '𝟝', '6': '𝟞', '7': '𝟟',
'8': '𝟠', '9': '𝟡'
}
def convert_to_xoge():
input_text = input_box.get("1.0", tk.END).strip()
output_text = ""
for char in input_text:
# Convert if in mapping, otherwise keep original (for special symbols)
output_text = xoge_map.get(char, char)
output_box.delete("1.0", tk.END) # Clear output box
output_box.insert("1.0", output_text) # Insert converted text
def paste_from_clipboard():
clipboard_text = pyperclip.paste()
input_box.delete("1.0", tk.END) # Clear input box
input_box.insert("1.0", clipboard_text) # Paste clipboard content
# Set up the GUI window
root = tk.Tk()
root.title("Xoge Text Converter")
root.geometry("600x400")
# Input box label and widget
input_label = tk.Label(root, text="Input Text:")
input_label.pack(pady=5)
input_box = scrolledtext.ScrolledText(root, width=60, height=10, wrap=tk.WORD)
input_box.pack(pady=5)
# Buttons
button_frame = tk.Frame(root)
button_frame.pack(pady=5)
paste_button = tk.Button(button_frame, text="Paste", command=paste_from_clipboard)
paste_button.pack(side=tk.LEFT, padx=5)
convert_button = tk.Button(button_frame, text="Convert to #𝕏𝕆𝔾𝔼", command=convert_to_xoge)
convert_button.pack(side=tk.LEFT, padx=5)
# Output box label and widget
output_label = tk.Label(root, text="Xoge Output:")
output_label.pack(pady=5)
output_box = scrolledtext.ScrolledText(root, width=60, height=10, wrap=tk.WORD)
output_box.pack(pady=5)
# Start the GUI loop
root.mainloop()
6
5
11
641

10 Feb 2025
次はクリップボード履歴監視ツール
Pythonでのクリップボード操作といえばいつもお世話になってるpyperclipライブラリー
これってWindows/macOS/Linuxどれでも使えるって書いてあるけど、クリップボードの仕様も同じなんだろうか。。
2
2
67

29 Nov 2024
More into regex
Findall - lists, tuples,
^, $, ., .*, .*?
DOTALL, IGNORECASE,VERBOSE methods of re module
.sub() - to replace; Dividing text into groups & extracting 1st letter of a word
To end it, wrote a sample program to extract phone numbers & email ids from a large sample of text, & used some concepts of regex learnt so far
It was fun to improvise the code as well to debug a little bit. I was writing code in google colab, which cannot use pyperclip module as it runs in virtual environment. So, created a sample text myself with some scenarios included.
Udemy course - Automate the boring stuff with Python
8/n
#LearnAI_MLForJob
1
3
360