
Think smarter, not harder. Meet your brain's new best friend 📒
Joined October 2024
- Tweets 1,647
- Following 16
- Followers 254,181
- Likes 5,602
Photos and videos
Pinned Tweet

Jun 8
Introducing a more powerful NotebookLM 🚀
Massive upgrades deliver agentic capabilities in chat, more advanced reasoning, and a suite of new output formats. Tackling complex, multi-step research problems has never been easier.
Rolling out now to Google AI Ultra subscribers.
215
537
4,360
856,249
Jun 9
Notebooks in @GeminiApp are now 100% rolled out in Europe!
We're so excited to hear what you think! Thank you for your patience 🙏
Apr 8

Last year, we integrated into the @GeminiApp by allowing you to upload your notebooks as sources. Now, we’re taking our relationship to the next level 🏠 ♥️
Starting today, you can now:
— Access all of your personal, unshared notebooks directly inside the Gemini App
— Use your chats with Gemini as sources in new or existing unshared notebooks
We're rolling out notebooks in Gemini today, starting with Google AI Ultra, Pro, and Plus subscribers on the web. In the coming weeks, we'll expand access to mobile, more countries across Europe, and to free users.
41
55
694
58,571
Jun 8
Want a closer look at today’s launch? Here is a breakdown of what’s new and exciting 🧵:
First up: An upgraded, more thoughtful chat experience.
Powered by Gemini 3.5 and @Antigravity, you will now have better visibility into the AI's thinking process. Plus, each notebook has a secure cloud computer including 100 curated software skills, unlocking deeper research and more complex analysis.
53
236
1,933
205,455
Jun 8
Next: You can now ask NotebookLM to assemble context from your sources into ready-to-download, customizable formats. New outputs include:
📊 Data visualizations & charts
📁 PDFs, docx, & markdown files
🖼️ Images with Nano Banana
📑 Excel, PPTX, & Structured data (csv, json)
6
34
388
29,371
Jun 8
Finally: An agentic research companion
You can now start a notebook by just entering your loose ideas and questions into the chat. NotebookLM will then guide you through building out your repository, even finding and adding (with your permission!) relevant sources from the web.
As always your feedback is everything to us. Try it out and let us know what you think 💖
9
32
358
22,187
Jun 8
Forget about our users? Who? Us??? Please.
These updates are rolling out globally on the web starting with Google AI Ultra and all Workspace business customers with AI Ultra Access and AI Expanded Access, however we *absolutely* plan to expand to others over time!
Jun 8
Introducing a more powerful NotebookLM 🚀
Massive upgrades deliver agentic capabilities in chat, more advanced reasoning, and a suite of new output formats. Tackling complex, multi-step research problems has never been easier.
Rolling out now to Google AI Ultra subscribers.
35
73
923
72,755
Jun 5
Ok, it’s probably about time we changed the game.
Stay tuned 👀
194
208
3,773
421,788
Jun 4
Today we’re launching another highly requested feature: Source Attribution! 🥳
No more guessing. Now you can see the exact formula (prompts sources) used to make each of your artifacts. Want to make an adjustment? Just tap "Iterate" and customize to your heart’s content 💖
51
156
1,345
77,678
Jun 4
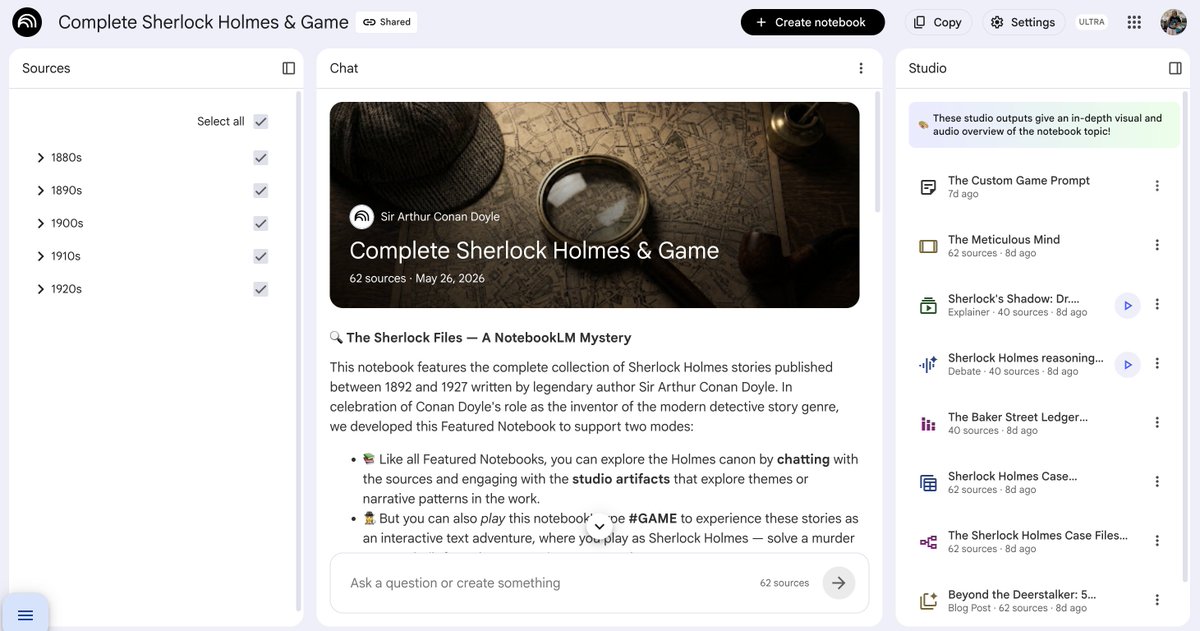
PRO TIP: Gamify your notebooks
Don't just read your notes— investigate them. Our new Sherlock Holmes notebook turns studying into an interactive mystery game. Deduce facts, uncover clues, & prove that even the most complex matters can be elementary.
➡️ goo.gle/Sherlock
38
111
965
78,496
Jun 2
Notice anything different about the NotebookLM mobile app recently? 😉
Well, we’re excited to REPORT that you can now create briefing docs, study guides, and blog posts on-the-go! 📱✨
Are there any other report formats you'd want specifically for mobile? Let us know!

86
59
714
43,090
May 28
ICYMI, check out our public notebook summarizing all of the top announcements from Google I/O 2026.
Access it here: goo.gle/4dR9MiQ
21
76
520
41,690
NotebookLM retweeted

May 20
I met a lot of really cool people at Google I/O, but the most exciting was @LizzieTao the genius behind the @notebooklm X account 🥰🤯

23
10
348
38,121
May 20
We're back in action! Back to your regularly programmed studying, learning, and research.
(Thank you SO much for your patience and understanding 🙏)
May 20
We're currently experiencing some system issues 🛠️
If you are on a paid plan, you might notice temporary restrictions on your usage and limits. We're working to get this resolved and bring your quotas back to normal ASAP!
Thank you so much for your patience and understanding 🙏
36
33
515
73,827
May 20
We're currently experiencing some system issues 🛠️
If you are on a paid plan, you might notice temporary restrictions on your usage and limits. We're working to get this resolved and bring your quotas back to normal ASAP!
Thank you so much for your patience and understanding 🙏
84
100
835
157,913
May 19
Happy anniversary to our beloved Tailwind 🎂
1.5 billion notebooks, audio overviews, and slide decks later… we are so grateful for the love and support from this incredible, one-of-a-kind community.
We can’t wait to show you what’s next! 👀
61
36
724
75,506
May 6
Friend of the pod @stevenbjohnson explains the magic behind our new source organization feature
Apr 24

Major new feature for @NotebookLM power users: in the tradition of Mind Maps, Notebook can now auto-label your sources, making it much easier to manage notebooks with many sources.
I’ve been using it for weeks and it is amazingly versatile with big notebooks. Details below.
Here’s how it works. If you have more than 5 sources in a Notebook, you’ll see a new “auto-label” button above the source list on the left side. Click on that and Notebook will review the content of all your sources and organize them into high-level categories. Each source can have multiple labels if there is overlap in the subject matter.
Once the labels have been applied, you’ll see a new tidy view of your sources where you see only the top level categories, but you can easily expand to see all the sources associated with each label. Click the three dot menu next to each to rename or delete the label. (Sources won’t be deleted.) Or add emojis to visually differentiate between labels. You can click the three dot menu next to each source to assign different labels to the source.
Having that organized label view in the source panel makes it much easier to find a specific source you’re looking for, but that’s just the beginning.
You can also focus the AI on specific categories using the selection buttons on the right hand of the source panel. Select one category and all the responses in chat will be grounded exclusively in the sources assigned to that label. This can be helpful if you’re worried about the AI getting distracted by information in other categories, and it can speed up your chat response times because there are fewer sources to load into the context.
Selecting by label is also super helpful for generating studio artifacts. If you want a podcast focused only the sources about the civil war in your American History notebook, just select that label and click the audio overview button in Studio.
Label view also greatly enhances Fast and Deep Research in a notebook with many existing sources. In the past, if one of the research agents added a batch of sources (up to 40 or 50 with Deep Research) all the sources would be scattered through your source panel alphabetically with no way to tell which ones were the new additions. But now, if all your pre-existing sources are neatly filed away in the appropriate labels, when you pull down new research sources they all appear in alphabetical list below the label categories. That makes it easy to review those new sources to see which ones you really want to keep, and you can manually select them (and de-select all the labels) to explore the new information you’ve just added to your notebook. Let’s say you want to add new information specifically about the Battle Of Gettysburg to your American History notebook—run a Fast Research query, import ten new sources, select those new unlabelled sources and hit the Slide Deck button to do a focused review of the history of Gettysburg.
Once you’ve explored those new sources, you can always hit the original auto-label button in the top left and choose “Reorganize unlabeled sources.” Notebook will automatically assign the appropriate labels to the new arrivals.
If you want to switch back to the full alphabetical list of sources, just choose “Return to list view” to return to the traditional source panel layout. Notebook will remember your labels so it's easy to switch back and forth between the two views.
The feature should be rolling out to all users over the next few days. Enjoy!
25
42
376
77,641
May 5
Source organization has officially ramped to 💯% of users!
Apr 24
Mo sources mo problems? Not anymore:
Rolling out now, NotebookLM can auto-label & categorize sources (when you have 5 ), so you can spend less time scrolling and more time thinking/learning/philosophizing, etc.
Rename, reorganize, & personalize (emojis!) to your ❤️'s content.
44
109
1,239
103,992