
Joined December 2020
- Tweets 20,769
- Following 431
- Followers 16,010
- Likes 11,282
5,801 Photos and videos


Pinned Tweet

Our Last Month (May) Trading Recap.
Total Signals: 24
T/P Reached: 20
S/L Reached: 04
Closed: 00
Running: 00
Invalid: 00
Success Rate: 83.33%
Total PnL: 1790%
Join our premium and start growing your portfolio with Alpha Crypto Signal. Let this June journey begin with us. Simply send a message and be a member of Alpha Crypto Signal premium.
Feel free to search in our channel and verify the signals yourself.
Join us our family: t.me/AlphaCryptoSignal
1
2
401
#INJ Update:
Getting 2 trendlines on $INJ.
Which one would you prefer to trade and share your thoughts with us, why? We will review the responses and pick the best ones to share with everyone.
Let's learn together using the real market instead of hindsight.
Drop your thoughts in the comment.👇
1
1
3
431
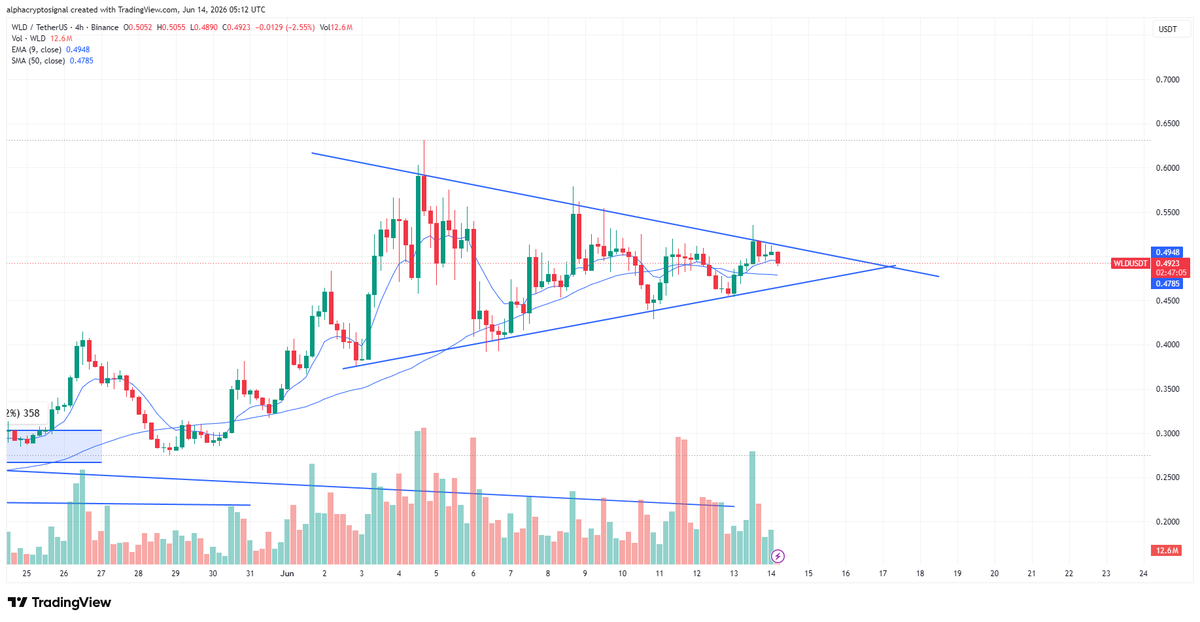
#WLD LTF Analysis:
$WLD is consolidating inside a symmetrical triangle, with higher lows pressing against a series of lower highs. The structure reflects a tightening range as buyers and sellers battle for control, while $WLD continues to hold above the 50 SMA and remains close to the 9 EMA. This type of compression often precedes a volatility expansion.
The setup remains neutral until a breakout occurs, but the pattern favors a directional move once resistance is cleared. A confirmed breakout above the upper trendline would signal bullish continuation and could trigger a strong momentum move. Until then, patience is warranted, with the breakout level serving as the key trigger for longs on $WLD.
2
11
1,486
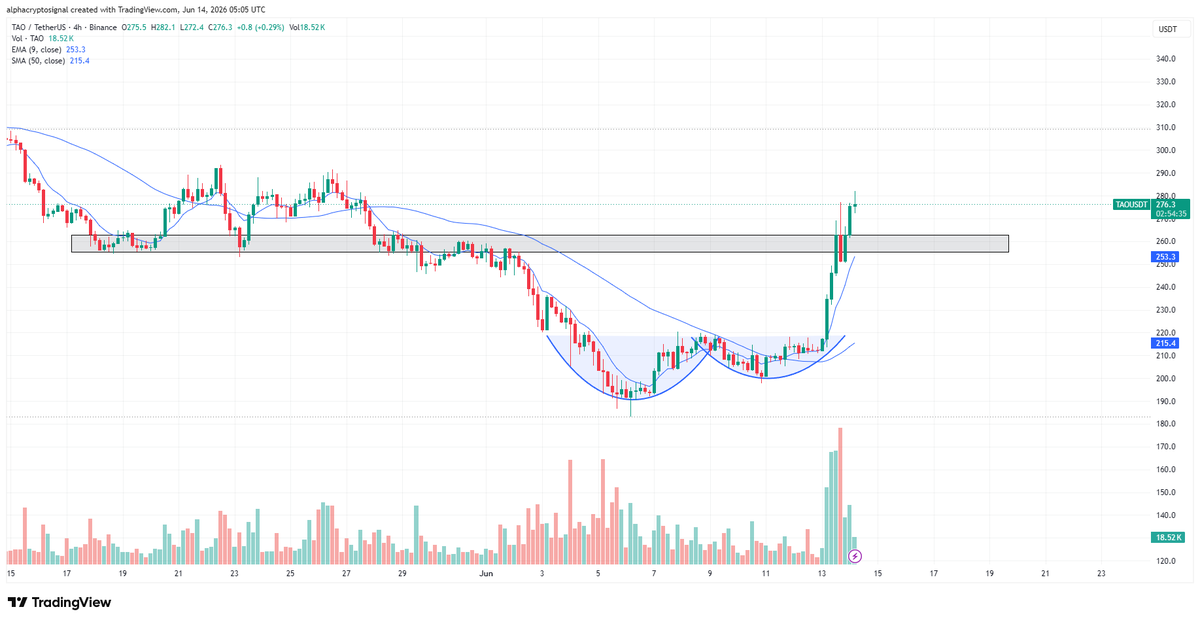
Thoughts on #TAO:
$TAO has confirmed a cup and handle breakout, followed by a strong impulsive move through a major horizontal resistance zone. The breakout was backed by a significant increase in volume, adding conviction to the move and signaling strong buyer interest. Price is now trading above both the 9 EMA and 50 SMA, keeping the short-term trend firmly bullish.
The ideal setup from here is to wait for a retest of the reclaimed horizontal zone around $255-$260. As long as this level holds as support, the breakout structure remains valid and favors continuation toward higher levels on $TAO. A successful retest would offer a lower-risk long opportunity, while losing the reclaimed zone would weaken the bullish outlook for $TAO.
1
2
687
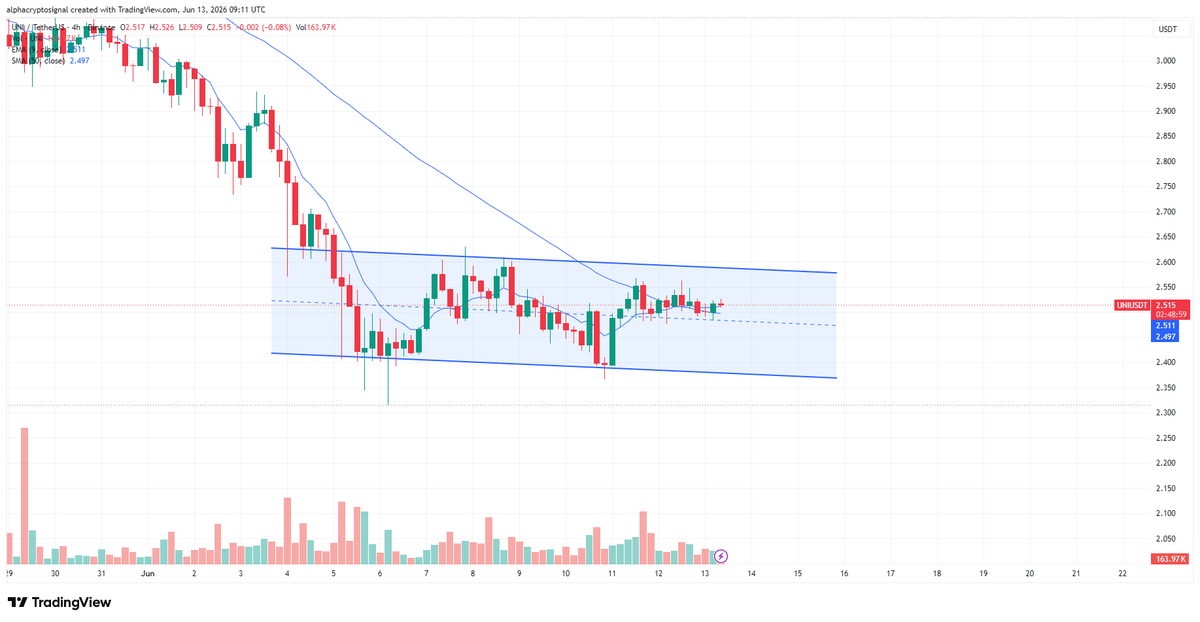
Chart Request: #UNI
$UNI continues to trade inside a descending channel, with price respecting both the upper resistance and lower support boundaries. The structure remains neutral-to-bearish while trapped inside the channel, and recent price action shows a lack of momentum compared to stronger altcoins in the market.
For now, $UNI looks range-bound and relatively boring. The higher-probability setup comes on a confirmed breakout above the channel resistance, which could signal a trend reversal and open the door for a stronger recovery. Until then, patience is key, as price is still consolidating within a bearish structure.
1
3
547
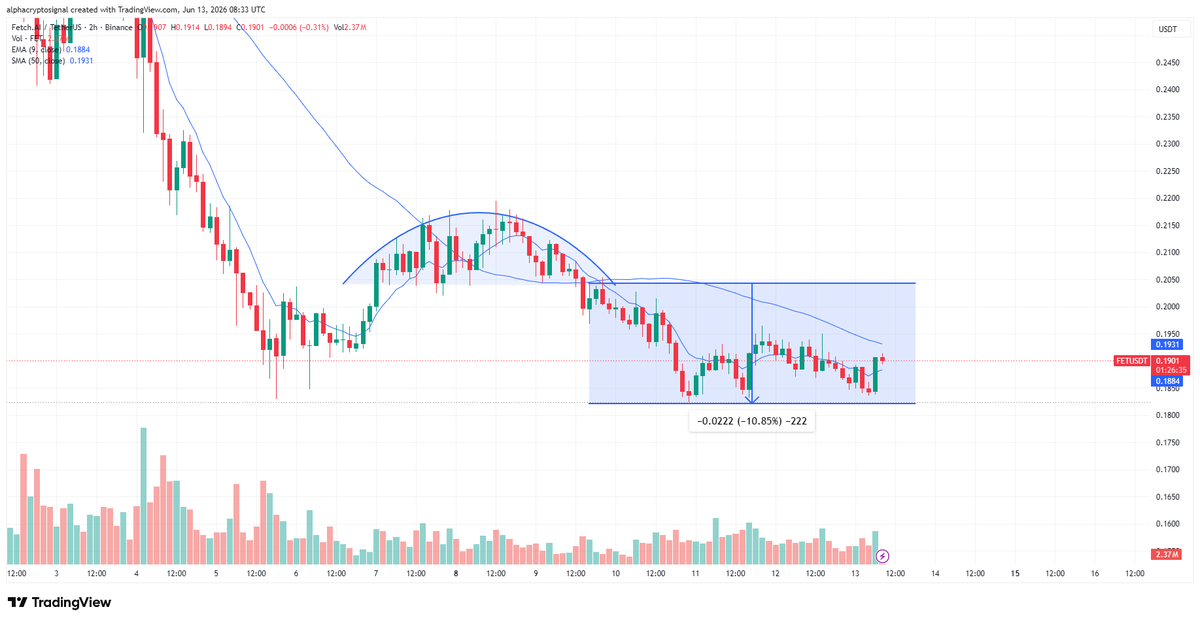
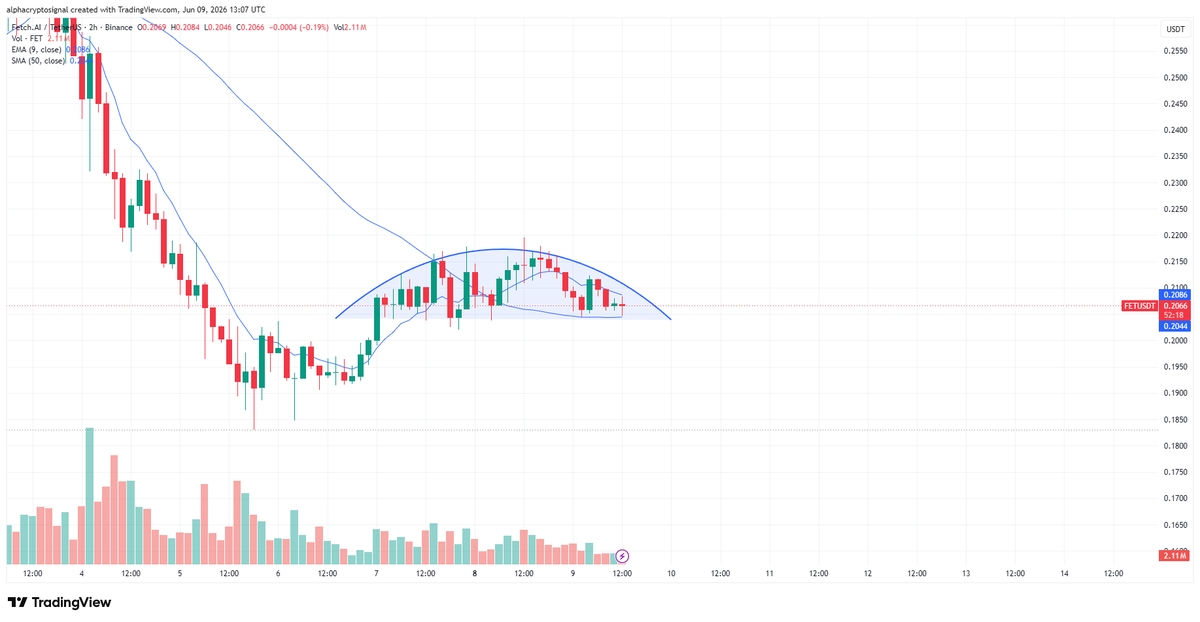
#FET Update:
The rounding top we highlighted on the LTF played out exactly as anticipated. $FET failed to sustain higher highs, lost momentum near resistance, and broke down cleanly below the key support zone — delivering a sharp -10.85% move with downside momentum still active and counting.
Another clean pattern recognition and execution. Structure remains bearish while $FET stays below the broken support. More downside favored in the short term.
Congratulations to those who followed the setup.

#FET LTF Analysis:
$FET is forming a potential rounding top on the lower timeframe, with price gradually losing momentum after failing to sustain higher highs. The curved structure suggests buyers are weakening while sellers begin to gain control near resistance.
For $FET, the highlighted support zone is the key level to watch. A confirmed breakdown below this area would complete the pattern and favor further downside, making $FET an attractive short setup. Until then, the bearish thesis remains conditional on support giving way.
1
4
1,742
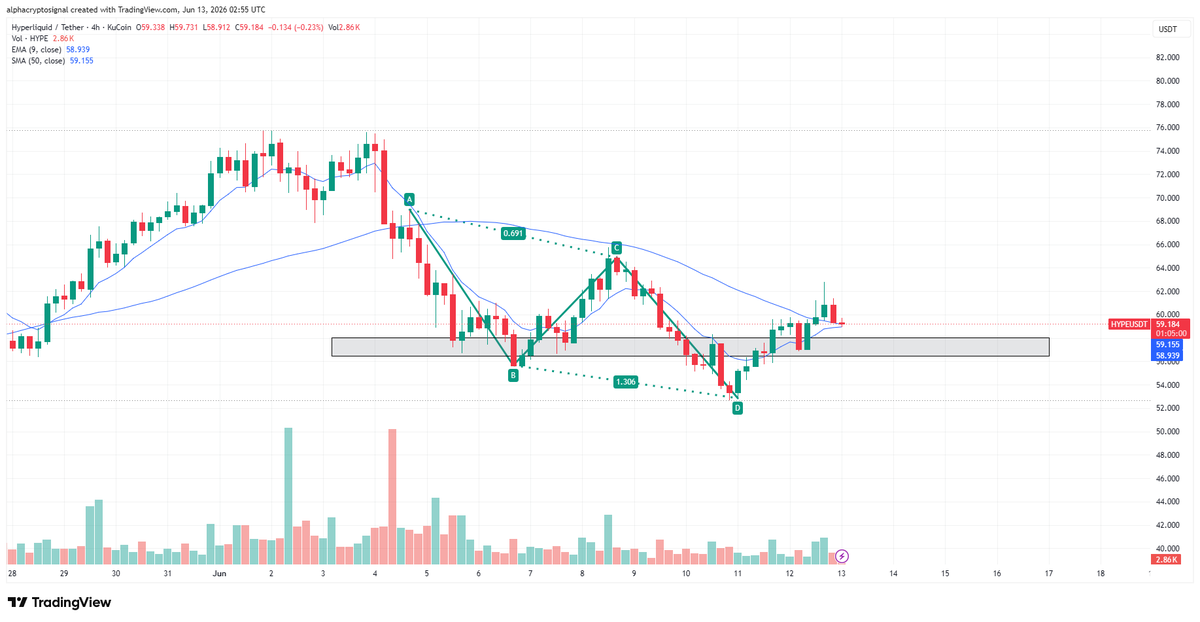
#HYPE LTF Analysis:
$HYPE is showing a completed ABCD harmonic pattern right at a key horizontal support zone. After finding support near the D point, $HYPE has reclaimed the support area and is now trading back above both the 9 EMA and 50 SMA, signaling improving bullish momentum.
As long as this reclaimed support holds $HYPE, the structure remains bullish and opens the door for a continuation move higher. A sustained hold above the current range could trigger the next leg up, while losing the support zone would weaken the setup and invalidate the bullish thesis.
3
5
778
Thoughts on #SOL:
$SOL is showing a W-shaped recovery on the 4H timeframe after defending the recent lows. $SOL has now reclaimed key moving averages and is testing a major resistance zone around $67–68.
A clean flip of this resistance into support would confirm the recovery structure and could trigger a relief rally toward higher levels. Bullish above the resistance zone, while rejection keeps $SOL range-bound.
3
4
490
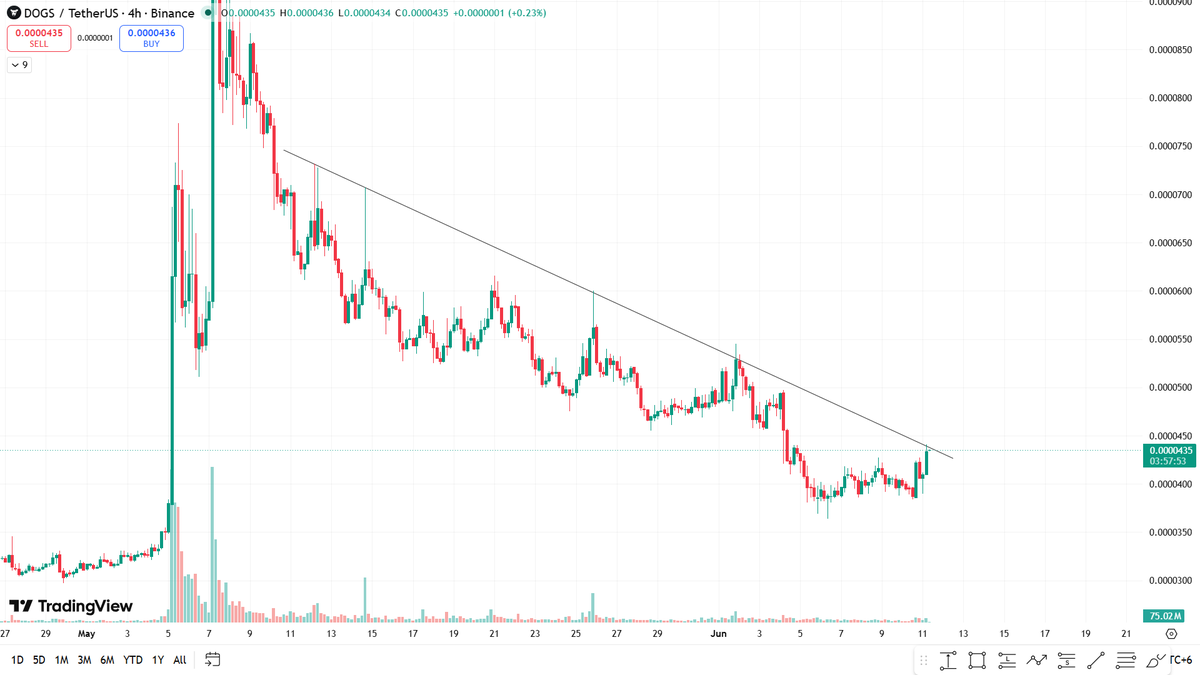
#DOGS Update:
RSI is showing strength but the volume is still relatively low. Price is approaching to it's trendline resistance again. Let's see how price reacts this time.
1
3
305
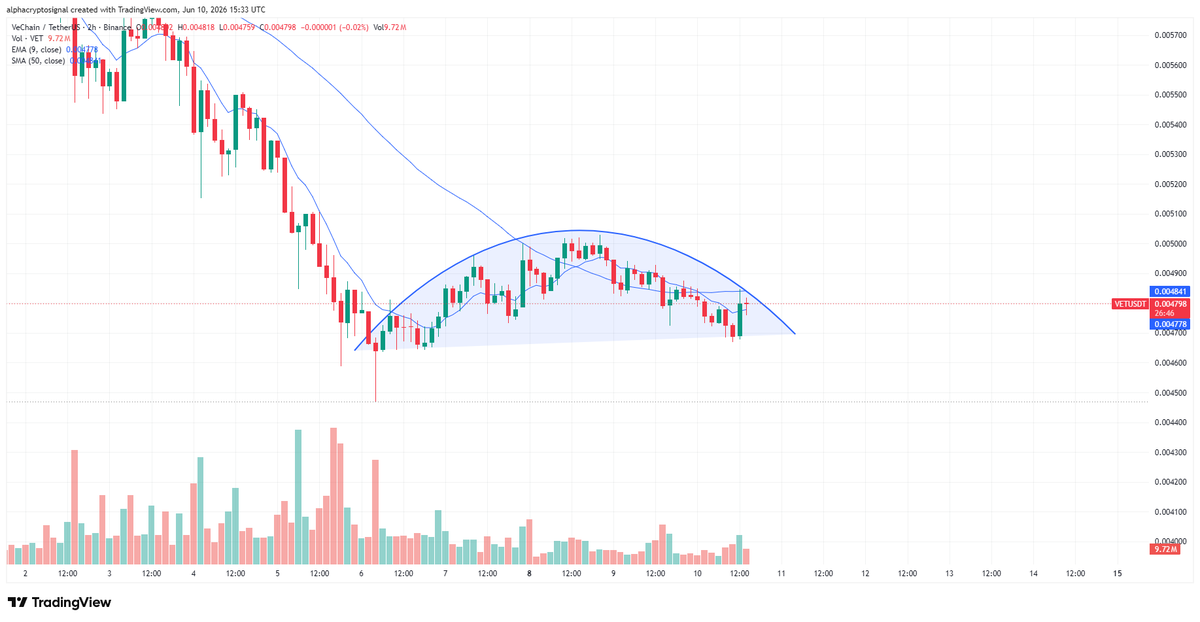
Thoughts on #VET:
$VET is forming a rounding top pattern on the 2H timeframe after a relief rally from the local bottom. $VET is losing momentum near resistance, while buyers continue to struggle with pushing higher.
A breakdown below the neckline support would confirm the bearish reversal setup and could lead to further downside. Bearish on breakdown, while support holds the pattern remains unconfirmed.
2
2
812
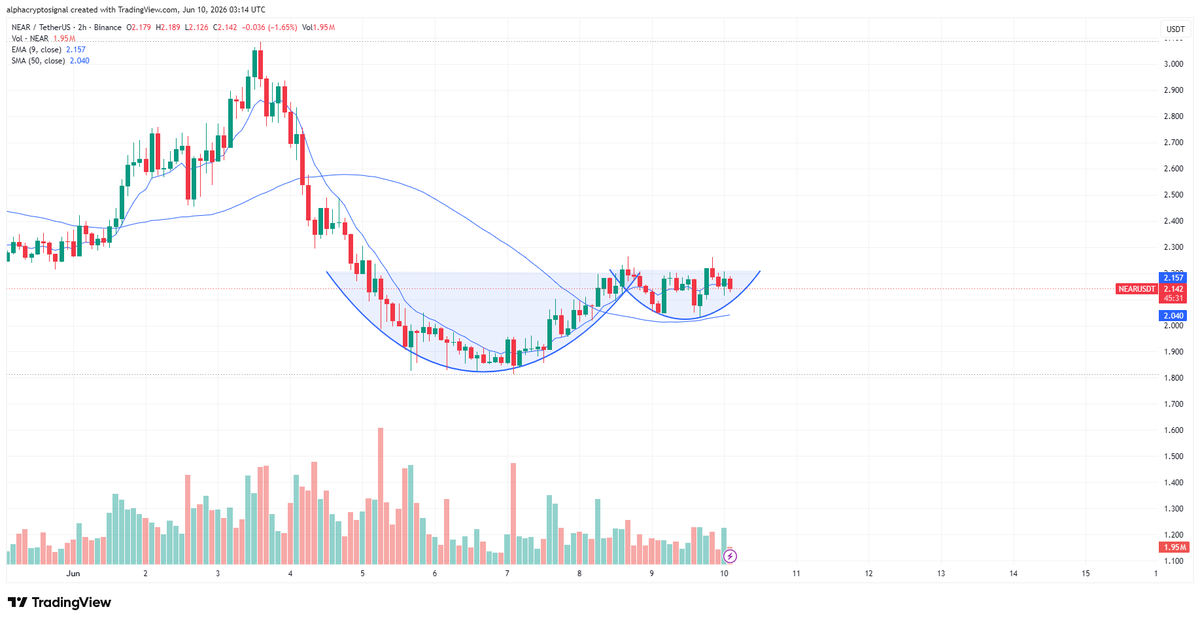
#NEAR LTF Analysis:
$NEAR is forming a cup and handle pattern on the 2H timeframe. While much of the market is showing weakness, $NEAR continues to hold its structure and consolidate near resistance, demonstrating relative strength.
A breakout above the handle resistance would confirm the bullish continuation setup and could trigger the next leg higher. Bullish on breakout, with the cup and handle structure remaining intact.
2
1
1
727
Join us on TG: t.me/ALphaCryptosignal
1
1
799