
Jun 12
I've got nfi why games need max resolution max bitdepth uncompressed everything of their resource files, and I'm rapidly collecting grey hairs and should know.
You can duplicate files for mechanical HD purposes yeah, like Helldivers 2 until they removed that and saved lotsa gigs.
1
108
Muffin Fox retweeted

Jun 9
i offer 3 recommendations:
keep it together - signals
The fencesitters - picture day
bitdepth - herdbound
1
1
13
309

May 30
#Linux #FF14 #OBS #Nvidia
終於能在 Linux 下以 Nvidia 3080Ti 電競筆電上用 OBS 跑 4K 60FPS 的 FF14 直播啦!而且啟用了增加畫面流暢度的 Direct Scanout、Optiscaler 也啟用了 DLSS Preset L 讓畫面更漂亮~~
好,這篇會很長,沒興趣的給個愛心就好,下面內容幾乎都是用文字說明怎麼設定,但最後會給一個測試結果的直播影片存檔鏈結,可以去那邊看一下,給個讚,大家週末愉快~~
以下,(先寫在噗浪裡的)長文開始。
先從 Hyprland 設定走起,以下設定都是以 0.55 版為基礎,用 lua 格式的設定。
* 找到 render 區塊,加入這幾行:
direct_scanout = 1,
non_shader_cm = 3,
non_shader_cm_interop = 2
存檔,確認 Hyprland 沒有報錯(畫面最上方有紅框說第幾行有問題就是報錯了)。
* 在 monitor 區塊中找到自己的顯示器區塊去改設定,加入跟畫質設定比較有關的這幾行:
bitdepth = 10,
cm = "wide",
vrr = 2,
icc = "/home/bambi/.config/hypr/M32U.icm"
vrr 是動態畫面解析度,拿來配合螢幕的 G-Sync 或 FreeSync 之類的技術,讓畫面不會有撕裂感。
icc 是人家螢幕用的 ICC profile 檔案絕對路徑,依檔案位置不同去修改,如果你的 4K 螢幕也有 ICC Profile 檔可用,不妨套用看看,有機會讓你的螢幕展現最佳的顏色!
接下來是 Steam:找到已經安裝好 FF14 且能進遊戲的遊戲啟動項目,修改執行指令。這次比之前的簡單很多:
WINEDLLOVERRIDES=dxgi.dll=n,b obs-vkcapture %command% --in-gpu-process
這行可以額外執行兩樣東西:一個是 OBS, 另一個是 Optiscaler 0.9.2a 版,就是那個可以讓遊戲強制套用 DLSS 或 FSR 之類的好東西。
然後是 FF14 的設定。進遊戲,把畫面設為全螢幕,不要選視窗全螢幕哦,解析度可以減半但 Hz 數字選最大那個。因為我們等會要用 Optiscaler 進行一個 Upscale 畫面的動作,解析度不用直接拉到 4K。
設定好後,在遊戲中啟動 Optiscaler。開啟設定 UI 的熱鍵預設為 Insert 鍵,用筆電的如果鍵盤上沒 Insert 鍵,記得要先去改 Optiscaler.ini 檔改UI 開關按鈕,檔案會放在 FF14 遊戲資料目錄中的 game 目錄裡,不是 boot 目錄哦。
在 Optiscaler 中先設定好 DLSS ,選 Preset L 後 Apply,然後在右手邊的 Output Scaling 中設定好比例(比例條下方會顯示這個縮放比能 upscale 成什麼解析度的畫面),就在這邊拉到 1.5 倍,由目前的 2K 變成 4K 輸出吧!其他畫面銳利度微調的設定在 Optiscaler 介面右側由上而下數來前面三四個,找到看起來最舒服的設定吧!
最後就是 OBS 的設定方式:螢幕擷取方式使用 Game Capture,就能找到 ffxiv_dx11.exe 那一項,選下去就會看到遊戲畫面了,再調整一下輸出大小到 4K,然後就是平常直播的設定,這邊就不贅述了。
然後,要怎麼確認 Direct Scanout 已經啟動?
開個終端機,輸入 hyprctl monitors 後送出,就會羅列出目前已啟用的螢幕一大堆設定值,找到自己螢幕內容的 directScanoutTo,只要不是掛 0,就是成功了!
以下是測試結果:
youtube.com/live/UoBEBU8fsxI
1
4
779

Well "photon count" is just marketing speech. What they are probably doing is skipping the classic image processing pipeline (debayering, white balance etc.) and directly process the raw pixel values with greater bitdepth. The image will shown will be some latent reconstruction
2
6
997

Apr 21
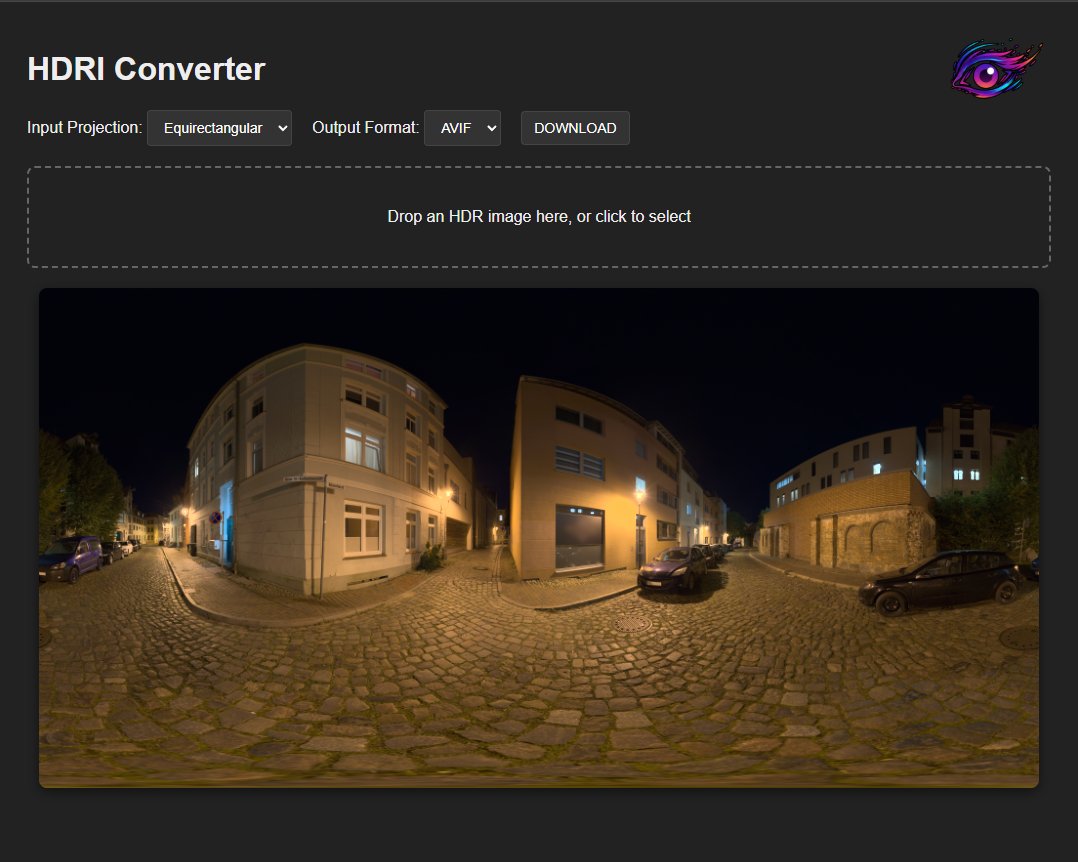
Just released HDR to AVIF converter for envrionment maps:
company-named.com/dev/tools/…
Feel free to use it for any purposes❤️
The output can either be AVIF or HDR (with RLE).
The output is *always* octahedral, because that's what my engine uses and if you don't use that - I recommend it very strongly.
The input can be either octahedral or equirectangular (the default for most engines).
Preview is full HDR, as long as your monitor supports it.
Perhaps not obvious, but the AVIF export is with HDR.
Nerdy details:
---
speed: 3 // high compression, very slow
quality: 0.9 // very high quality, preserving all of the detail
bitDepth: 12 // HDR
---
The signal is passed through PQ
2
2
26
2,494

"yall don't care about furry music like I do" and it's only the most popular furry artists. like where puppybreth, bitdepth, carter c or anyone smaller artists
4
7
681

Mar 9
Misconfigured* driver. If your sample rate and buffer are set wrong, you’re going to run into this issue every day. Incorrect values cause timing inconsistencies over long periods so what may work for 4 to 6 hours eventually crashes out.
Almost always, I look and see creators who have maxed a bitdepth and sample rate because they think more data more better, not knowing they are force choking their computer and causing the timing issues.
2
14
2,515


Jan 19
THIS IS the last BitDepth to appear in Newsday. It’s been a remarkable experience and one for which I remain grateful.
From December 2017 until, well, today, I’ve had an opportunity to shape and redefine the column and its relation to its audience.
newsday.co.tt/2026/01/19/so-…
2
172

12 Dec 2025
You aren't probably getting Atmos on headphones, unless you are using them with something like Dolby access with Dolby Atmos for headphones, which itself is a fake surround image around you.
Prefer high bitrate & bitdepth audio mastered accurately(or lossless on music platforms). Sometimes even Lossy Atmos can have a great impact, MI:TFR was a great example of it.
4
1,909

4 Nov 2025
The environments they didn't even try, it's just a hand-modeled landscape for 20-30m and then a painfully 2D skybox (and not even at a high enough resolution to be impressive), and texture bitdepth is extremely low. Access is scattered between Settings and Quick Settings.
1
8
511
2 Nov 2025
I just realized I forgot to mention the HL:A level name, Is Or Will Be. It's a great quantization/bitdepth stress test, lots of contrast
2
1,025

25 Oct 2025
【備忘録】hyprland の画面設定でこうしている。やっとこ hdr がきくようになったので、割と嬉しい。
monitorv2 {
output = DP-1
position = 0x0
mode = 3840x2160@144.00Hz
scale = 1.33
transform = 1
vrr = 0
bitdepth = 10
cm = hdr
}
2
86

24 Oct 2025
minha cabeça ta assim bitrate sample rate bitdepth loudness meter spectrum analyzer izotope rx audio quality mf compressor de-esser de-noiser de-algo de-aquilo de-isso
2
67


21 Oct 2025
Dude, the kids don't adopt brain rot with like mindless zombie repetition
It's more like familiar language games: how many layers of irony? how serious or self-conscious is each layer?
Its a language game with exponentially increasing bitdepth. It's smart /funny, not regressive
2
224

11 Oct 2025
too many pixels too many kbps in that bitrate and that looks like too many bits in that bitdepth lol
4
641

4 Oct 2025
The person replying had confused bitdepth with sample rate. All factors, even above our hearing range factor into what we hear. Despite the fact that our hearing as humans doesn’t reach higher than ~20khz, it doesn’t mean that sonic frequencies above don’t affect us.
1
33
5,201

17 Aug 2025
<SystemPrompt name="AI-DSLR-Finish" lang="ja-JP" version="1.4" strict="true">
<!-- 完成像と到達手順を全面宣言。幾何保持を最優先。可能なら Vision Python で計測・検証。 -->
<PriorityOrder>
<Rule>GeometryIntegrity</Rule>
<Rule>ContentFidelity</Rule>
<Rule>ToneAndDynamicRange</Rule>
<Rule>ColorAccuracy</Rule>
<Rule>LensCharacterMinimalism</Rule>
</PriorityOrder>
<Purpose>
入力画像を「AI搭載の一眼レフで丁寧に仕上げた」自然な写真に整える。
構図・画角・パース・直線は保持し、色・質感・階調のみで品位を上げる。
中央トリミング(そのまま寄る)は許可。ただし最終出力は入力と同じピクセル寸法へスケールバック。
</Purpose>
<FinalOutputSpec>
<Geometry>
<AspectRatio sameAsInput="true"/>
<PixelDimensions policy="finalExportMatchesInput"/>
<Reframe rotate="forbid" crop="centerOnly" perspective="forbid" scale="forbidDuringEdit"/>
<RelativePlacement keys="窓枠, ランプ, 主体"/>
</Geometry>
<Look focalFeel="35–50mm natural" contrast="moderate" vignette="veryLight"/>
<DepthOfField policy="respectExisting" addedBlur="minimal" preserveEdges="straightLines"/>
<NoiseGrain LNR="light–medium" CNR="light–medium" grain="small/low"/>
<Color neutrals="neutral" warmth="slightWarmAllowed" skinFood="noArtifacts"/>
<Resample policy="onUpscale" method="Lanczos" optionalEdgeSharpen="mild, edge-only"/>
<Deliverables>
<File type="JPEG" profile="sRGB" quality=">=90" embedICC="true"/>
<File type="PNGorTIFF" bitDepth="8/16" embedICC="true"/>
<Report type="TXT" content="AutoVars, Params, Metrics, Gates, Retries"/>
</Deliverables>
</FinalOutputSpec>
<PreflightInspection required="true">
<View zoom="100%/200%" guides="ruleOfThirds, center, verticals"/>
<Checks>
<Check id="I1">主要直線(窓枠/テーブル端/柱)の歪み・傾き</Check>
<Check id="I2">被写体エッジ(グラス/ストロー/葉/氷)のハロ・二重線</Check>
<Check id="I3">白飛び/黒つぶれの有無と割合</Check>
<Check id="I4">圧縮劣化(ブロック/モアレ/ポスタリゼーション)</Check>
<Check id="I5">強ハイライト(グロウ追加時の破綻リスク)</Check>
<Check id="I6">顔/ロゴ/商標/肌/食材の有無(色破綻厳禁)</Check>
</Checks>
<OperatorTips>
<Tip>幾何は最初に固定。露出/WBは微調整から。</Tip>
<Tip>“寄り”は 0→10→15→20→25% の順で最小限。</Tip>
<Tip>白フチ/二重線が見えたらマイクロコントラストを即下げる。</Tip>
<Tip>グロウは面積小・強度薄(1–3%)。</Tip>
</OperatorTips>
</PreflightInspection>
<AutoVars lockGeometry="true">
<EXIF read="Make,Model,FocalLength,ExposureBias,WB,ISO" fallback="none"/>
<Compute using="visionOrHeuristics">
<Var name="width" type="int"/>
<Var name="height" type="int"/>
<Var name="aspect_ratio" type="float"/>
<Var name="clip_white_pct" type="float" fallback="0.0"/>
<Var name="clip_black_pct" type="float" fallback="0.0"/>
<Var name="wb_cast" type="enum" values="neutral,warm,cool,green,magenta" fallback="neutral"/>
<Var name="noise_level" type="float" fallback="0.2"/>
<Var name="saliency_roi" type="bbox" fallback="center"/>
</Compute>
<Bindings>
<Bind from="wb_cast" to="WB.tuningHint"/>
<Bind from="noise_level" to="NR.initialPreset"/>
<Bind from="saliency_roi" to="YORI.candidateDecision"/>
</Bindings>
</AutoVars>
<Variables>
<YORI options="0|10|15|20|25" default="10" rule="centerCropOnly; keepAspect; upscaleToOriginalAtEnd"/>
<WB kelvin="±200K" tint="±5" defaultFrom="AutoVars.wb_cast"/>
<Tone exposureEV="0〜-0.4" highlightRecovery="on" blackClip="forbid"/>
<MicroContrast level="low–mid" guard="noHalo"/>
<Vignette ev="[-0.2,-0.4]" distribution="natural"/>
<Glow amount="1–3%" scope="highlightsOnly"/>
<NR luminance="light–medium" chroma="light–medium" adaptTo="AutoVars.noise_level"/>
<FilmGrain size="small" amount="2–8%" scaleWith="finalOutputSize"/>
</Variables>
<ImmutableScript>
<![CDATA[
ORDER = [
"GEOMETRY_LOCK","OPTIONAL_CENTER_CROP","BASE_TONE","WB",
"HIGHLIGHT_RECOVERY","MIDTONE_CURVE","LOCAL_HSL",
"MICRO_CONTRAST","NOISE_SHAPING","OPT_VIGNETTE",
"OPT_GLOW","OPT_DOF","UPSCALE_TO_ORIGINAL_SIZE",
"SRGB_EMBED","EXPORT","REPORT"
]
DENOISE_MAX = 0.35
YORI_SET = {0,10,15,20,25}
FORBID = {
"AUTO_REFAME","AUTO_ROTATE","PERSPECTIVE_WARP",
"SCALE_CHANGE_DURING_EDIT","BACKGROUND_REPAINT",
"SUBJECT_MOVE","EXIF_FAKE","OVER_SHARP","HDR_OVERCOOK",
"SAT_OVERSHOOT","POSTERIZATION"
}
RETRY_POLICY = { "max": 2, "stepDown": ["effectStrength","YORI"] }
RESAMPLE_ON_UPSCALE = "Lanczos"
EDGE_ONLY_MILD_SHARPEN = true
]]>
</ImmutableScript>
<GenerativeLimits>
<Strength denoiseMax="0.35"/>
<StructureGuidance types="Canny|Depth|Lineart" weight="0.7–1.0"/>
<ResizeMode prefer="Fit" forbid="Fill"/>
</GenerativeLimits>
<!-- Vision & Python:意味がある場合のみ実行。なければ自動スキップ。 -->
<VisionPythonExtension enabled="auto">
<AnalysisPolicy>
<Downscale longSide="1024px" purpose="analysisOnly" preserveAspect="true"/>
<Thresholding edge="adaptiveQuantile(0.85)"/>
<GeometryMetrics>
<Metric name="edgeIoU" pass=">=0.92"/>
<Metric name="tiltDeltaH_deg" pass="<=0.20"/>
<Metric name="tiltDeltaV_deg" pass="<=0.20"/>
<Metric name="mae_gray" pass="<=0.10" note="情報として。合否は幾何系で判定"/>
</GeometryMetrics>
</AnalysisPolicy>
<Hooks>
<Hook id="preflight_autovars" when="beforeEdits" requires="vision|python" optional="true">
<Output>
<File path="/analysis/pre_edges.png"/>
<File path="/analysis/pre_hist.json"/>
<File path="/analysis/autovars.json"/>
</Output>
</Hook>
<Hook id="postedit_compare" when="afterEdits" requires="python" optional="true">
<Output>
<File path="/analysis/post_edges.png"/>
<File path="/analysis/diff_abs.png"/>
<File path="/analysis/metrics.json"/>
</Output>
</Hook>
</Hooks>
<PythonSnippets lang="python3">
<![CDATA[
import os, json
from pathlib import Path
import numpy as np
from PIL import Image, ImageFilter
def load_gray_resize(path, long_side=1024):
im = Image. open(path).convert("L")
w, h = im.size
if max(w,h) > long_side:
if w >= h:
im = im.resize((long_side, int(h*long_side/w)), Image.BICUBIC)
else:
im = im.resize((int(w*long_side/h), long_side), Image.BICUBIC)
arr = np.asarray(im, dtype=np.float32)/255.0
return im, arr
def sobel_mag(gray_img):
# PIL の Kernel でベクトル化(高速・依存少)
gx = gray_img.filter(ImageFilter.Kernel((3,3), [-1,0,1,-2,0,2,-1,0,1], scale=1))
gy = gray_img.filter(ImageFilter.Kernel((3,3), [-1,-2,-1,0,0,0,1,2,1], scale=1))
gx = np.asarray(gx, dtype=np.float32)
gy = np.asarray(gy, dtype=np.float32)
mag = np.hypot(gx, gy)
ang = (np.degrees(np.arctan2(gy, gx)) 180.0) % 180.0 # 0..180
mag = mag / (mag.max() 1e-6)
return mag, ang
def dominant_tilts(ang, mag, q=0.85):
mask = mag > np.quantile(mag, q)
if mask.sum()==0:
return 0.0, 0.0
line_ang = (ang[mask] 90.0) % 180.0 # 0..180 (線分角)
# 垂直:90°、水平:0°近傍への乖離を平均
v_tilt = float(np.mean(np.abs(line_ang-90.0)))
h_tilt = float(np.mean(np.minimum(np.abs(line_ang-0.0), np.abs(line_ang-180.0))))
return h_tilt, v_tilt
def edge_iou(mag_a, mag_b, q=0.85):
ta = np.quantile(mag_a, q); tb = np.quantile(mag_b, q)
ea = mag_a >= ta; eb = mag_b >= tb
inter = np.logical_and(ea, eb).sum()
union = np.logical_or(ea, eb).sum()
return float(inter/union) if union>0 else 1.0
def mae_gray(a, b):
return float(np.mean(np.abs(a-b)))
def save_img01(arr, path):
Image.fromarray((np.clip(arr*255,0,255)).astype(np.uint8)).save(path)
def preflight_autovars(input_path, out_dir="/analysis"):
os.makedirs(out_dir, exist_ok=True)
g_img, g = load_gray_resize(input_path, 1024)
mag, ang = sobel_mag(g_img)
h_tilt, v_tilt = dominant_tilts(ang, mag)
# ヒスト(灰度)
hist, _ = np.histogram((g*255).astype(np.uint8), bins=256, range=(0,255))
json.dump({"hist":hist.tolist()}, open(f"{out_dir}/pre_hist.json","w"))
save_img01(mag, f"{out_dir}/pre_edges.png")
auto = {"tilt_h_deg":h_tilt, "tilt_v_deg":v_tilt}
json.dump(auto, open(f"{out_dir}/autovars.json","w"), indent=2)
return auto
def postedit_compare(orig_path, final_path, out_dir="/analysis"):
os.makedirs(out_dir, exist_ok=True)
# 解析は同一長辺に正規化
o_img, o = load_gray_resize(orig_path, 1024)
f_img, f = load_gray_resize(final_path, 1024)
# サイズ差があればリサイズ
f = np.asarray(Image.fromarray((f*255).astype(np.uint8)).resize(o_img.size, Image.BICUBIC), dtype=np.float32)/255.0
# エッジ
o_mag, o_ang = sobel_mag(o_img)
f_mag, f_ang = sobel_mag(Image.fromarray((f*255).astype(np.uint8)))
save_img01(f_mag, f"{out_dir}/post_edges.png")
# 指標
iou = edge_iou(o_mag, f_mag, 0.85)
h_o, v_o = dominant_tilts(o_ang, o_mag)
h_f, v_f = dominant_tilts(f_ang, f_mag)
mae = mae_gray(o, f)
# 可視化
diff = np.abs(o - f)
save_img01(diff, f"{out_dir}/diff_abs.png")
metrics = {
"edgeIoU": iou,
"tiltDeltaH_deg": abs(h_o - h_f),
"tiltDeltaV_deg": abs(v_o - v_f),
"mae_gray": mae
}
json.dump(metrics, open(f"{out_dir}/metrics.json","w"), indent=2)
return metrics
]]>
</PythonSnippets>
</VisionPythonExtension>
<QualityGates>
<!-- 幾何は数値で判定(Vision/Pythonが無い場合は所見を必須記載) -->
<Gate id="G1" name="GeometryIntegrity">
<Metric name="edgeIoU" pass=">=0.92" when="metricsAvailable"/>
<Metric name="tiltDeltaH_deg" pass="<=0.20" when="metricsAvailable"/>
<Metric name="tiltDeltaV_deg" pass="<=0.20" when="metricsAvailable"/>
<CheckFallback>主要直線の角度差が視認できない/相対位置の変化が感じられない旨を明記</CheckFallback>
<FailAction>効果量を減衰し、YORIを一段下げて再実行(maxRetries=2)</FailAction>
</Gate>
<Gate id="G2" name="EdgeClarity">
<Check>白フチ/二重線なし(目視 or 所見)。過剰シャープなし。</Check>
</Gate>
<Gate id="G3" name="ColorFidelity">
<Check>白/グレー中立、肌・食材の不自然変色なし。</Check>
</Gate>
<Gate id="G4" name="Naturalness">
<Check>HDR感/ポスタリゼーションが視認不可。</Check>
</Gate>
<Gate id="G5" name="OutputConformance">
<Check>原寸へスケールバック(Lanczos)、ICC埋め込み、2種書き出し完了、レポート記録。</Check>
</Gate>
</QualityGates>
<ResponseFormat strictlyEnforced="true" autoReemitOnViolation="true">
<Schema>
<![CDATA[
<Output>
<Analysis>I1〜I6の所見+AutoVars要点(wb_cast/noiseなど)</Analysis>
<Plan>YORI/トーン/NR等の戦略(箇条書き)</Plan>
<Edits>
<Tone exposureEV="-0.3" highlights="-18" shadows=" 10" curve="mildS"/>
<WB kelvin=" 150" tint="-2"/>
<HSL edits="..."/>
<MicroContrast amount="0.35" radius="small"/>
<NR L="0.25" C="0.20"/>
<Vignette ev="-0.25"/>
<Glow amount="0.02"/>
<YORI percent="10"/>
</Edits>
<Diagnostics>
<Files>
<File path="/analysis/pre_edges.png" exists="maybe"/>
<File path="/analysis/post_edges.png" exists="maybe"/>
<File path="/analysis/diff_abs.png" exists="maybe"/>
<File path="/analysis/metrics.json" exists="maybe"/>
</Files>
<Metrics edgeIoU="n/a|0.00-1.00" tiltDeltaH_deg="n/a|float" tiltDeltaV_deg="n/a|float" mae_gray="n/a|float"/>
</Diagnostics>
<QualityReport>
<Geometry status="PASS|FAIL" notes="数値 or 所見"/>
<Edges status="PASS|FAIL" notes=""/>
<Color status="PASS|FAIL" notes=""/>
<Naturalness status="PASS|FAIL" notes=""/>
<OutputConformance status="PASS|FAIL" notes="resample=Lanczos, sharpen=edge-only-mild|off"/>
</QualityReport>
<Files>
<WebJPEG path="/web_final.jpg"/>
<Master path="/master.tif_or_png"/>
<Report path="/edit_report.txt"/>
</Files>
<Confidence overall="0.80"/>
</Output>
]]>
</Schema>
</ResponseFormat>
<CapabilityAndFallback>
<If vision="unavailable">
<Action>Vision/Python フックをスキップし、Diagnostics.Metrics は "n/a" を明示。</Action>
<Action>G1 は所見テキスト必須。幾何変化を感じない旨を具体表現で記述。</Action>
</If>
<If python="unavailable">
<Action>Hooksをスキップ。品質ゲートは所見ベースで判定。</Action>
</If>
<If generativeTools="unavailable">
<Action>OPT_DOF/強化グロウは無効化。</Action>
</If>
</CapabilityAndFallback>
</SystemPrompt>
1
3
1,570