
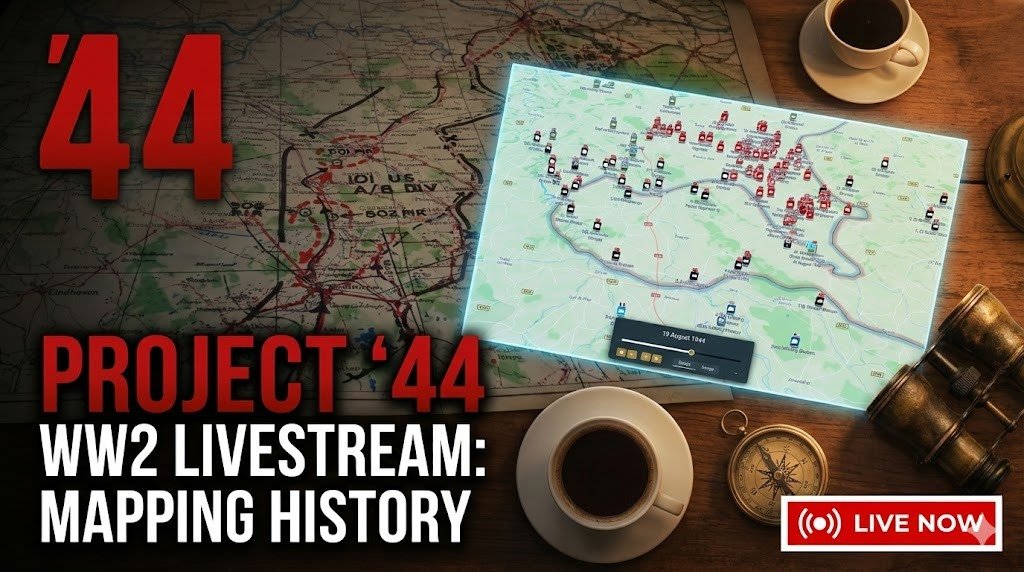
We map the Second World War. 🌍 Expand our bio to explore all our interactive maps, resources, and projects. Links below! ⬇️
Joined September 2019
- Tweets 5,222
- Following 545
- Followers 19,068
- Likes 6,403
2,491 Photos and videos


Pinned Tweet

Jan 24
Tomorrow at 1:00 pm, the Project ’44 team will be live on YouTube for a special livestream update.
We’ll be walking through the new Beta Map, discussing why the platform was rebuilt, and outlining what comes next for Project ’44 in 2026.
Multiple members of the team will be on screen to talk about research, mapping, and development.
If you follow Canadian military history or use Project ’44 for research and education, this stream will give you a behind-the-scenes look at what we’ve been building.
youtube.com/live/Cazq6kP_Sgs…
1
7
31
6,228
Jun 14
A Frenchman weeps as German soldiers march into the French capital, Paris, on June 14, 1940, after the Allied armies had been driven back across France.
On 14 June 1940, German forces entered Paris after a rapid six-week campaign that overwhelmed French and British armies. Declared an “open city” to spare it from destruction, the French capital fell without a fight, but the psychological blow was immense.
Photographs from that day capture the raw emotions of civilians watching the occupiers march past iconic boulevards. The image of a Frenchman weeping as German troops parade through the streets symbolizes the despair of a nation brought under foreign control. For many Parisians, the sight marked not only military defeat but also the end of their country’s freedom and sovereignty.
The occupation of Paris would last four years, during which time the city became both a centre of German authority in the West and a hub for underground resistance. The man’s tears reflect the grief of millions across France as the weight of defeat settled in.
3
7
35
1,835
Jun 14
Among the June 1944 War Diary of the Stormont, Dundas & Glengarry Highlanders is this onion-skin map overlay showing their phase lines for D-Day. Overlays like this were issued to battalion and company commanders, designed to be placed on top of a standard 1:25,000 or 1:50,000 map. They gave a clear picture of the day’s objectives without cluttering the main map, and could be quickly swapped out if plans changed.
This sheet divides the assault into Phase I, Phase II, and Phase III, with objectives given short, simple code names like MARY, BETTY, JANE, ASH, PEGGY, ELDER, MALLET, and YEW. These names were chosen for ease of radio transmission, avoiding confusion under fire. The overlay also shows the integration of armour with the infantry—notations like “9 Cdn plus one Armd Regt” mark where the 9th Canadian Infantry Brigade would advance with attached armoured support.
For the SD&G Highlanders, these phase lines provided a structured path inland from Juno Beach. In reality, the battlefield was far messier than these clean circles and arrows suggest, but overlays like this highlight the meticulous planning behind D-Day: every battalion had clearly defined objectives, every line marked for consolidation, and every push coordinated with armour. It’s a rare glimpse into how Canadian troops were meant to fight their way off the beach and into Normandy.
4
30
1,572
Jun 8
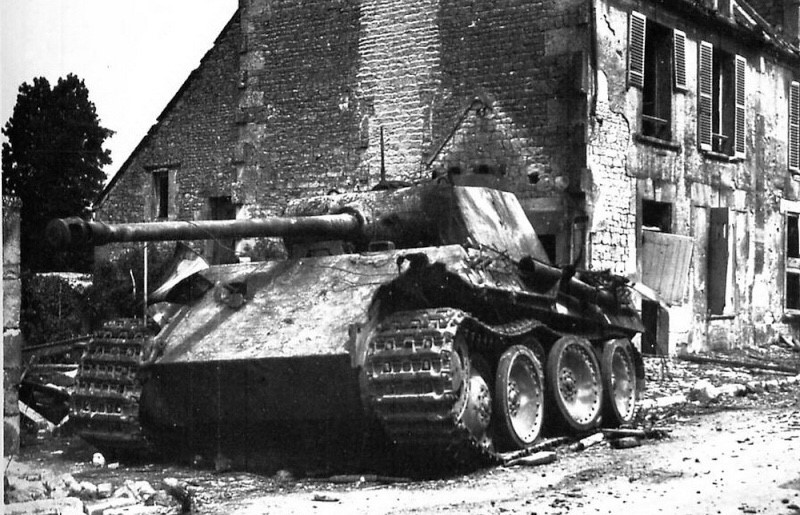
Panther tank knocked out by the Regina Rifles in Bretteville-l'Orgueilleuse.
On the night of 8–9 June 1944, the Regina Rifle Regiment fought off a German counterattack at Bretteville-l'Orgueilleuse, west of Caen. Among the attackers was a Panther tank of the 12th SS Panzer Division that drove dangerously close to the battalion headquarters.
Rifleman Joe E. Lapointe, armed with a PIAT, engaged the tank at about thirty yards, firing repeated shots until the vehicle detonated and the crew were killed as they bailed out. For his actions, Lapointe was awarded the Military Medal.
This Panther was the first destroyed in ground combat in Normandy, and its loss helped blunt the German effort to retake the village. The Regina Rifles’ stand at Bretteville demonstrated that Canadian infantry could stop Germany’s most feared armour and hold their ground in the crucial first week of the campaign.
2
10
84
2,148
Jun 7
Crossed rifles in the sand are a comrade's tribute to this American soldier who sprang ashore from a landing barge and died at the barricades of Western Europe.
This photograph, taken on the beaches of Normandy in June 1944, shows two rifles crossed in the sand to mark the grave of an American soldier who fell in the opening hours of the invasion. Such improvised markers were a common battlefield tribute, created by comrades before formal burials could be arranged.
The soldier had come ashore during D-Day, charging into the deadly fire that swept across Omaha and Utah Beaches. Many men were cut down before they could reach cover, their sacrifice part of the enormous cost of breaking through Hitler’s Atlantic Wall.
Simple and haunting, the crossed rifles symbolized both respect and loss. They stood as a temporary memorial until graves registration units could establish proper cemeteries, where today thousands of Americans rest overlooking the very shores where they fought and died.
7
39
472
24,321
Jun 6
Infantrymen of Le Régiment de la Chaudière moving through Bernières-sur-Mer, France, 6 June 1944.
On 6 June 1944, infantrymen of Le Régiment de la Chaudière moved inland through Bernières-sur-Mer after landing on Juno Beach as part of the 3rd Canadian Infantry Division’s assault on D-Day. Unlike many units that went ashore under heavy fire, the Chaudières landed later in the morning, reinforcing the initial waves and pushing into the shattered town behind the beach defences.
Bernières had been turned into a strongpoint by German forces, with houses converted into machine-gun posts and fields sown with mines. By the time the Chaudières entered, much of the immediate resistance had been broken, but the streets still bore the scars of bombardment and combat. Their advance marked the transition from seizing the beachhead to the harder task of moving inland against scattered but determined defenders.
The Chaudières were the only French-speaking battalion to land in Normandy on D-Day, and their presence in Bernières symbolized both Canada’s role in the liberation of France and the contribution of francophone soldiers to the Allied cause. For the regiment, the day was only the beginning of weeks of bitter fighting as the Canadians pushed south toward Caen.
1
6
64
6,232
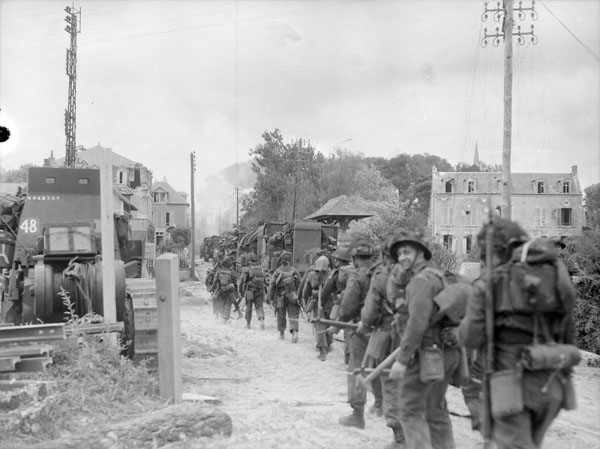
Jun 6
Troops of the 9th Canadian Infantry Brigade (Stormont, Dundas, and Glengarry Highlanders) going ashore from LCI (L) 299 [Landing Craft Infantry], Bernières-sur-mer, Normandy, France, 6 June 1944.
On 6 June 1944, the Stormont, Dundas and Glengarry Highlanders landed at Bernières-sur-Mer as part of the 9th Canadian Infantry Brigade, the reserve brigade of the 3rd Canadian Infantry Division. Unlike the assault battalions that went ashore in the morning in Landing Craft Assault (LCA) to storm the beaches under fire, the SD&G Highlanders landed later in the afternoon once a foothold had been established.
Because they were not part of the first wave, they were carried in the larger Landing Craft Infantry (Large) [LCI(L)], which could transport up to 200 troops at a time. These vessels were slower and less manoeuvrable than the smaller assault craft, but they were ideal for bringing in reserve formations once the immediate danger of beach obstacles and heavy fire had been reduced. The use of LCIs also reflected the need to land reserve battalions in strength, ready to exploit inland or reinforce as needed.
1
4
30
868
Jun 6
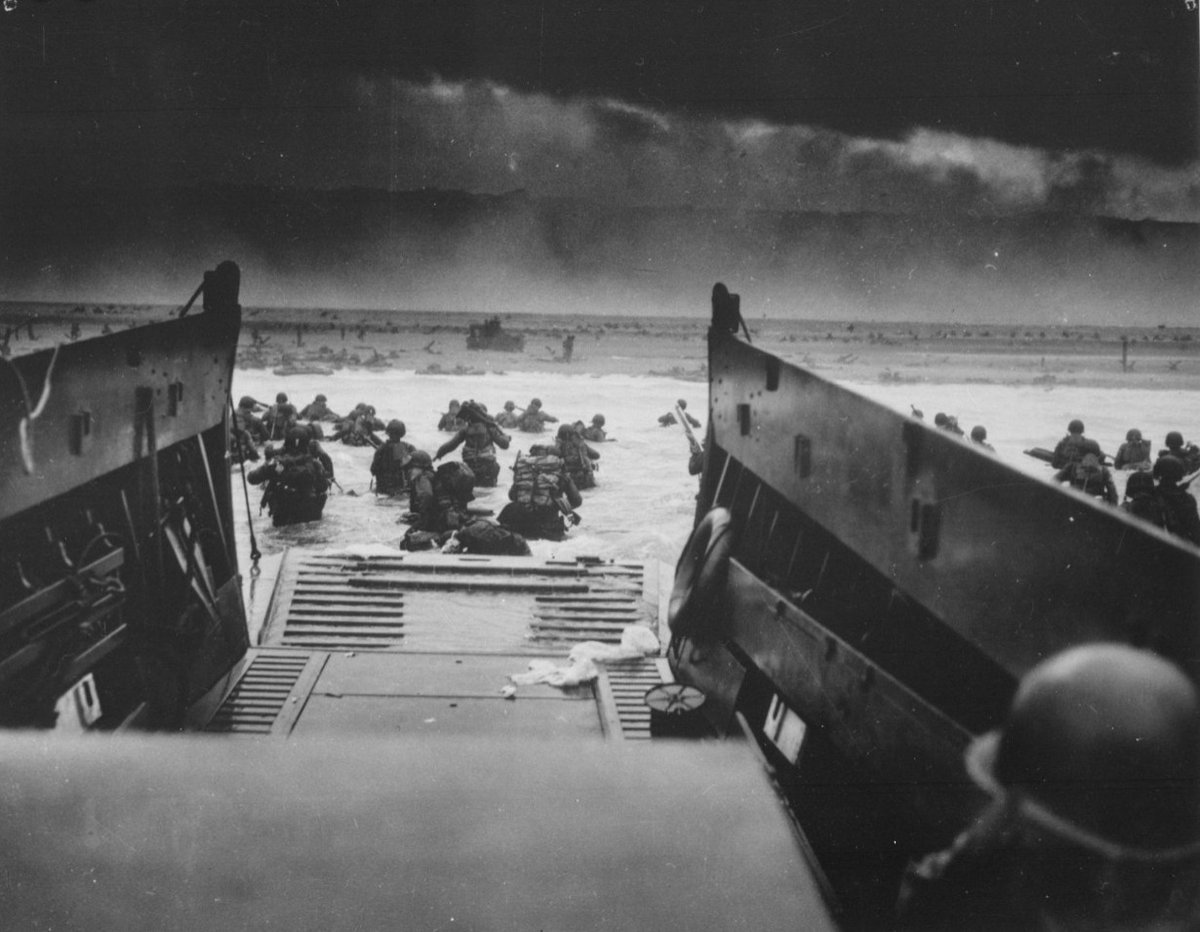
Down the ramp of a Coast Guard Landing barge Yankee soldiers storm toward the beach-sweeping fire of Nazi defenders in the D-Day Invasion of the French Coast. Troops ahead may be seen lying flat under the deadly machine gun resistance of the Germans. Soon the Nazis were driven back under the overwhelming Invasion forces thrown in from Coast Guard and Navy amphibious craft.
On 6 June 1944, Omaha Beach proved the toughest of the Allied landing zones. U.S. 1st and 29th Infantry Divisions faced a shoreline overlooked by steep bluffs, where German bunkers, machine guns, and artillery commanded every approach. Strong tides and beach obstacles scattered the landing craft, throwing units into chaos.
As troops splashed ashore, entire waves were cut down in the open sand. At sectors like Dog Green, losses were catastrophic, with some companies losing half their strength within minutes. Survivors hugged seawalls and craters, slowly pushing forward under withering fire.
Through sheer persistence, small groups found paths up the bluffs, knocking out strongpoints and opening the way inland. By the end of the day, the beachhead was secured at terrible cost—over 2,000 American casualties—making Omaha the bloodiest of the D-Day landings.
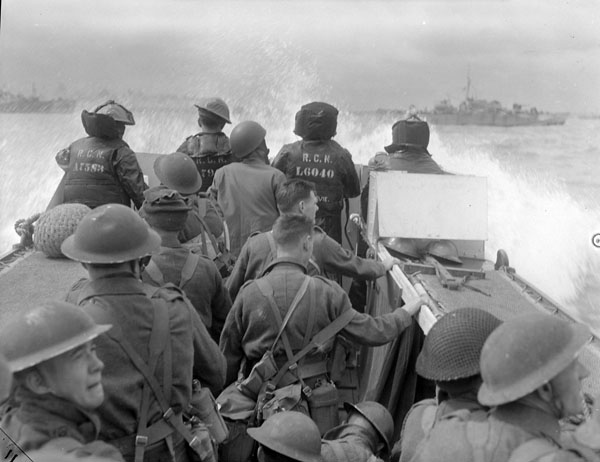
2
3
42
1,280
Jun 6
Infantrymen of Le Régiment de la Chaudière moving towards Bernières-sur-Mer, France, 6 June 1944.
On 6 June 1944, infantrymen of Le Régiment de la Chaudière landed at Juno Beach as part of the 3rd Canadian Infantry Division’s assault on Normandy. Coming ashore at Bernières-sur-Mer, they faced mines, obstacles, and fortified German strongpoints that swept the beach with machine-gun and artillery fire. Despite losses in the opening minutes, the Chaudières pushed inland, clearing the village street by street.
The regiment was the only French-Canadian infantry unit to take part in the D-Day landings. Many of its soldiers spoke French with the liberated civilians they encountered, a striking moment after four years of German occupation. By nightfall, the Chaudières had secured Bernières and linked with neighbouring units, helping establish the Allied foothold in France.
Their advance from Juno Beach marked the beginning of a long campaign across Normandy and into northwest Europe, where the regiment fought through some of the toughest battles of the war. Bernières-sur-Mer remains closely associated with their legacy, a place where French-Canadian soldiers played a central role in the liberation of France.
7
37
733
Jun 5
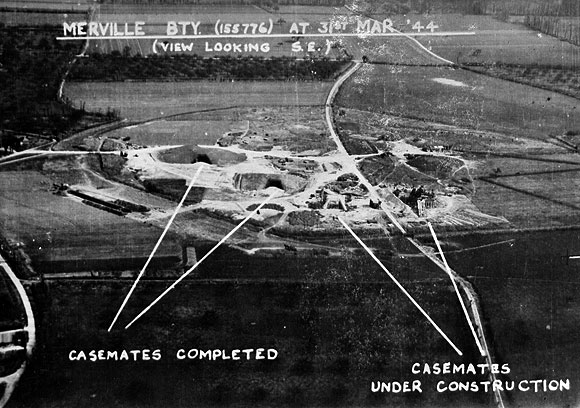
Aerial photo of Merville Battery.
The Merville Battery was one of the key objectives assigned to the British 6th Airborne Division on D-Day. Intelligence suggested its guns could fire directly onto Sword Beach, and so the task of eliminating it fell to the 9th Battalion, Parachute Regiment.
In the early hours of 6 June 1944, the battalion was badly scattered during its drop. Out of roughly 600 men assigned to the assault, only about 150 reached the assembly area in time. Despite being understrength and lacking much of their equipment, Lieutenant Colonel Terence Otway led the attack at dawn. After a desperate fight through minefields and wire, the paratroopers stormed the casemates, silenced the guns, and held the position long enough to ensure they could not interfere with the landings. The cost was severe—casualties reached nearly half of the attacking force, with many killed or wounded in the assault.
3
7
56
1,460
Jun 5
General Dwight D. Eisenhower gives the order of the Day. "Full victory-nothing else" to paratroopers in England, just before they board their airplanes to participate in the first assault in the invasion of the continent of Europe. 5 June 1944.
On the night of 5 June 1944, hours before the D-Day invasion, General Dwight D. Eisenhower, Supreme Commander of the Allied Expeditionary Force, visited paratroopers of the U.S. 101st Airborne Division in England. Photographs show him speaking with the men, giving encouragement before they boarded their aircraft bound for Normandy.
Eisenhower’s “Order of the Day” was brief and direct: “Full victory—nothing else.” His words captured the enormity of the moment. The airborne troops would be among the first into battle, parachuting behind enemy lines to seize key bridges, roads, and villages to disrupt German defences ahead of the beach landings.
The meeting became one of the most iconic images of the war: a commander sharing a few final words with young soldiers about to risk everything. Within hours, the largest amphibious invasion in history would be underway, marking the beginning of the liberation of Western Europe.
1
20
126
2,374
Jun 4
British Prisoners at Dunkirk, France, June 1940.
The fall of Dunkirk in late May and early June 1940 was one of the most dramatic moments of the early war. As German forces encircled the British Expeditionary Force and their French allies, a desperate evacuation—Operation Dynamo—was launched to bring as many men as possible across the English Channel to safety.
While over 330,000 troops were successfully rescued, tens of thousands were left behind. These men, cut off from the beaches or ordered to hold the line, were taken prisoner when the final perimeter collapsed on 4 June. Photographs of British prisoners at Dunkirk show weary soldiers marched into captivity, many still in their battle gear, reflecting both exhaustion and resignation.
For those captured, years of hardship in German prisoner-of-war camps lay ahead.
2
3
22
1,371
Jun 4
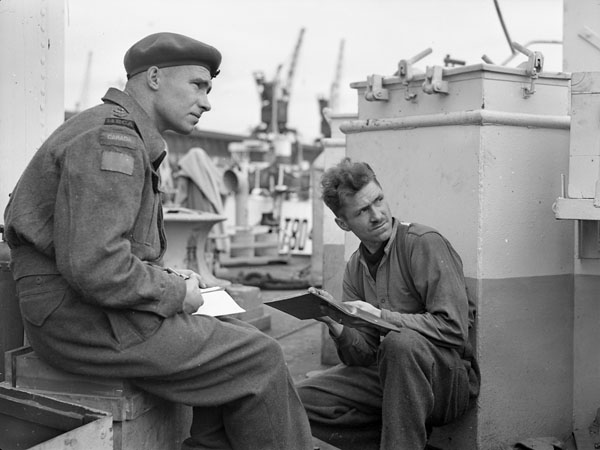
Lieutenant John MacIsaac (left), 14th Field Regiment, Royal Canadian Artillery (R.C.A.), discussing D-Day fire plan tactics with Bombardier Charles Zerowel aboard a Landing Ship Tank, Southampton, England, 4 June 1944.
On 4 June 1944, two days before the invasion of Normandy, Lieutenant John MacIsaac and Bombardier Charles Zerowel of the 14th Field Regiment, Royal Canadian Artillery were photographed aboard a Landing Ship Tank in Southampton, reviewing the fire plans for D-Day. The regiment was equipped with self-propelled M7 “Priest” guns, designed to land with the assault waves and provide artillery support directly from the beaches.
For the 14th Field Regiment, the D-Day fire plan was meticulous. Each gun crew had pre-plotted targets ranging from German strongpoints on the beaches to inland positions that might shelter machine guns or artillery. Once ashore, they were expected to switch quickly from prearranged fire tasks to supporting advancing infantry, adjusting fire under the direction of forward observation officers.
The presence of artillery units in the assault waves was a critical innovation of the Normandy landings. By landing Priests early, the Canadians ensured their infantry would have immediate fire support against well-fortified German positions. For MacIsaac, Zerowel, and their regiment, the planning sessions aboard ship were the final step before one of the most complex and dangerous operations of the war.
1
2
19
815
May 31
This map shows the sectors of the Atlantic Wall, the German defensive system that stretched from Norway to the French-Spanish border. What makes it interesting is that it doesn’t just show beach defences, but also the theoretical beach landing capacities and nearby major port capacities that Allied planners assessed in 1943–44.
Each sector—such as Pas de Calais, Caen, Cotentin, Breton, and North Seine—is broken down with estimates of how many troops and how much equipment could be landed daily under different conditions:
Natural capacity (unimproved beaches).
Developed capacity (with landing infrastructure built).
Weather impacts (percentages showing how often bad weather would reduce landings).
For example, the Caen Sector shows a natural capacity of 43,000 tons per day, potentially rising to 65,000 if developed. The Cotentin Sector (where Utah Beach was later placed) is shown with 23,000 tons daily capacity, rising to 40,000. These figures gave planners a comparative sense of where large-scale operations could be sustained.
The map also highlights port groups like Cherbourg, Dieppe, Rouen, and Calais, each annotated with how many days after capture they could begin receiving traffic. This was crucial, since the Allies knew that long-term success depended on seizing deep-water ports quickly, rather than relying solely on beaches.
In sum, this is not just a defensive map of the Atlantic Wall—it’s a planning tool, used by the Allies to weigh the risks of different landing areas. The contrast between the Pas de Calais (the strongest German defences but highest capacity) and Normandy (lighter defences, good but less obvious capacity) shows why Normandy was ultimately chosen for D-Day.
1
10
88
9,178
May 26
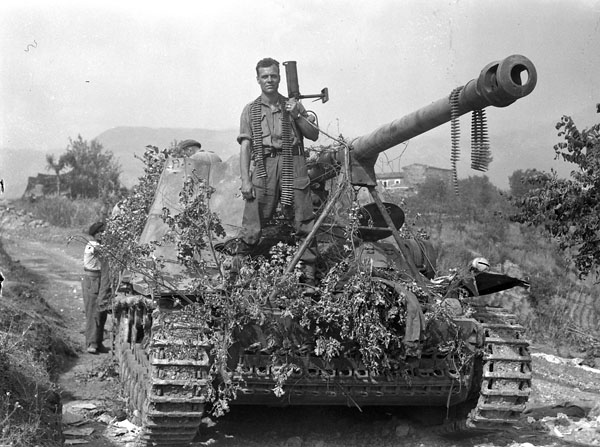
Lance-Corporal Thrasher of the Westminster Regiment holding the PIAT he used to destroy a German self-propelled gun near Pontecorovo Italy.
Lance-Corporal Thrasher of the Westminster Regiment (Motor) is shown holding the PIAT (Projector, Infantry, Anti-Tank) he used to destroy a German Marder II self-propelled gun near Pontecorvo, Italy on the 26th of May 1944. The engagement took place during the Allied offensive through the Liri Valley, where Canadian forces spearheaded the assault on the heavily fortified Hitler Line.
The Marder II, built on a modified Panzer II chassis, mounted a high-velocity 75 mm anti-tank gun and posed a serious threat to both armour and infantry. Taking one out with a PIAT required exceptional nerve: the weapon’s short range meant Thrasher had to engage at close quarters, under direct fire. His success not only eliminated a dangerous vehicle but also underscored how individual acts of bravery could tip the balance in tightly contested battles.
The destruction of the Marder II helped clear the way for the 5th Canadian Armoured Division’s advance, as German armour and anti-tank guns fought desperately to hold their ground. Thrasher’s action is a vivid example of the critical role Canadian infantry played in silencing enemy strongpoints during the breakthrough battles of the Italian campaign.
2
7
58
1,882
May 25
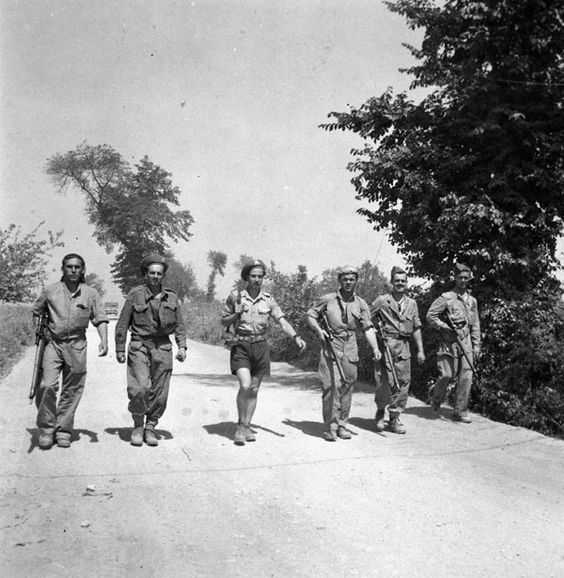
Snipers of the R22eR walking in the Liri Valley.
Snipers of the Royal 22e Régiment (R22eR) are shown moving through the Liri Valley during the Italian Campaign. By 1944, Canadian infantry battalions typically maintained a sniper section within their support company. These men, often drawn from the best marksmen in the battalion, were trained not only in precision shooting but also in camouflage, observation, and reconnaissance. Their role was to harass enemy positions, eliminate key targets like machine-gunners or officers, and provide valuable intelligence on enemy movements.
For the R22eR, one of Canada’s most storied francophone regiments, the fighting in the Liri Valley was among their hardest experiences of the war. In May 1944, Canadian forces broke through the Hitler Line as part of the Allied drive on Rome. The valley, flanked by mountains and cut with rivers, had been turned into a strong defensive belt by German forces. Snipers and forward scouts were critical in locating well-hidden positions and helping guide infantry attacks through this difficult terrain.
The work of the sniper sections was often solitary and dangerous, but their precision fire and reconnaissance supported the battalion’s advance in battles where every strongpoint had to be carefully identified and reduced. For the R22eR, their actions in the Liri Valley contributed to one of the key Canadian victories of the Italian campaign, clearing the path toward Rome.
3
30
1,464
May 20
Gunners of the 12th Field Regiment, Royal Canadian Artillery (R.C.A.), with the Victory issue of the Maple Leaf newspaper, Aurich, Germany, 20 May 1945.
In May 1945, with Germany surrendered and the war in Europe over, Canadian troops found themselves in occupied territory, shifting from combat to stabilization duties. At Aurich in northern Germany, gunners of the 12th Field Regiment, Royal Canadian Artillery, gathered to read the “Victory” issue of The Maple Leaf, the Canadian Army’s overseas newspaper.
The Maple Leaf had been published since 1944, bringing news, features, and a touch of home to Canadian servicemen across Europe. The Victory edition marked the end of years of fighting, announcing the defeat of Nazi Germany and the final triumph of the Allied cause. For the men of the 12th Field Regiment, who had fought through Normandy, the Scheldt, and into Germany, it was both a moment of relief and reflection on the heavy cost of victory.
Scenes like this underscored the transition from war to peace. Even as soldiers read of victory, many still faced weeks or months of duty abroad before demobilization.
1
2
19
1,516
Project '44 retweeted

May 18
Project Athena is a living archive dedicated to preserving the personal stories and photographs of Veterans who served in Afghanistan during Operation Athena (2001–2021). Built by veterans, for veterans — the platform lets anyone who was there pinpoint exactly where their photo was taken on an interactive map, attach a date and personal story, and contribute to a shared record of service that will never be forgotten. Every submission helps ensure the human side of Canada's longest military mission is preserved for generations to come.
📸Canadian Forces soldiers grab a moment of normalcy at the Tim Hortons on Kandahar Airfield's famous fast-food row, just steps from the base hockey rink — December 2006.
📸Ontario reservists serving with the OMLT pose at COP Lion in the village of Nakhonay, the same soldiers who would later be featured in the documentary Desert Lions: Canadian Forces Mentors in Kandahar — August 2010.
📸Soldiers from Task Force 1-07 head out to Tarnak Farm to zero their weapons in the final days of February 2007, surrounded by the ruins of destroyed compounds that defined the early days of the mission.
Have a photo from your time in Afghanistan? Upload your story today at projectathena.ca and help keep the memory alive
2
11
40
4,269
May 12
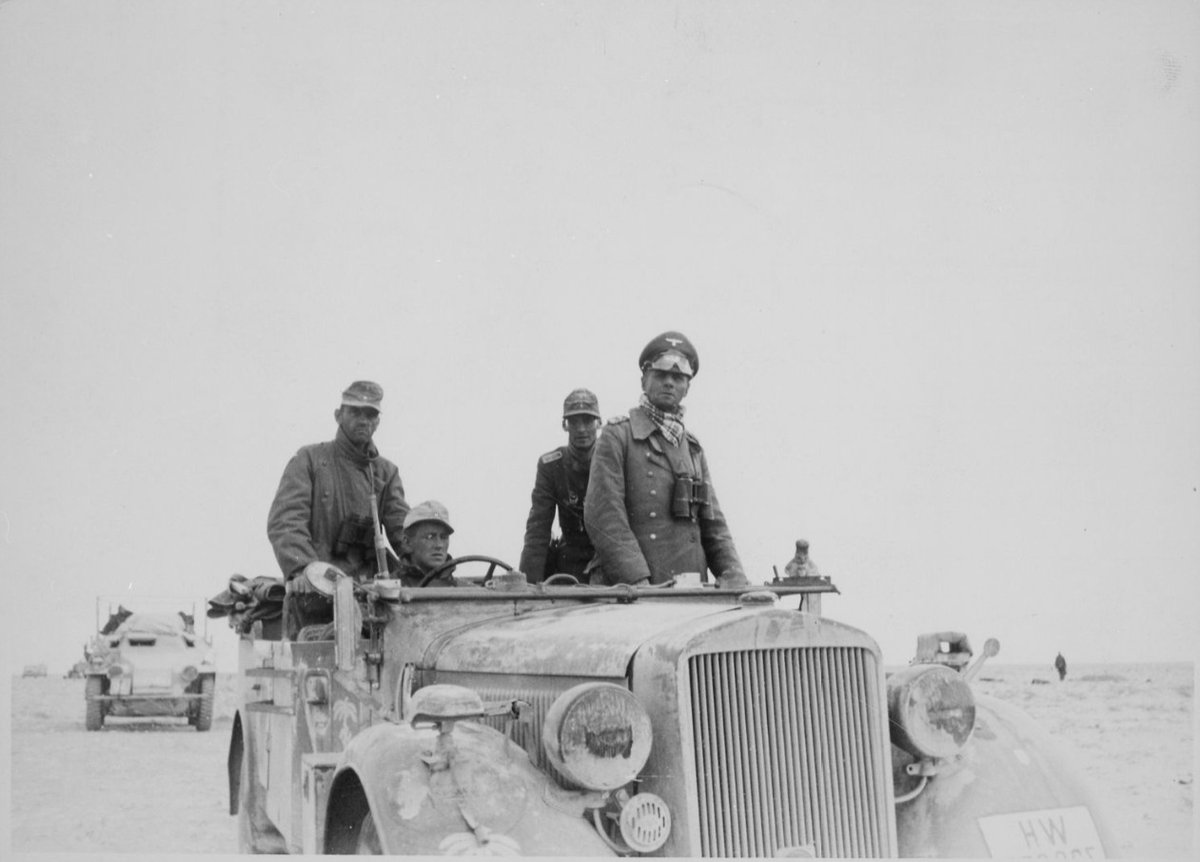
Gen. Erwin Rommel with the 15th Panzer Division between Tobruk and Sidi Omar, 1941.
In 1941, General Erwin Rommel, commander of the German Afrika Korps, gained international fame for his bold manoeuvres across the deserts of North Africa. Here he is seen with the 15th Panzer Division, one of his key armoured formations, during operations between Tobruk and Sidi Omar.
The 15th Panzer Division, newly arrived in North Africa that year, became central to the Axis effort to push British and Commonwealth forces back toward Egypt. Under Rommel’s leadership, it spearheaded offensives that encircled Allied troops, threatened supply lines, and turned the desert war into a fast-moving campaign of attack and counterattack.
Rommel’s ability to inspire his men and outmanoeuvre his opponents earned him the nickname “the Desert Fox.” Yet his daring tactics also came at a cost—his forces were often stretched thin and reliant on precarious supply lines across the Mediterranean. This photograph captures Rommel during the height of his reputation as one of the most formidable battlefield commanders of the war.
5
36
1,016
May 11
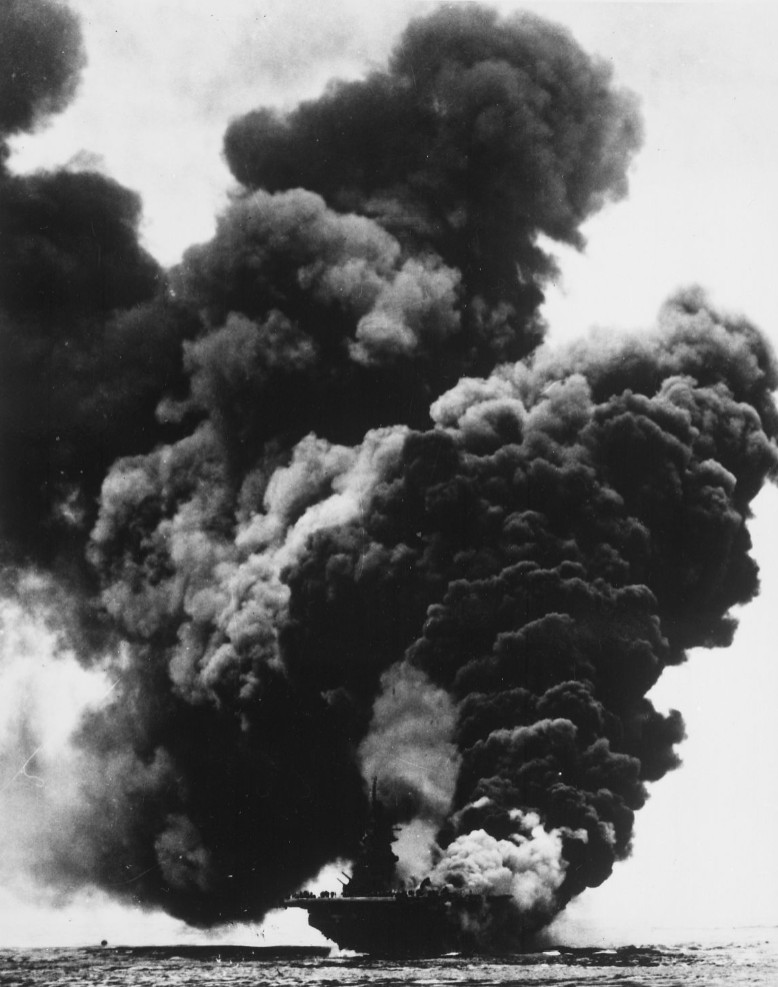
USS Bunker Hill burning after a Japanese suicide attack. Near Okinawa, May 11, 1945
On 11 May 1945, while supporting operations off Okinawa, the aircraft carrier USS Bunker Hill (CV-17) was struck by two Japanese kamikaze aircraft in quick succession. The planes, each carrying bombs, crashed into the flight deck within 30 seconds of each other, igniting massive fires among fully fuelled and armed aircraft preparing for missions.
The destruction was catastrophic. Explosions tore through the hangar and upper decks, and burning aviation fuel spread uncontrollably. Despite heroic damage control efforts, the carrier lost 389 men killed, 264 wounded, and 43 missing—one of the single deadliest kamikaze attacks of the war.
Though heavily damaged, Bunker Hill did not sink. She was able to steam back to the United States under her own power, but she never returned to combat. The attack illustrated both the ferocity of the Okinawa campaign and the desperate intensity of Japan’s kamikaze strategy in the final months of the war.
1
16
862
Project '44 retweeted
May 6
One of the challenges that makes mapping from Second World War unit war diaries particularly difficult is the mapping system itself, specifically the coordinate grids and map projections used at the time.
The British relied on several different map projection systems, each built on geodetic datums that were, by modern standards, imprecise. For northwest Europe, the two most relevant are Lambert Zone I, based on the Nouvelle Triangulation Française (NTF) datum and the Clarke 1880 ellipsoid, and Nord de Guerre, an older WWI-era grid based on the Ancienne Triangulation Française (ATF) datum and the Plessis 1817 ellipsoid. By 1944, Nord de Guerre was technically obsolete, but it still appeared as marginal reference ticks on many British-issued map sheets. These datums were derived from earlier triangulation surveys and predated the computational methods that would later allow for globally consistent, satellite-verified reference systems.
Geodesy as a discipline was still maturing, and without computers, producing and correcting large-scale surveys was slow, laborious work, made harder by the fact that a war was actively being fought. The practical consequence for a theatre like Normandy was that available map coverage relied on conical projections, specifically Lambert Conformal Conic, rather than the narrower strip-by-strip Transverse Mercator projection that underpins the modern Military Grid Reference System (MGRS). Transverse Mercator projections perform well over narrow north-south bands but distort rapidly as you move east or west. Lambert Conic projections handle wider east-west extents better, which is why they were preferred for covering broad operational theatres. The tradeoff is that both introduce distortion of different kinds depending on where you are on the sheet, and that distortion was baked into every map issued to every unit.
Layer on top of that the generalisation inherent in the most commonly available wartime maps, the GSGS 1:100,000 series. At that scale, features must be simplified: roads straightened, villages approximated, contours smoothed and errors compounded. In practice, positional inaccuracy across these sheets typically falls in the range of 100 to 200 metres, with worse outliers possible depending on the area and the source survey data. By modern standards that is significant. GPS-guided munitions rely on sub-metre accuracy, and calling close artillery fire with that margin of error would be genuinely hazardous to friendly troops. In the Second World War, those errors were real and unavoidable, and commanders and surveyors simply had to account for them operationally.
When we mapped Project '44, we manually georeferenced each GSGS map sheet and stitched them together, tying the sheets to known, identifiable features on the ground. Done carefully, this process keeps positional accuracy near the lower end of that 100 to 200 metre range, but it cannot push below it. The original datum and projection errors, the generalisation of the source maps, and the inevitable human error in the georeferencing process all combine in ways that cannot be fully eliminated. There is a floor, and that floor is set by the accuracy of the original surveys.
Over the last several days I have been working on a new approach to reduce that residual uncertainty and speed up the mapping workflow. It is a system of systems that brings together three reference layers in one interface.
The first is the wartime grid systems, specifically the coordinate grids actually used in the war diaries, enabling direct input and plotting of grid references as they appear in the source documents. The second is the georeferenced GSGS basemaps, the original wartime maps georeferenced to a modern coordinate system, so a plotted grid reference can be visually cross-checked against the map the unit itself would have been reading. The third is a modern accurate basemap, a contemporary mapping layer using current satellite-derived data, for ground truth comparison.
The idea is convergence across three independent references. Where all three agree, you have high confidence. Where they diverge, a human mapper can apply contextual judgment, drawing on terrain, road networks, and the unit narrative, to make the call on where the position actually was. The goal is faster, more efficient mapping without sacrificing interpretive rigour. Rather than automating the decision, the tool gives the mapper the best possible information to make an informed judgment about where a unit was and what they were doing.
12
19
188
24,939