
#Vidaslivestre/ #pixelart/ #bitcoin stamps . 🐐🐒🌵🐸 BTC
Joined September 2021
- Tweets 5,451
- Following 2,540
- Followers 610
- Likes 28,595
522 Photos and videos


TEPIXELA₿S retweeted

Jun 4
Now we have an UNPRUNABLE BLOCKCHAIN running on Bitcoin.
I've managed to build a blockchain that exists inside of a Bitcoin Stamp.
WP: 57z3n0.github.io/stampcoin-w…
Link: 57z3n0.github.io/stampcoin-w…
TX: af8597bd02c67de20840c543d4d557c40d1a90425e6659e30a46afba24f77a19
12
17
57
3,462
TEPIXELA₿S retweeted

May 29
Incredible! We Love to see it! 🐸🫂☕️🇵🇹
@PepeVault1 @NFCsummit @FAKERARES_XCP @NotablePepes @Stampchain @kaleidoscopexcp
May 29

This is the most important tweet of our lives.
We’re excited to introduce PepeVault, the traveling exhibition dedicated to the real on-chain Pepe lore, organized by our friends at @pepevault1
NFC Lisbon, June 4–6, pepevault.lol

5
19
334
TEPIXELA₿S retweeted

May 27
Have you played with the ACME testnet yet? testnet.acme.pics/
🚀 ACME PROTOCOL — PATH TO SUCCESS
*Your complete 101 dummies guide for new users on Bitcoin Testnet4*
This is the official “checklist to become dangerous” on ACME.
Everything is on testnet — tBTC has zero real value, so go wild and FAFO responsibly.
Click any task below to expand the exact step-by-step instructions in the original interactive version (testnet.acme.pics).
You’ll go from total noob to on-chain legend in ~19 tasks.
Total tasks: 19
Legend:
🟢 Beginner
🔵 Intermediate
🟣 Advanced
🟠 Master
---
### 🟢 TIER 1 — BEGINNER
Start Here — No Excuses (7 tasks)
01. Connect to ACME Testnet
*"Where do I go and how do I get started?"*
1. Install the Unisat Wallet browser extension from unisat.io
2. Open Unisat → network dropdown → switch to Bitcoin Testnet4
3. Go to testnet.acme.pics
4. Click Connect Wallet (top right) and approve the Unisat popup
Tip: Always double-check you’re on Testnet4. Testnet BTC = play money.
02. Get Testnet BTC from the Faucet
*"Need some tBTC if you're gonna FAFO on ACME."*
1. Once connected, find Faucet in the ACME navigation menu
2. Your wallet address should auto-fill (or paste it manually)
3. Click Request tBTC
4. Check your Unisat balance — it lands quickly
Tip: Faucets have cooldowns. If it doesn’t work instantly, wait a few minutes and try again.
03. Change Your Theme in Settings
*"I'm more of a pink/dark theme kinda guy. Blossom looked great."*
1. Click your profile icon or Settings
2. Find the Theme section
3. Pick Blossom (pink/dark) or any other vibe you like and save
Tip: Theme saves to your account and will carry over to mainnet.
04. Create a Profile Asset
*"Let me make my presence known in the Bitcoin ACME universe."*
1. Go to Create → Profile
2. Upload image (JPG, PNG, GIF, SVG, or even MP4)
3. Give it a name (min 3 characters)
4. Choose storage: On-chain (forever on Bitcoin) or Arweave
5. Hit Mint and sign in Unisat
Tip: This is your permanent identity on ACME. Spend 5 minutes making it good.
05. Create an Asset
*"Let me put my artwork on ACME."*
1. Go to Create → Asset
2. Upload your file (images, audio, video — almost anything works)
3. Add name description
4. Fill in Relationship fields if linking to a Collection
5. Choose storage and Mint
Tip: This creates a 1-of-1. Want multiple copies? See Task 09.
06. Create a Collection
*"All my artwork will be forever shown in my Collection."*
1. Go to Create → Collection
2. Name it (this becomes your brand)
3. Add cover image description
4. Mint it
5. Future assets: type your Collection name in the Relationship field
Tip: Collections are on-chain and permanent. Choose the name wisely.
07. Confirm Your Asset on the Block Explorer
*"Is this working? Let me check the Block Explorer."*
1. After minting, copy the txid shown by ACME
2. Go to mempool.space/testnet4
3. Paste the txid
4. Wait until it says Confirmed
Tip: Testnet can be slow. Pending for 10 minutes is normal — don’t mint again.
---
### 🔵 TIER 2 — INTERMEDIATE
Getting Dangerous (5 tasks)
08. Deploy a Fungible Token
*"Why stop with just art when you can FAFO with some tokens."*
1. Go to Create → Token
2. Set ticker (e.g. `$MYTOKEN`), supply, decimals
3. Choose ATS-20 standard
4. Deploy and sign
Tip: Tickers are first-come, first-served and case-sensitive. Testnet = free experimentation.
09. Issue Editions for Your Asset
*"Having the 1:1 is cool, but how do you make more copies to sell?"*
1. Open any asset you own
2. Click Issue Editions
3. Choose how many copies
4. Sign the transaction
Tip: Editions are numbered (1/50, 2/50…). Lower numbers hit different.
6
12
633
TEPIXELA₿S retweeted
May 28
GM!
Question: What is true digital permanence?
6
14
526
TEPIXELA₿S retweeted
May 26
Change is needed in the Bitcoin ecosystem. All creators, builders, artists, investors, and collectors need to understand the risks of centralized indexing and centralized marketplace.
3
8
19
337
TEPIXELA₿S retweeted
May 22
We are honored to announce that Contemporary Buddhist artist @paperbuddha is joining the ACME Team as a new ambassador!
Paper Buddha will be joining us in our quest to provide artists, collectors, and investors with the true ethos of blockchain for their assets through deeper decentralization, next level nativity, a permissionless marketplace, and true verifiable ownership.
6
5
28
2,154
TEPIXELA₿S retweeted

May 21
Using the ACME Cortex, you can easily cross-reference assets from other protocols and blockchains. For example, the entire NSID directory from @BTCArtDirectory is beautifully rendered on the ACME Cortex
Join Telegram channel for most updated news.
t.me/acmeonbtc/1
Open Testnet Live:
testnet.acme.pics
@ACMEonBTC #ACMECortex #BTCinnovation #Bitcoinstamps #NSID

2
5
13
711
TEPIXELA₿S retweeted
May 19
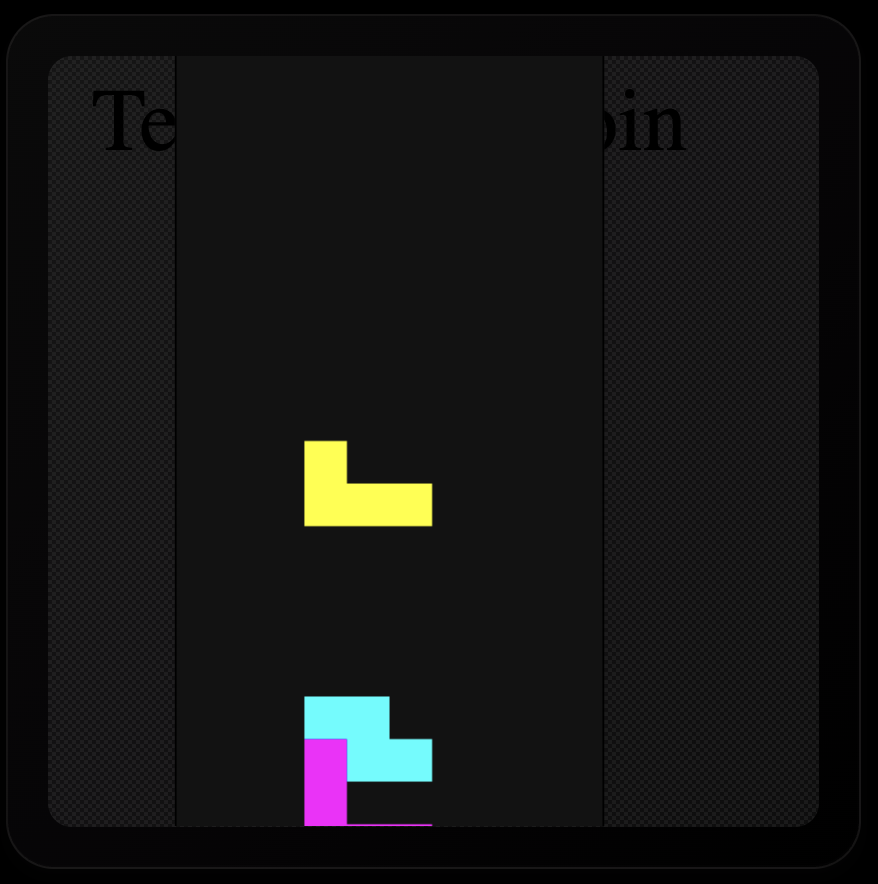
All of the UNPRUNABLE games I've created on Bitcoin Stamps so far:
1. Snake Game 1/1 (The first Game on Stamps): stampchain.io/stamp/18288
2. Tetris 1/1 (The second game on Stamps): stampchain.io/stamp/18453
3. Game of Life (The first zero-player game): stampchain.io/stamp/69439

1
8
26
330
TEPIXELA₿S retweeted

💡🟠 Why ACME Protocol is taking BTCFi* to the next level? ( 🧵 Thread 👇)
Most BTCFi today is still limited: lend BTC, stake wrapped BTC, or trade on sidechains.
ACME protocol @ACMEonBTC will changes the game com pletely.
You can now swap ANY Bitcoin-native digital asset directly against each other $BTC, NFTs, $ACME Token, Memecoins, Bitcoin Tokens… all on one unified protocol.
No bridges. No wrapping. No fragmentation. Pure Bitcoin liquidity.
*Bitcoin decentralized finance

1
3
18
356

4
6
20
307
TEPIXELA₿S retweeted
May 18
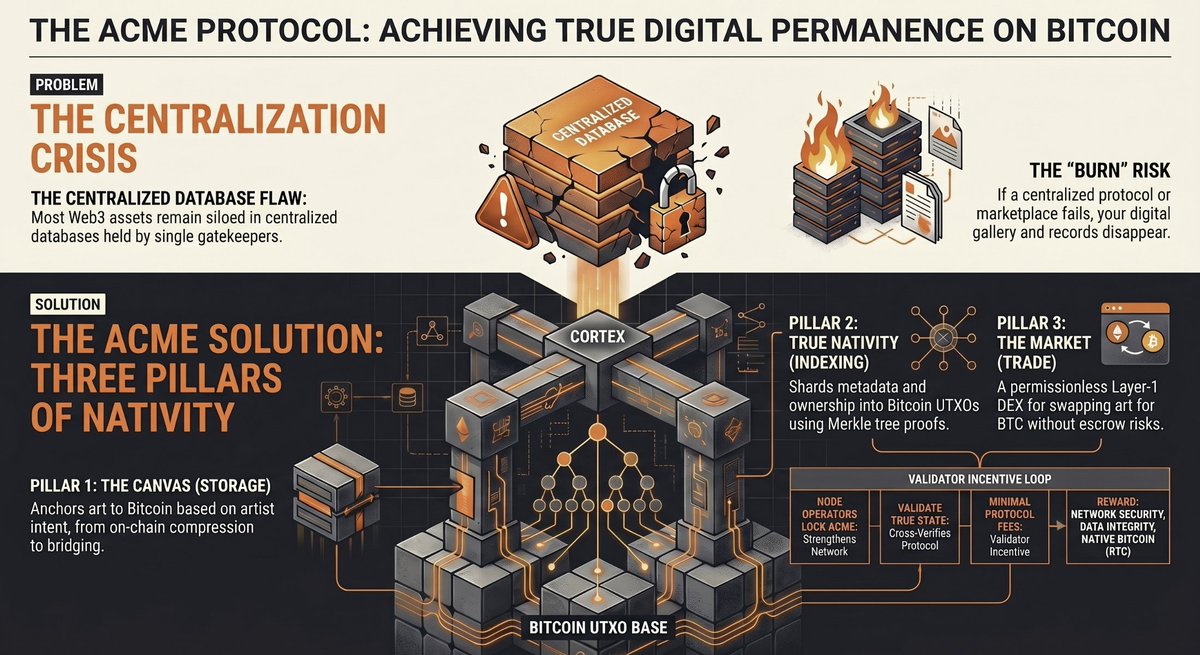
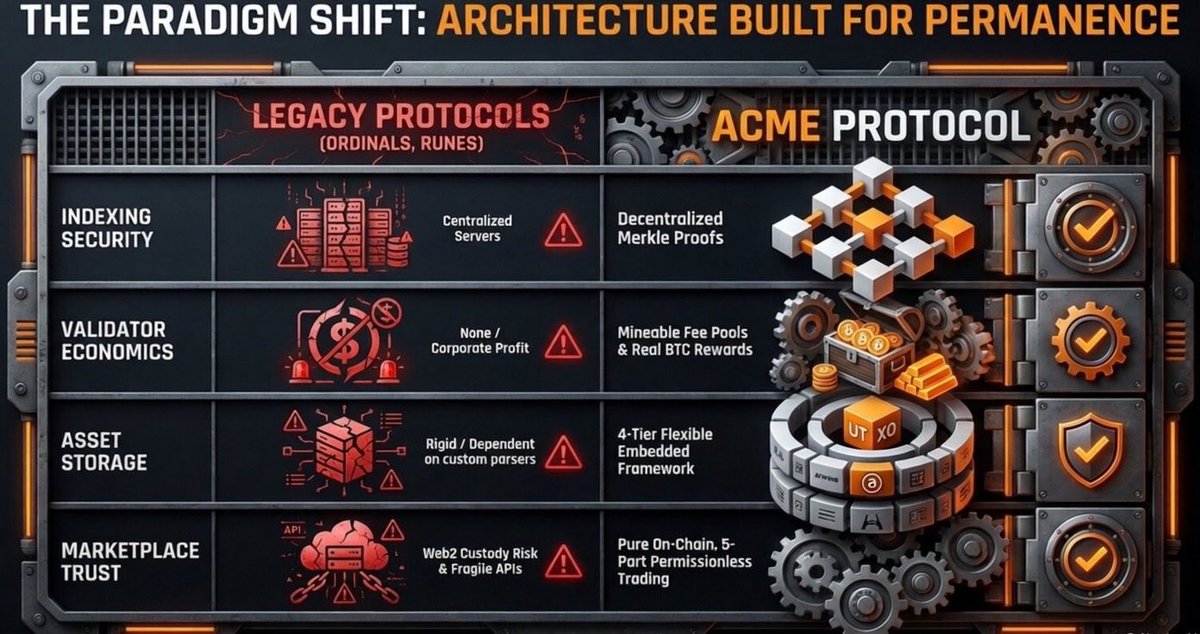
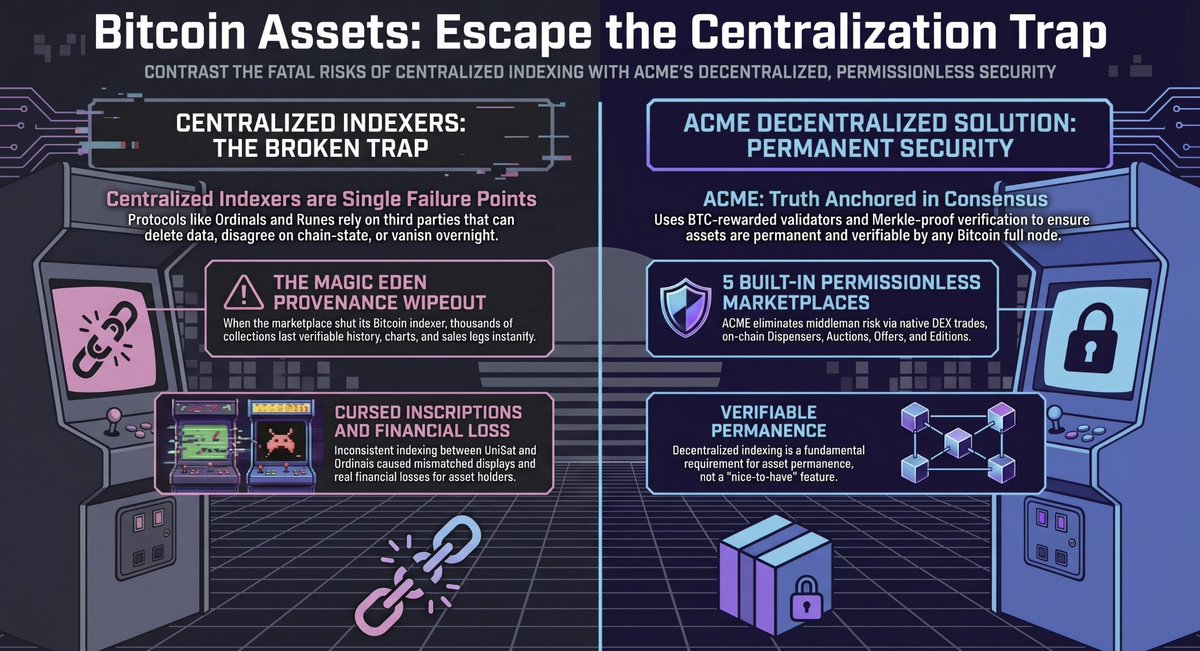
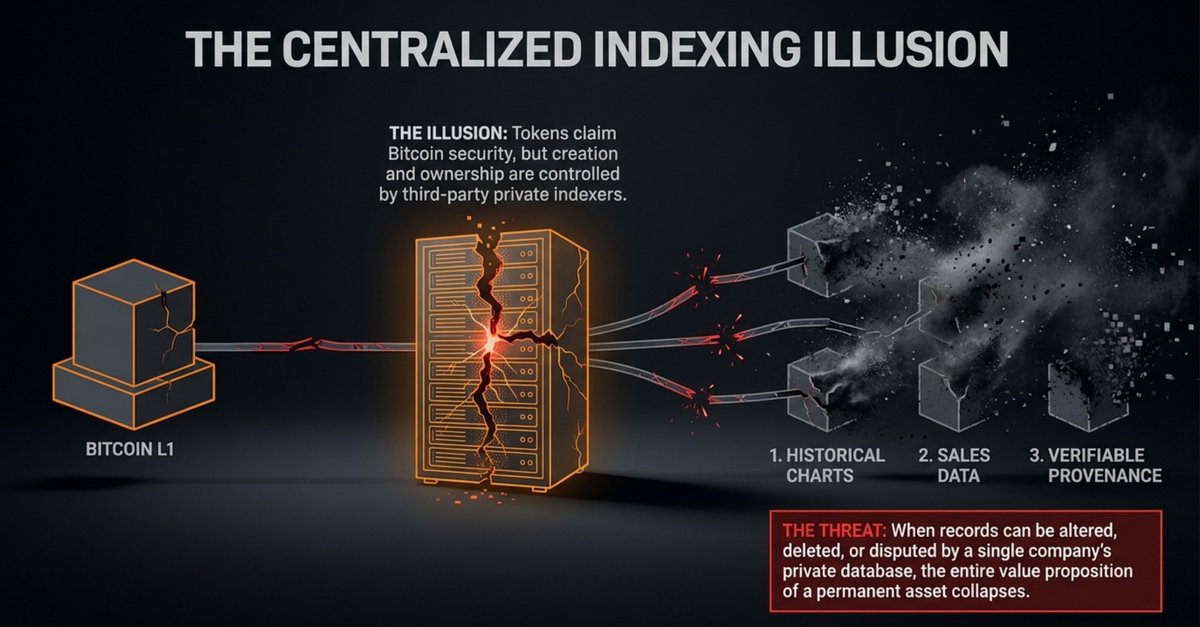
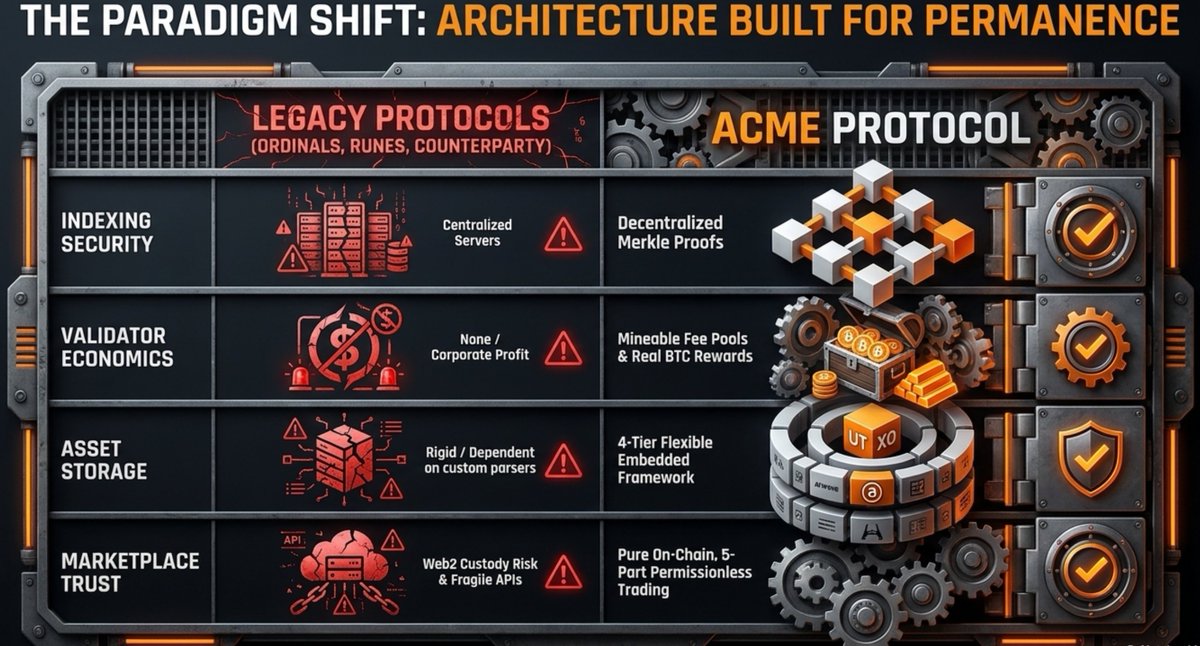
Artists collectors and investors the time has come to demand decentralized indexing, next level nativity, and permissionless marketplaces.
Centralized platforms have failed us with fragmentation trust vulnerabilities and control that puts artists collectors and investors at constant risk of thefts, pump and dumps, data loss, and lost ownership. Bitcoin itself is decentralized and permissionless so its asset infrastructure must match that standard without compromise.
ACME Protocol delivers precisely these standards as the first truly decentralized permanent digital asset meta protocol native to Bitcoin. It pioneers decentralized indexing and next level nativity and Merkle proof verification. It includes five built in permissionless marketplace options all secured by BTC rewarded validators used to decentralize indexing/validation.
Artists gain flexibility through the 4 methods for embedding data on Bitcoin which gives artists option: UTXOs, Witness data, OP RETURN, and Arweave linked.
Testnet LIVE testnet.acme.pics/

6
17
552
TEPIXELA₿S retweeted
May 16
BAYC on ACME testnet. Mint yourself some free Ape and test out the ACME testnet platform.
First is first.
testnet.acme.pics/dex/nft/ed…
#ACMEProtocol @ACMEonBTC #BTCInnovation #FAFO
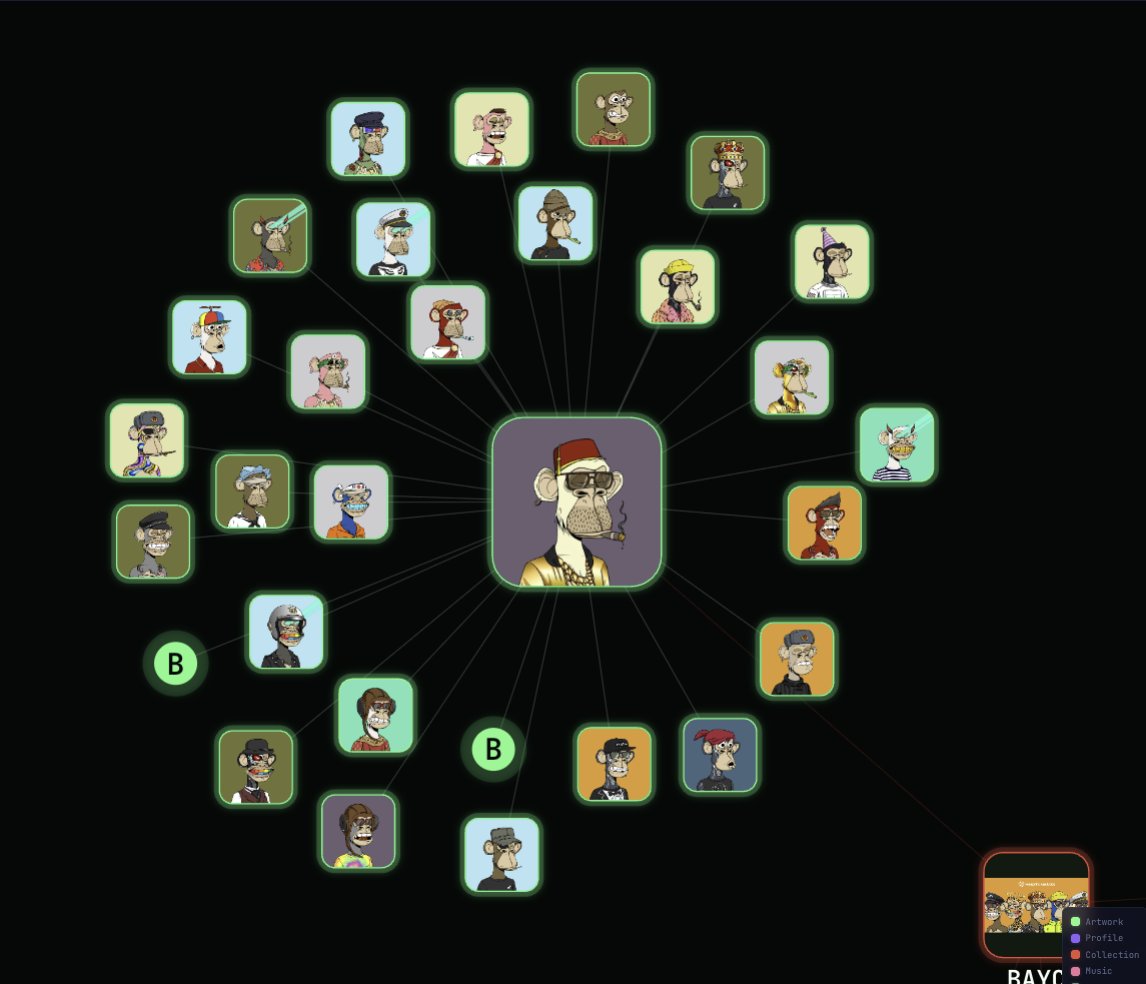
May 14

Late-night FAFO session with the ACME Studio & Runtime ✅
Took a few tries, but I finally got BAYC collection running perfectly on the ACME testnet. This is exactly why ACME is so powerful — any creator can now launch their own high-quality PFP collection with ease.
In the meantime, go grab yourself some free Apes on ACME Testnet (only 1,000 mints available)!
BAYCONAMCE05 testnet.acme.pics/dex/nft/ed…
Join Telegram for updated news:
t.me/acmeonbtc/1
#PFP #NFT #Web3 #Crypto #Testnet #FreeMint #CreatorEconomy @ACMEonBTC #Bitcoin
1
4
7
410

TEPIXELA₿S retweeted
May 12
"Real innovation hits different — it’s usually so damn obvious that you’ll look back one day and kick yourself for sleeping on it. 😩
Don’t say I didn’t warn you. @ACMEonBTC 🔥"
2
8
106

TEPIXELA₿S retweeted

May 10
onchain ownership has a sideproduct, and that is a immutable record of the art.. maaaany relevant artworks with great story and provenance have been lost and forgotten along the way.. Keeping the records on bitcoin, onchain is the best bet to preserve the data currently.. $ACME with CORTEX solution for storing digital ownership, provenance and story of culturally relevant and also absolutelly irrelevant artworks.
1
3
12
657
TEPIXELA₿S retweeted
May 10
We agree as long as the "NFTs" respect the true ethos of blockchain and decentralized networks 🧡


Art has always priced on three things: provenance, story, and cultural relevance and on chain ownership doesn't replace any of them.
On the contrary, NFTs upgrade all three.
6
9
645
TEPIXELA₿S retweeted
May 10
Artists, collectors, and investors:
If you don’t want more Magic Eden scandals, Foundation shutdowns, "cursed" asset numbering, Nifty Gateway-style centralization, or Gondi-level risks… it’s time to deeply understand full decentralization and permissionless marketplaces.
Your ownership, your money, your art, your assets, and true immutability all depend on it.
ACME Protocol is building precisely this future, decentralized indexing, native UTXO storage, Merkle-proof verification, and 5 built-in permissionless trading options with zero intermediaries.
Testnet LIVE 👉 testnet.acme.pics/
1
11
31
5,606
TEPIXELA₿S retweeted
May 6
Decentralized indexing, permissionless marketplaces, and creator embedding options are critical because centralized platforms repeatedly expose Bitcoin assets to thefts, manipulation, and loss of control.
ACME solves this with native on-chain tools: trustless indexing for reliable discovery, five permissionless trading mechanisms, and seamless embedding. All delivering true censorship-resistant ownership.
This alignment with Bitcoin’s core principles enables artists to build sustainable, sovereign careers without intermediaries 🟠🟠🟠🟠🟠
TESTNET IS LIVE testnet.acme.pics/
1
5
15
326