
Joined April 2013
- Tweets 774
- Following 490
- Followers 2,454
- Likes 2,183
119 Photos and videos


Pinned Tweet

Feb 3
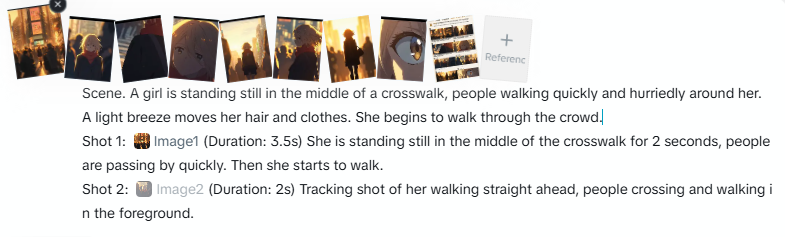
I’ve finally applied #ViduQ3 to a narrative project for @SquadBlastgame . It handles action sequences and explosions with a level of consistency I hadn’t seen before.
I achieved camera movements I’ve had in mind for a long time that other models simply wouldn't allow me to implement.
The Start-end frame option generates high-quality animations with great control, provided you choose the points wisely and give the model enough time to generate the full movement fluidly.
Grok surprised me with its iteration speed. I use it to bring dynamism to establishing shots and dialogue scenes that require quick corrections. If the scene needs movement, it’s my first choice.
For more paced scenes or dialogues in wide shots, I prefer Sora 2. It is better suited for maintaining character style in distant shots, where Grok tends to struggle.
The music was created in Suno (Industrial Tech-Step). I was looking for a sense of movement through minor-key synth arpeggios and extreme reverb. The "Studio" feature allowed me to precisely control the intro length and the exact point where the kick hits.
Finally, a huge thanks to @Framer_X for the amazing work on Cartoon Hero and for helping me connect with the professional world, and to @Artedeingenio for his SREFs.
I didn't have much time to develop the art style from scratch, so I used one of the SREF he shares. It fit perfectly with the bluish palette and the Otomo-inspired retro sci-fi style I was aiming for. It easily saved me a full day of work.
IF ANYONE HAS ANY TECHNICAL KNOW-HOW QUESTIONS RELATED TO ANY SEQUENCE FEEL FREE TO ASK IN THE COMMENTS.
36
16
159
16,759
Jun 1
Cartoon Hero 3.0 is launching!
Registrations are open for this week only!
(launch date 2nd to 8th June)
This is where I started learning AI animation.
It’s not just a course; it’s a community of over a thousand AI animators featuring:
-Dozens of courses
-Exclusive member contests with thousands of dollars in prizes
-Discord server with professionals from the film, advertising, and animation industries
-Job opportunities
I am an active member of this community. It has not only taught me a lot, but it has also opened doors for professional work.
Don't miss out on this opportunity—join our community today 👇
8
4
42
155,486
May 30
People often don't realize that for some, tech, science, research, and exploring how these fields connect with humanity is their natural way to express themselves.
May 29

I have decided to drop out of the AI program at Amazon. I will not be making a Punky Duck series. Actions speak louder than words.
My intent was to showcase artists, both new and seasoned, both inside and outside the studios, driving this new tech.
My sincerest apology to those I upset. I promise to do better moving forward. Thank you for your patience with me. I will try harder.
5
508
VoxelPlot retweeted

I've spent the past couple of weeks refining and re-training an LTX 2.3 subject replacement IC-LoRA
The first iteration was great when you had a character LoRA or wanted to do T2V, but I wanted to see if I could add image reference capability too, which is getting closer
What has started to emerge through the 50 rounds of training is that aside from simply swapping subject A with subject B, it's possible to blur the boundaries of what you're replacing and blend concepts - almost like a "vibe slider", which is something I'm planning to explore some more
For those who are interested in training IC-LoRAs, here are some things I've learned so far:
- Quality of training data > amount of training data. You can get great results with relatively tiny datasets (10-15 pairs) if they're good and the effect you're aiming for is clear
- first_frame_conditioning is a crucial parameter. Higher values will favour replacing every pixel and lower values will ignore reference images, but can be better when using with style LoRAs. Getting the balance right is crucial
- For general purpose IC-LoRAs it can help to train with a low learning rate (5e-5 or less) at more steps, especially if the goal is to only change part of the input video
I'm still pretty early in my IC-LoRA journey and there's lots left to learn, but I'm starting to be convinced that this kind of training is going to be key for future applications of video models
8
16
246
13,755
VoxelPlot retweeted

Comparison of LO work and my finished version!
5
184
1,940
40,930
May 14
I'm finishing up Jujutsu Kaisen and it's a masterpiece of such caliber (layouts, animation, lighting, VFX) that it made me want to make some battle shonen scenes.
I started this scene, but I suddenly got hit with a ton of work and couldn't finish it.
So, I'm going to post what I have so far—if you want me to finish the fight, let me know in the comments or repost!
Since my Japanese friends were the ones who made my last post take off, I've decided to post this during their timezone to show my appreciation. (ありがとうございます)
If I get 100 reposts, I promise to make a part two and put real effort into a great fight scene.
#DreaminaCPP @dreamina_ai
10
3
43
2,069
May 8
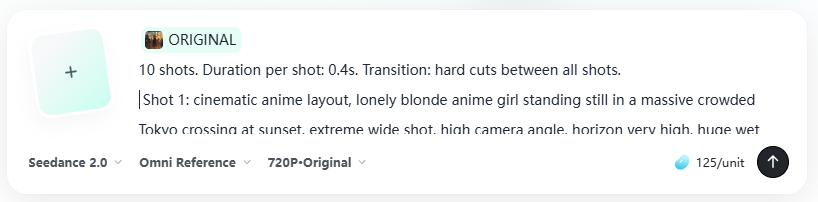
Seedance 2.0 - Advanced Workflows Series
11. Cinematic Camera Angles through Video Gen Specialized Storyboard AI Agent
Are you already getting camera shots and angles through Nano Banana Pro? Take the next step.
Seedance 2.0 has a better spatial understanding of the scene than image generation models. Because it is built to produce cinematic clips, it achieves more beautiful shots and angles than image models like Nano Banana, which are primarily made for image editing.
As an added bonus, Seedance renders the entire space of the scene, so you can get tens of shots with complete spatial and element consistency in a single generation.
Create a specific AI Agent to help you with storyboarding, and feed the input into Seedance to get the most cinematic shots.
You can access Seedance 2.0 now on insMind (link at the end of the thread).
Workflow Prompts👇
21
135
1,044
124,605
May 8
4. Select the Best Shots From Multiple Generations of Video
Analyze the multiple generations and extract the most beautiful shots you can find.
In my case, I kept 16 shots, which I later used to make a small storyboard. I had a total of 16 shots, which I decided to animate in 2 different generations: 8 8.
In each generation, I provided the list of shots, and in each shot's section, I referenced the specific image, so that Seedance would replicate the exact same shot I had obtained in the previous videos.
4
1
20
4,231
May 5
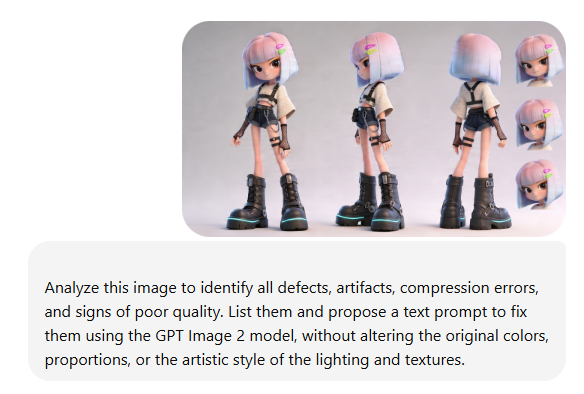
GPT Image 2 - Advanced Workflows
📷Image Upscaling and Restoration
GPT Image 2 is not just an editing model, but one of the best upscalers and image repair models on the market.
It sharpens blurry images and corrects defects caused by successive edits, such as banding, posterization, debanding artifacts, mild blur, edge halos, ringing, dirty edges, compression smearing, and loss of fine detail.
GTP Image 2 is available now in insMind (link at the end of thread).
Workflow Prompts👇
4
6
64
5,043
May 5
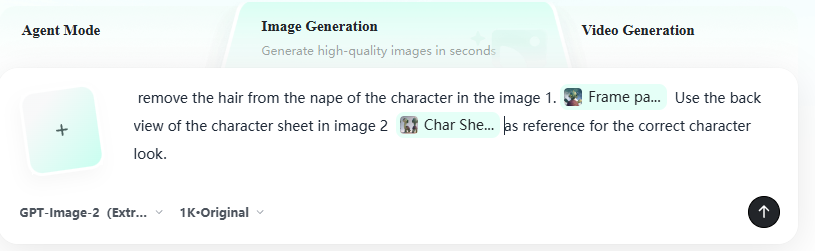
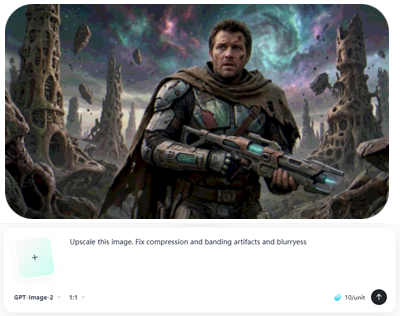
2. Use GPT Image 2 to re-render the image
With the provided prompt, upload the image and ask it to restore, enhance, or upscale it. You can also use a simpler prompt if you only want to upscale and there are 2 or 3 specific defects you have pinpointed and want to fix.
When you only want to improve the resolution, you can add character references so it doesn't modify the textures. Add phrases and images that help preserve the style.
Prompt (upscale with character references): Upscale this image. Preserve colors and lightning and color grade. Use images 2, 3 and 4 as a reference to render look and textures of the characters.
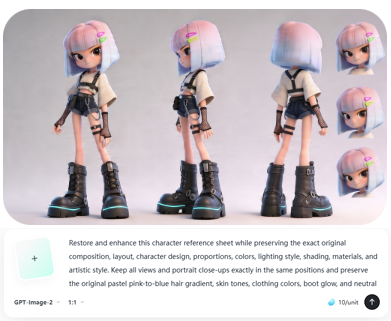
Prompt (image restoration of character sheet): Restore and enhance this character reference sheet while preserving the exact original composition, layout, character design, proportions, colors, lighting style, shading, materials, and artistic style. Keep all views and portrait close-ups exactly in the same positions and preserve the original pastel pink-to-blue hair gradient, skin tones, clothing colors, boot glow, and neutral gray background tone.
Clean up all visible compression and quality defects, including banding, posterization, debanding artifacts, mild blur, edge halos, ringing, dirty edges, compression smearing, and loss of fine detail. Smooth the tonal transitions in the background, hair, skin, and clothing so gradients become clean and continuous, but do not change the original colors or lighting.
Restore fine detail in the hair strands, bangs, clothing fabric, denim shorts, fishnet gloves, straps, buckles, chain, stitching, and boot laces, making them cleaner and sharper without changing the design. Improve edge quality around the hair silhouette, clothes, boots, accessories, and close-up portraits, removing artifacts while keeping the original shape exactly.
Keep the image looking like the same polished 3D stylized character sheet, only cleaner, higher resolution, and artifact-free. Do not redesign any element, do not alter the pose, expression, anatomy, proportions, texture style, or material response. The result should be a high-quality restoration/upscale of the same image, with preserved original colors, preserved proportions, preserved lighting mood, and preserved texture style.
Prompt (realistic image): Upscale this image. Preserve colors and lightning and color grade. Use images 2, 3 and 4 as a reference to render look and textures of the characters.
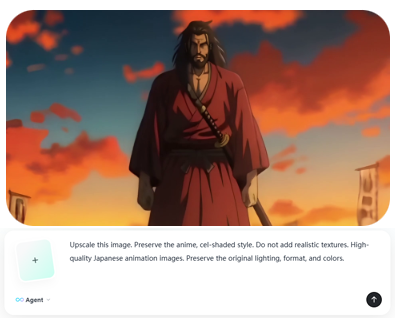
Prompt (anime): Upscale these images. Preserve the anime, cel-shaded style. Do not add realistic textures. High-quality Japanese animation image. Preserve the original lighting, format, and colors.
1
4
1,288
May 3
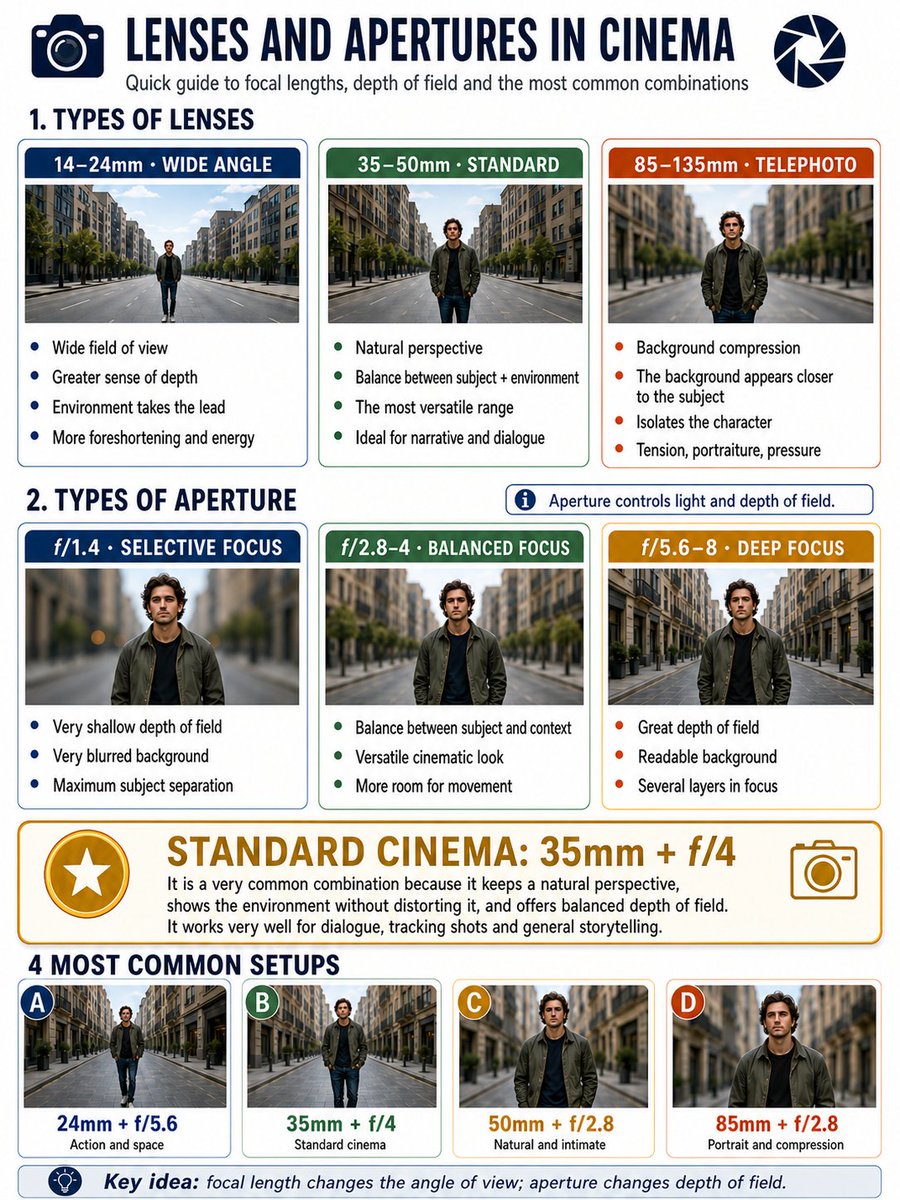
GPT Image 2 is extremely good at infographics. Prompt:
Make a 3:4 format infographic about camera lenses and apertures in cinema.
I want an area with classifications of lenses: 14–24, 35–50mm, 85–135 (3 categories).
And then another area with apertures: 1.4, 2.8–4, and 5.6–8 (3 categories).
Put below each type of aperture an example to see the background blur, and below each type of lens an example to see the perspective.
They would be: 3 types of lenses, three types of focal lengths golden standard in cinema (most common used setup).
And at the very bottom, examples of the 4 most used configurations.
2
1
26
1,504
May 1
Seedance 2.0 - Advanced Workflows Series
10. Fixing AI Artifacts with Video Editing
Use the multi-reference Vid2Vid capabilities of Seedance 2.0 to fix small defects and artifacts in AI-generated shots.
Take a screenshot of the video frame containing the defect, upload it to GPT Image 2, and modify the image so the defect disappears.
Flawed Video Corrected Image: Seedance 2.0 will regenerate the video without the defect.
GPT Image 2 and Seedance 2.0 are now available on insMind (link at the end of the thread).
Workflow Prompts 👇
15
33
309
22,494
May 1
4. Remove the chroma key and composite scenes
DaVinci Resolve has a very powerful effect called 3D Keyer that makes removing the chroma key very simple.
Drag the effect onto your chroma video, and then select the FX Overlay option under the video window.
Open the effects panel and select the eyedropper, then you will be able to select the color in the image to remove it. Hold shift to add more colors and refine.
Tip: set the despill to high values so the effect completely cleans up all the green. Make fine adjustments until you manage to remove the color completely.
Video tutorial 👇
1
8
1,103