
May 25
Building onchain apps on @arc with Circle wallet but not sure which wallet to use?
Let me explain.
Developer-Controlled, User-Controlled, or Modular each one is built for a different use case, and picking the wrong one wastes weeks.
Here's a complete breakdown to help you choose set up the right one from day one
👇🧵
First, the big question:
❓ Who controls the private keys?
→ Your backend controls them = Developer-Controlled
→ The end user controls them = User-Controlled or Modular
This single decision shapes your entire architecture.
DEVELOPER-CONTROLLED WALLETS
Your app holds custody of all private keys.
Users never see or touch them.
Best for:
• Automated payment backends
• AI agents
• Programmatic payouts
• High-TPS systems
Setting up Developer-Controlled Wallets:
1️⃣ npm install @circle-fin/developer-controlled-wallets
2️⃣ Set env vars:
CIRCLE_API_KEY=...
ENTITY_SECRET=...
3️⃣ Generate register your 32-byte entity secret at Circle Console
⚠️ Never share it. Store the recovery file OUTSIDE your repo.
Dev-Controlled SDK init: const client = initiateDeveloperControlledWalletsClient({ apiKey: process.env.CIRCLE_API_KEY, entitySecret: process.env.ENTITY_SECRET, }); Then create a WalletSet → create Wallets inside it → transfer tokens. Each mutating request needs a UUID v4 idempotencyKey.
Dev-Controlled SDK init:
const client = initiateDeveloperControlledWalletsClient({
apiKey: process.env.CIRCLE_API_KEY,
entitySecret: process.env.ENTITY_SECRET,
});
Then create a WalletSet → create Wallets inside it → transfer tokens.
USER-CONTROLLED WALLETS
The end user owns their private keys.
Your app never has custody.
Auth options:
• Google / Apple / Facebook login
• Email OTP
• PIN
Best for:
• Consumer apps
• NFT marketplaces
• DeFi platforms on Ethereum or L2
User-Controlled needs BOTH backend frontend:
npm install @circle-fin/user-controlled-wallets@latest
npm install @circle-fin/w3s-pw-web-sdk@latest
npm install vite-plugin-node-polyfills
Env vars:
CIRCLE_API_KEY= (backend only!)
CIRCLE_APP_ID= (frontend)
🚨 Never expose your API key to the frontend.
How User-Controlled wallet creation works:
1. Backend creates user gets userToken & encryptionKey
2. Backend calls Circle API → gets a challengeId
3. Frontend receives challengeId tokens
4. User approves via Circle's hosted UI
5. Wallet is created ✅
This challenge-response model = user always consents.
Frontend challenge execution:
const sdk = new W3SSdk({ appSettings: { appId: APP_ID } });
await sdk.getDeviceId(); // MUST call this first!
sdk.setAuthentication({ userToken, encryptionKey });
sdk.execute(challengeId, (error, result) => {
// user approved ✅
});
⚠️ Skip getDeviceId() and execute() silently fails.
MODULAR WALLETS (Passkey)
User owns keys via biometric auth (Face ID / fingerprint).
Supports custom smart contract modules.
Best for:
• DeFi apps needing biometric UX
• Multisig setups
• Session keys & spending limits
• Gasless L2 experiences
MSCA account type only.
Modular Wallets — important chain limits:
✅ Supported: Base, Arbitrum, Polygon, Optimism, Avalanche, Unichain, Monad
❌ NOT supported: Ethereum mainnet, Solana, Aptos, NEAR
If you need Ethereum mainnet non-custodial → use User-Controlled EOA instead.
EOA vs SCA — which account type?
🔹 EOA: Default. Works everywhere (EVM Solana Aptos). No creation fees. Higher TPS. Needs native gas tokens.
🔹 SCA: EVM L2s only. Gas sponsorship via Circle Gas Station. Supports batch txns. Avoid on Ethereum mainnet (high gas cost).
Developer Building Pick your wallet:
🤖 Automating payouts / AI agents → Developer-Controlled EOA
👤 Consumer app (Google/email login) → User-Controlled SCA on L2
🔐 DeFi biometric auth custom logic → Modular MSCA on L2
🖼 NFT app on Ethereum → User-Controlled EOA
Docs: developers.circle.com/wallet…
Once again build on @arc the OS infrastructure is designed to suit builders


3
1
12
171

Jan 2
console.log("user token:", userToken)
Security team’s favorite feature.
37
1,470

24 Nov 2025
4/10
Identity & governance use CIP-68 tokens:
• UserToken (identity)
• RefToken (membership & collateral state)
• LoanApp Token (ASCA loan governance)
Every contribution, vote, and penalty is tied to a verifiable on-chain identity.
4
58


28 Sep 2025
$FUNNAI isn't just another speculative token – it's for pure use, based on real AI work. 😎
$FUNNAI's tokenomics is sustainable, with a focus on AI use and decentralization. No speculation – value comes from real work: users deploy mAIners (AI agents) who compete in on-chain challenges on ICP, earning tokens for characters.
#Bitcoin-inspired? Yes! 21 million tokens, a halving of the adoption bonus every 3 months, automatic burn and buyback – all for lasting sustainability. 📈💰
FunnAI Vault? It's an unethical "VC fund" – fully on-chain, a decoupled mechanism inspired by Bitcoin, but with a focus on exploited AI work. It collects fees for deployment, provisioning, and premium features, converts them into $FUNNAI, adds liquidity on @ICPSwap, and 🔥burns tokens, creating constant buying pressure. Everything is independent, no middlemen!
🔒🤖
Join an ecosystem where AI truly works for you – don't speculate, earn money on valuable work. 📊
#funnAI #DeAI #ICP #ProofOfAIWork #UserToken #BlockchainAI #OnChain #NoSpeculation
6
19
762

17 Jul 2025
Sunrise Full Fee Abstraction
At a high level, fee abstraction is a layer of indirection between transaction intent and gas settlement:
Transaction Fee = f(UserToken, ExecutionContext) → RISE
@SunriseLayer abstracts the fee payment interface by embedding a deterministic on-chain asset conversion layer into its transaction pipeline.
This allows users and smart contracts to express transaction fees in arbitrary ERC-20 tokens while ensuring final settlement remains in $RISE.
Fee Token Declaration
Users specify a preferred fee token optional swap parameters
Atomic Conversion Layer
A protocol-native swap mechanism executes a deterministic conversion of the input token to RISE, atomically and just-in-time.
Canonical Settlement
Block producers/sequencers receive RISE, ensuring fee predictability and DoS resistance at the protocol level.

21
19
192

25 Apr 2025
> pulling data from musixmatch is against the ToS
It uses the same api that is used in their mobile app & desktop app (now deprecated). It's nothing against it. We use guest tokens which they used on both platforms to fetch lyrics.
Spotify has lyrics endpoint but requires you to send usertoken: github.com/spicetify/cli/blo…
2
1
2
227

21 Sep 2024
Affection token is mintable by burning 1:1 #pDAI or #pUSDC
Discount depends on the price difference and the gas cost.
Using #Affection allows users to create their usertoken to chat in Dysnomia ecosystem
T.me/affection_pls
@affection_pls
1
2
6
172

27 Aug 2024
If userToken() is using useState(), please use $fetch instead of useFetch to avoid having the user data in the payload twice
1
1
17
1,096

4 Jun 2024
UserToken版SlackAppでマルチチャンネルゲスト問題を回避するの、組織規模によってはSlack管理者とかなり話通じないときつそう。War roomチャンネル諦めてWar roomスレッドで運用してます。スレッドでもわりと大丈夫 #waroom
3
824


17 Apr 2024
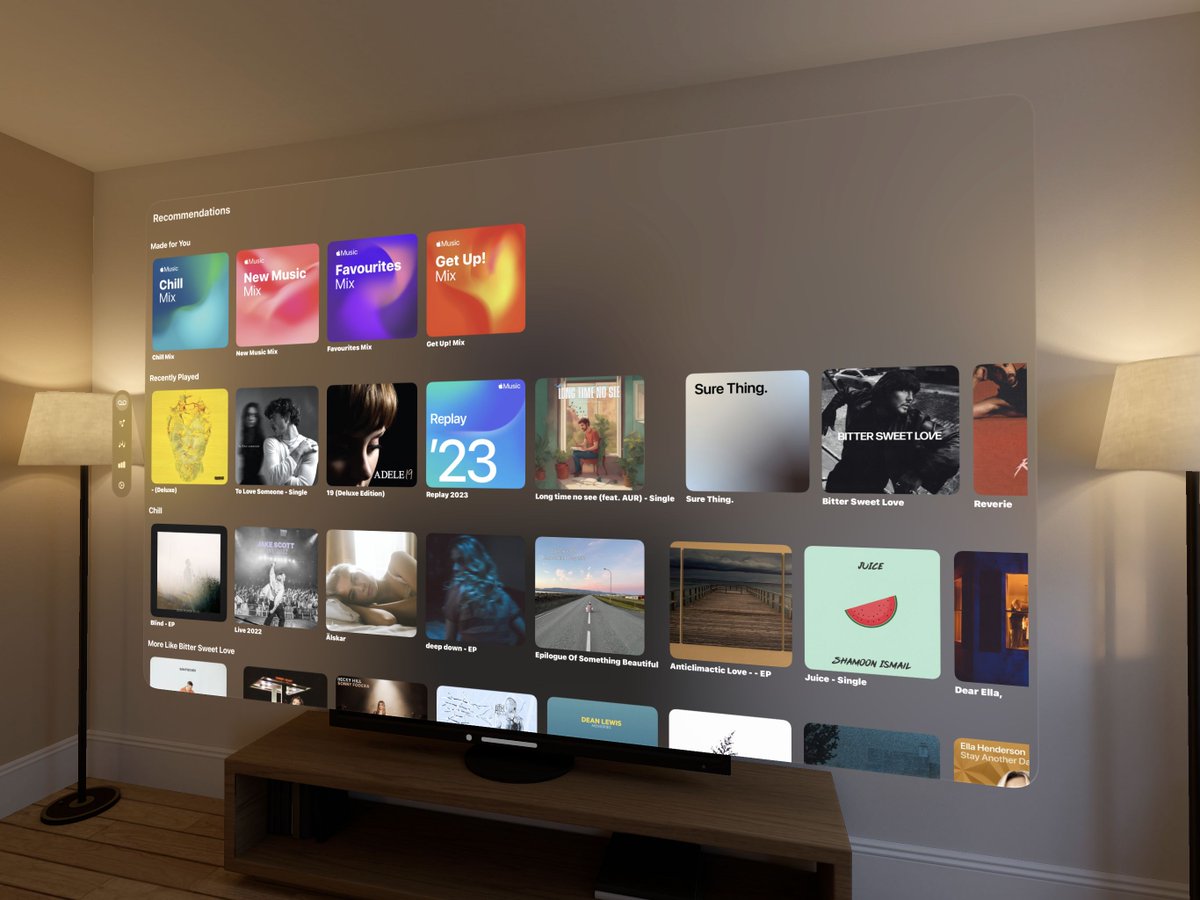
Exploring visionOS and MusicKit: Working with Simulator
If you are a developer interested in working with visionOS & MusicKit, you may have encountered some difficulties when trying to use the simulator.
This is especially true if you do not have access to an Apple Vision Pro or live in a country where visiting a developer lab is not feasible.
I recently faced these same challenges and decided to find a way to work with the simulator for both the catalog and user library. Here is how I did it.
Getting the User Token
To get started, you will need to obtain a user token. You can do this using the following code:
do {
let developerToken = try await DefaultMusicTokenProvider().developerToken(options: .ignoreCache)
let userToken = try await DefaultMusicTokenProvider.init().userToken(for: developerToken, options: .ignoreCache) print(userToken)
} catch {
print(error)
}
This code will print the user token to the console.
Using MusadoraKit
Once you have the user token, you can use MusadoraKit to work with the simulator. MusadoraKit (github.com/rryam/MusadoraKit) is a library that simplifies the process of working with MusicKit.
You will need to set the environment variable for the scheme in Xcode. The variable should be called "USER_TOKEN" and its value should be the user token you obtained in the previous step.
Then use the methods for getting user-related items like recommendations:
@State private var recommendationStations: Stations = []
recommendationStations = try await MRecommendation.defaultStations()
This code should work correctly and show user-related items in the visionOS simulator. Note that it is using the Apple Music API instead of MusicKit.
Mocking Data in Now Playing View
To mock the data in the now-playing view, you can set the current entry of the queue directly in the simulator. Here is an example:
public func play(with song: Song, for songs: Songs) async throws {
ApplicationMusicPlayer.shared.queue = ApplicationMusicPlayer.Queue(for: songs, startingAt: song)
#if DEBUG
ApplicationMusicPlayer.shared.queue.currentEntry = .init(song)
#endif
try await ApplicationMusicPlayer.share…()
}
This code sets the current entry of the queue to the given song, which will populate the data of your now playing view for you to work on your UI. Note that while it may not play the song, it will display the song's data.
Conclusion
Working with the simulator for visionOS can be challenging, but with some adjustments, you can work with both the catalog and user library. By getting the user token and mocking the data in the now playing view, you can develop and test your app's UI without needing an actual $3500 device!
1
12
1,386

3 Apr 2024
🚨 CrossFi testnet - Chống chỉ định với cheaters
🎉Airdrop khủng - đã xác nhận airdrop
lên tới $100.000.000 MPX
💸Vốn: 0đ
⏰Time: 10 phút - dailys - 60 days left
💰 Tiềm năng: $5000
▶️Làm theo HD sau để nhận Airdrop - Chống
1/ Truy cập testpad.xfi.foundation connect metamask chuyển qua XFI chain
2/ Faucet token XFI và MPX góc phải màn hình qua telegram - bấm trực tiếp để xác nhận telegram chính chủ, rồi quay ra ngoài claim
3/ Vào test.xficonsole.com/wallet import seedphrase của Metamask vào
4/ Task kiếm XFT: có 6 task
Task 01: gửi MXP hoặc XFI trên cosmos tới 1 địa chỉ ví khác, quay về mục Operation history, copy hash quay về tab earn XFT, bấm vào check paste Txhash! bấm lại check
Task 02: Gửi XFI trên EVM tới một địa chỉ khác, quay về mục Operation history, copy hash quay về tab earn XFT, bấm vào check paste Txhash! bấm lại check
Task 03: Multsgn 01 - Gửi cùng lúc tới 2 địa chỉ ví cosmos khác nhau token MXP hoặc XFI, quay về mục Operation history, copy hash quay về tab earn XFT, bấm vào check paste Txhash! bấm lại check
Task 04: Multsgn 02 - Gửi cùng lúc tới 1 hoặc 2 địa chỉ ví cosmos cùng lúc 2 loại token MXP và XFI, quay về mục Operation history, copy hash quay về tab earn XFT, bấm vào check paste Txhash! bấm lại check
Task 05: Bond MXP vào mục "Staking" chọn validator, chọn số lượng để MXP để stake, quay về mục Operation history, copy hash quay về tab earn XFT, bấm vào check paste Txhash! bấm lại check
Task 06: sent token XFT tới một địa chỉ ví khác ở chain EVM, vào Wallet ở tab Console, bấm vào EVM, chọn import, vào mục usertoken copy và paste contract token XFT
0xDb5C548684221Ce2f55F16456Ec5Cf43a028D8e9
Bấm sent và sent 1 lượng bất kỳ. quay về mục Operation history, copy hash quay về tab earn XFT, bấm vào check paste Txhash! bấm lại check
👉P/s: Nếu mọi người chưa có ví để chuyển có thể tạm sử dụng ví của mình:
EVM:
0x76bf0b7d61878ec164618ae00f2b83fb7d3d3b54
0x1858850485E63C868473e51eE833f1b2c8739D0B
0x34d326628b84bb921de8da41f8195ae23a84fd4c
Cosmos:
mx1w6lskltps78vzerp3tsq72urld7n6w65vnedp5
mx1rpvg2py9uc7gdprnu50wsvl3kty888gtzcwzu5
mx1xnfjvc5tsjaey80gmfqlsx26ugagfl2vwr2j2r
🙏 Anh em comment địa chỉ ví EVM và cosmos ở dưới bài để mọi người cùng làm testnet nha
Tham khảo thêm HD tại đây!
docs.crossfi.org/crossfi-fou…
🗣️Share kèo airdrop chất lượng cao tại:
👉Telegram Channel: t.me/airdrop136
👉 Telegram Chat: t.me/airdrop136chat
👉 Youtube: youtube.com/@Airdrop136
👉 debank Web3 ID: Airdrop136
#Retroactive #airdrop136 #Testnet
3 Apr 2024

🎊 CrossFi testnet - Confirmed airdrop!
💸Vốn: 0 đ
⏰Time: 10 phút/ngày - 60 days
💰Tiềm năng: $5000
▶️Cách thức thực hiện:
1/ Truy cập testpad.xfi.foundation connect metamask chuyển qua XFI chain
2/ Faucet token XFI và MPX góc phải màn hình qua telegram - bấm trực tiếp để xác nhận telegram chính chủ, rồi quay ra ngoài claim
3/ Vào test.xficonsole.com/wallet import seedphrase của Metamask vào
4/ Task kiếm XFT
- Sent on chain EVM, cosmos qua các ví khác, copy Txhash trong Operaion history của test.xficonsole.com/wallet và dán vào Mục testpad.xfi.foundation/earn-… bấm check để kiếm điểm
- Mulltisend: chọn 1 địa chỉ, gửi, và chọn nhiều địa chỉ gửi
- Chuyển nhượng token có thể làm theo cách sau: Vào wallet, tiếp theo vào import token paste contract vào mục usertoken để add thêm token XFT 0xDb5C548684221Ce2f55F16456Ec5Cf43a028D8e9
Chọn gửi đến địa chỉ ví bất kỳ bên EVM để gửi 1 lượng bất kỳ!
- Bond (trái phiếu): vào mục Staking ở test.xficonsole.com/validato… chọn Bond và bond token. chọn validator, chọn token để bond!
P/s: Nếu mọi người chưa có ví để chuyển có thể tạm sử dụng ví của mình:
EVM: 0x76bf0b7d61878ec164618ae00f2b83fb7d3d3b54
Cosmos: mx1w6lskltps78vzerp3tsq72urld7n6w65vnedp5
🙏 Anh em comment địa chỉ ví EVM và cosmos ở dưới bài để mọi người cùng làm testnet nha
Tham khảo thêm HD tại đây!
docs.crossfi.org/crossfi-fou…
🗣️Share kèo airdrop chất lượng cao tại:
👉Telegram Channel: t.me/airdrop136
👉 Telegram Chat: t.me/airdrop136chat
👉 Youtube: youtube.com/@Airdrop136
👉 debank Web3 ID: Airdrop136
#Retroactive #airdrop136 #Testnet
8
8
19
2,390
3 Apr 2024
🎊 CrossFi testnet - Confirmed airdrop!
💸Vốn: 0 đ
⏰Time: 10 phút/ngày - 60 days
💰Tiềm năng: $5000
▶️Cách thức thực hiện:
1/ Truy cập testpad.xfi.foundation connect metamask chuyển qua XFI chain
2/ Faucet token XFI và MPX góc phải màn hình qua telegram - bấm trực tiếp để xác nhận telegram chính chủ, rồi quay ra ngoài claim
3/ Vào test.xficonsole.com/wallet import seedphrase của Metamask vào
4/ Task kiếm XFT
- Sent on chain EVM, cosmos qua các ví khác, copy Txhash trong Operaion history của test.xficonsole.com/wallet và dán vào Mục testpad.xfi.foundation/earn-… bấm check để kiếm điểm
- Mulltisend: chọn 1 địa chỉ, gửi, và chọn nhiều địa chỉ gửi
- Chuyển nhượng token có thể làm theo cách sau: Vào wallet, tiếp theo vào import token paste contract vào mục usertoken để add thêm token XFT 0xDb5C548684221Ce2f55F16456Ec5Cf43a028D8e9
Chọn gửi đến địa chỉ ví bất kỳ bên EVM để gửi 1 lượng bất kỳ!
- Bond (trái phiếu): vào mục Staking ở test.xficonsole.com/validato… chọn Bond và bond token. chọn validator, chọn token để bond!
P/s: Nếu mọi người chưa có ví để chuyển có thể tạm sử dụng ví của mình:
EVM: 0x76bf0b7d61878ec164618ae00f2b83fb7d3d3b54
Cosmos: mx1w6lskltps78vzerp3tsq72urld7n6w65vnedp5
🙏 Anh em comment địa chỉ ví EVM và cosmos ở dưới bài để mọi người cùng làm testnet nha
Tham khảo thêm HD tại đây!
docs.crossfi.org/crossfi-fou…
🗣️Share kèo airdrop chất lượng cao tại:
👉Telegram Channel: t.me/airdrop136
👉 Telegram Chat: t.me/airdrop136chat
👉 Youtube: youtube.com/@Airdrop136
👉 debank Web3 ID: Airdrop136
#Retroactive #airdrop136 #Testnet
1
3
8
3,503
18 Feb 2024
They have made it public, but not open* 😅
public func userToken(for developerToken: String, options: MusicTokenRequestOptions) async throws -> String
2
447
18 Feb 2024
The end goal is something like this:
let developerToken = "YOUR_DEVELOPER_TOKEN"
let userToken = "YOUR_USER_TOKEN"
let tokenProvider = CustomTokenProvider(developerToken: developerToken, userToken: userToken)
MusicDataRequest.tokenProvider = tokenProvider
3
404
18 Feb 2024
I got fed up that you cannot load the user's library-related items in the simulator to debug, so I created a wrapper in MusadoraKit to do so.
Now, you can add your userToken and debug library-related items in the simulator itself!
github.com/rryam/MusadoraKit…
3
22
2,710

11 Feb 2024
It’s #UserToken holder #trivia Sunday. 1-3pm est. today. Join us for some fun and get free #USR for joining us. Ends just in time for the #SuperBowl to start. #BTC #BNB #GetFitMining #GroveX #Embr discord.gg/nNaREwZ7ws
3
2
203
3 Feb 2024
Tomorrow is #UserToken #trivia from 1pm-3pm! Come hang out with us and get free #USR. #bnb #BTC #GetFitMining #GroveChain #Embr discord.gg/QmZUvNUrHR
1
5
9
384
20 Jan 2024
Sunday is #UserToken holder #trivia. Join us at 1pm-3pm est. this coming Sunday for some fun and get free #USR. #bnb #BTC #GroveCoin #Embr #GetFitMining discord.gg/U7r8UDuS2g
4
5
263