
OHMTGFUCKJWB DJJAJFB ROJMYGID DN HOMYGOS FNNANFNAM cashdummy sounds cute but... hear me out if i call them StoredData....... like... cashier works in a store.... and dummy's purpose on the whole game in general...
i love StoredData....
anon im going INSANE please reveal urself

4
179

19 May 2025
Is there anyone one who wants to build on #Trac
🧱 Understanding Trac Network's Smart Contract Architecture
In the Trac Network, smart contracts are composed of two primary components:
1. Protocol: This defines how peers communicate, handle transaction data, and map incoming commands to specific contract functions.
2. Contract: This contains the core logic that executes in response to the protocol's directives.
This separation allows for flexible and modular design, facilitating more straightforward updates and maintenance.
---
🛠️ Step-by-Step Guide to Building a Smart Contract on Trac Network
1. Set Up Your Development Environment
Install the Trac Peer SDK: Begin by installing the trac-peer package, which provides the necessary classes and methods for developing on the Trac Network.
npm install trac-peer
Initialize Your Project: Set up your project directory and initialize it with your preferred package manager (e.g., npm or yarn).
2. Create the Protocol Class
The protocol class extends the base Protocol class from the trac-peer package. It handles incoming transactions and maps them to the appropriate contract functions.
import { Protocol } from "trac-peer";
class SampleProtocol extends Protocol {
constructor(peer, base, options = {}) {
super(peer, base, options);
}
async extendApi() {
this.api.getSampleData = function () {
return "Some sample data";
};
}
mapTxCommand(command) {
let obj = { type: "", value: null };
if (command === "storeData") {
obj.type = "storeData";
obj.value = { data: "Example data" };
}
return obj;
}
}
In this example, when a transaction with the command storeData is received, it maps to the storeData function in the contract with the provided data.
3. Develop the Contract Logic
The contract class contains the business logic and responds to the protocol's instructions.
import { Contract } from "trac-peer";
class SampleContract extends Contract {
constructor(protocol, base, options = {}) {
super(protocol, base, options);
}
async storeData(payload) {
const { data } = payload;
await this.base.set("storedData", data);
return { success: true, message: "Data stored successfully." };
}
}
Here, the storeData function saves the provided data to the contract's storage.
4. Deploying the Contract
To deploy your contract:
Package Your Protocol and Contract: Ensure both classes are correctly exported and bundled.
Use the Trac CLI or API: Deploy your contract using Trac's command-line interface or API, specifying the protocol and contract files.
Register with Validators: Interact with MSB validators to get your transaction validated and appended to the decentralized ledger.
---
📚 Additional Resources
Trac Network Documentation: Provides comprehensive guides and examples.
Example Contracts Repository: Explore sample contracts to understand best practices.
Trac Network Community: Join the Discord or Telegram channels to connect with other developers.
19 May 2025

Who's going to build fast ordinals trading on Trac Network? docs.trac.network/documentat…
2
3
27
986

22 Feb 2025
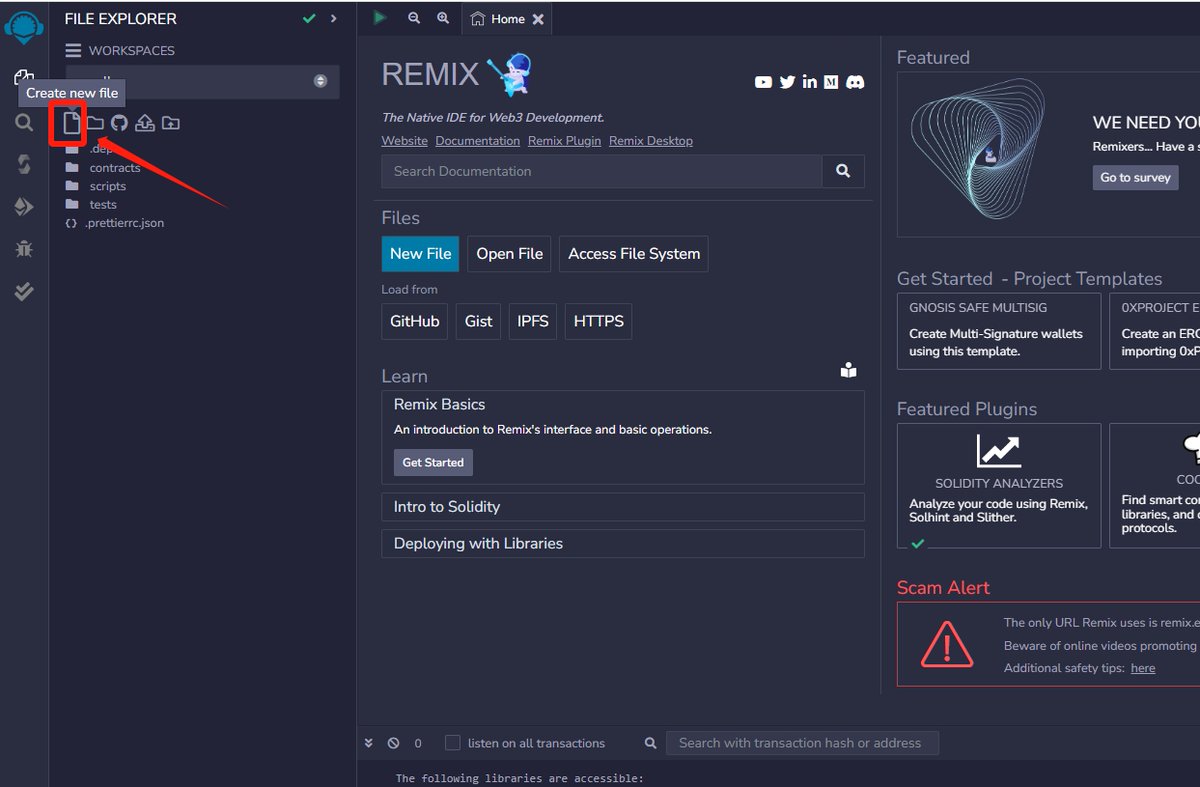
I used Remix to deploy a smart contract on the Nexus network
Here are the steps that I took;
- Visit remix.ethereum.org/
- Click on the FILE icon and create a new file, call it; "SimpleStorage.sol" (press ENTER after typing out the name)
- After creating the file, if you've got a code to use for the deployment, you can use it, for me; I got these codes from @0xMoei (Which he used during Fhenix Testnet)
- Paste the codes below in the created file (SimpleStorage.sol)
// SPDX-License-Identifier: MIT
pragma solidity ^0.8.0;
contract SimpleStorage {
uint256 public storedData;
function set(uint256 x) public {
storedData = x;
}
function get() public view returns (uint256) {
return storedData;
}
}
----- After that, ensure your code is COMPILED, before deploying -----------
You can explore other options to deploy more ERC20, ERC or NFT/ERC721 (I already did both)
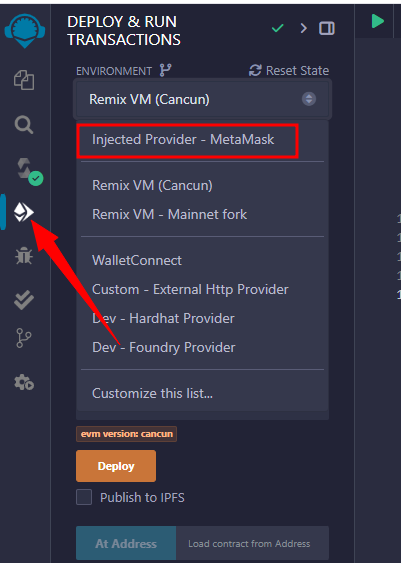
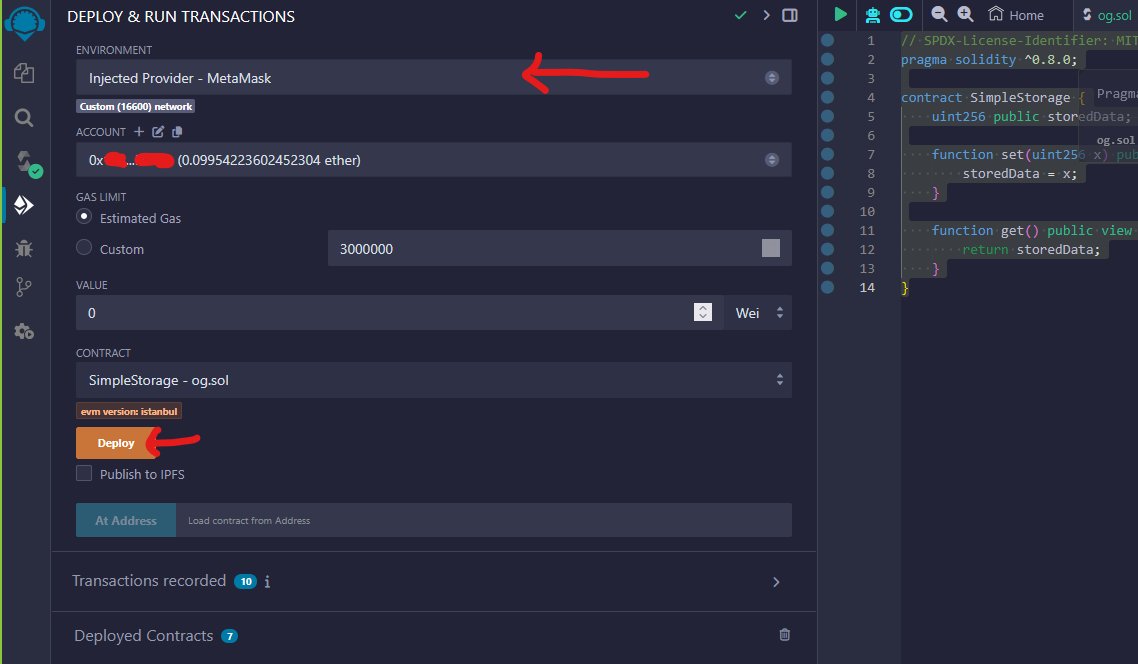
- Click on the "Deploy & Run Transactions" tab
- Change environment to "Injected Provider - Metamask". This will pop up metamask for you to sign in (Ensure you are switched to Nexus testnet before connected metmask wallet)
- Confirm that you're metamask is connected successfully.
- Ensure your wallet address and $NEX balance is displayed on the ACCOUNT field before deploying
- If everything is set, click on DEPLOY and sign transaction
- You will see your contract on "Deployed Contracts", beneath the DEPLOY button
You can also check on the Nexus explorer: explorer.nexus.xyz/


9
4
25
2,269

22 Feb 2025
How to deploy a contract on the @0G_labs blockchain
First, go to the Remix website at remix.ethereum.org
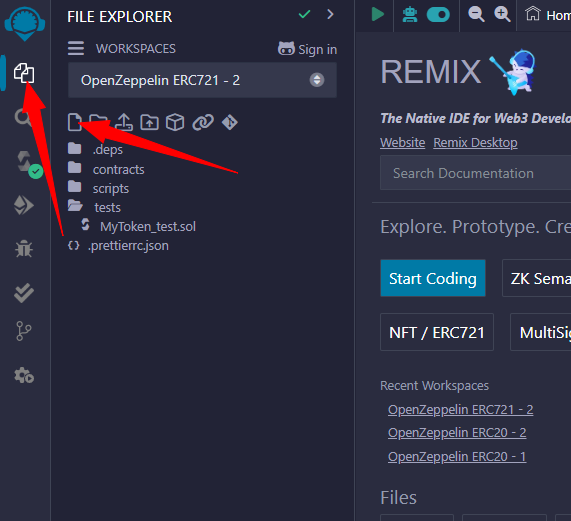
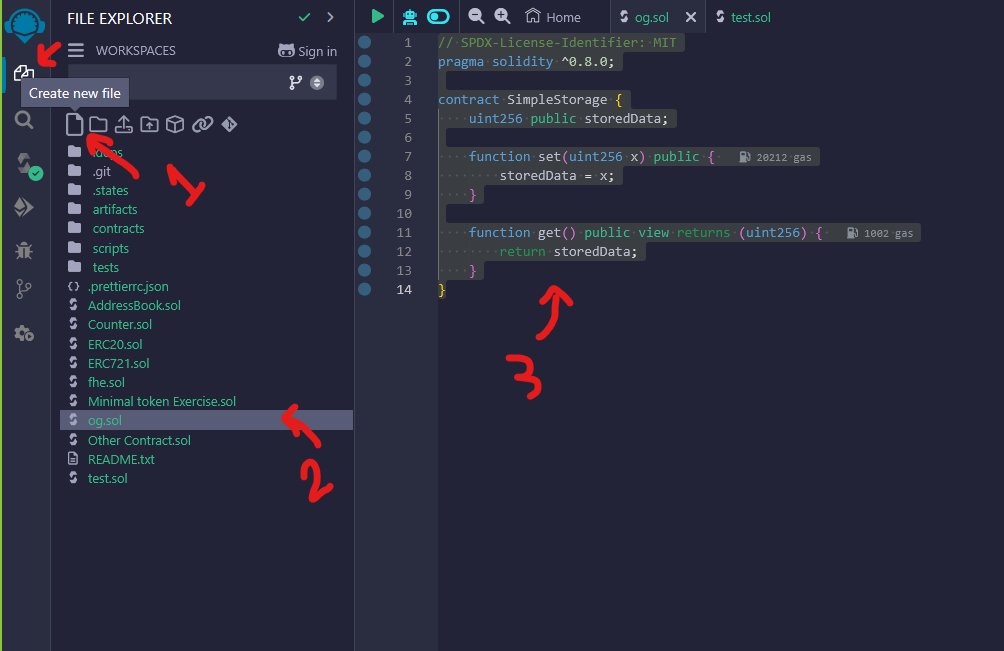
In the File Explorer, click "Create New File" and name it 0G.sol
Copy the provided code and paste it into the 0G.sol:
// SPDX-License-Identifier: MIT
pragma solidity ^0.8.0;
contract SimpleStorage {
uint256 public storedData;
function set(uint256 x) public {
storedData = x;
}
function get() public view returns (uint256) {
return storedData;
}
}
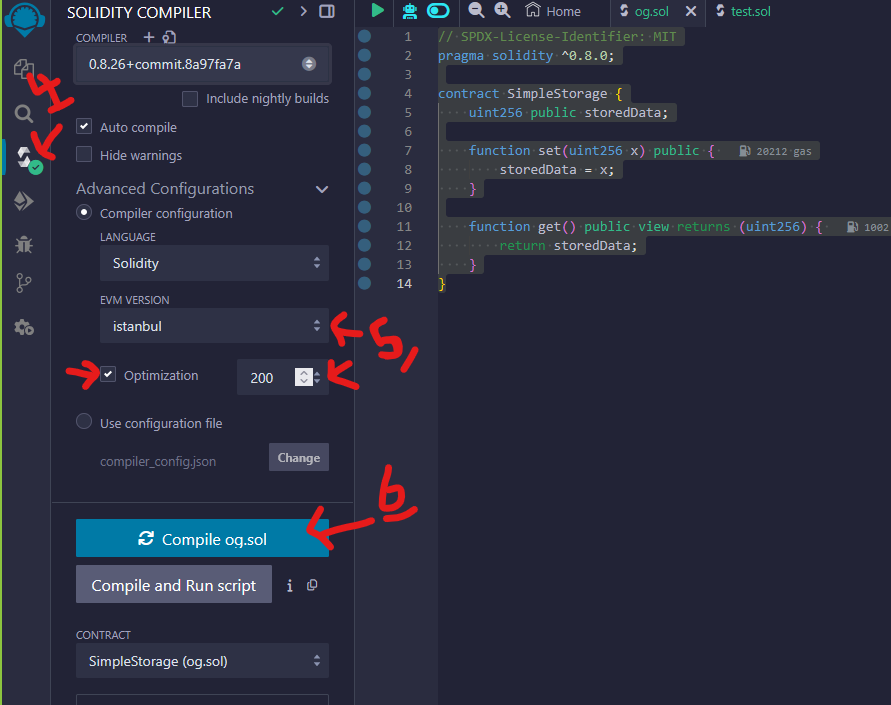
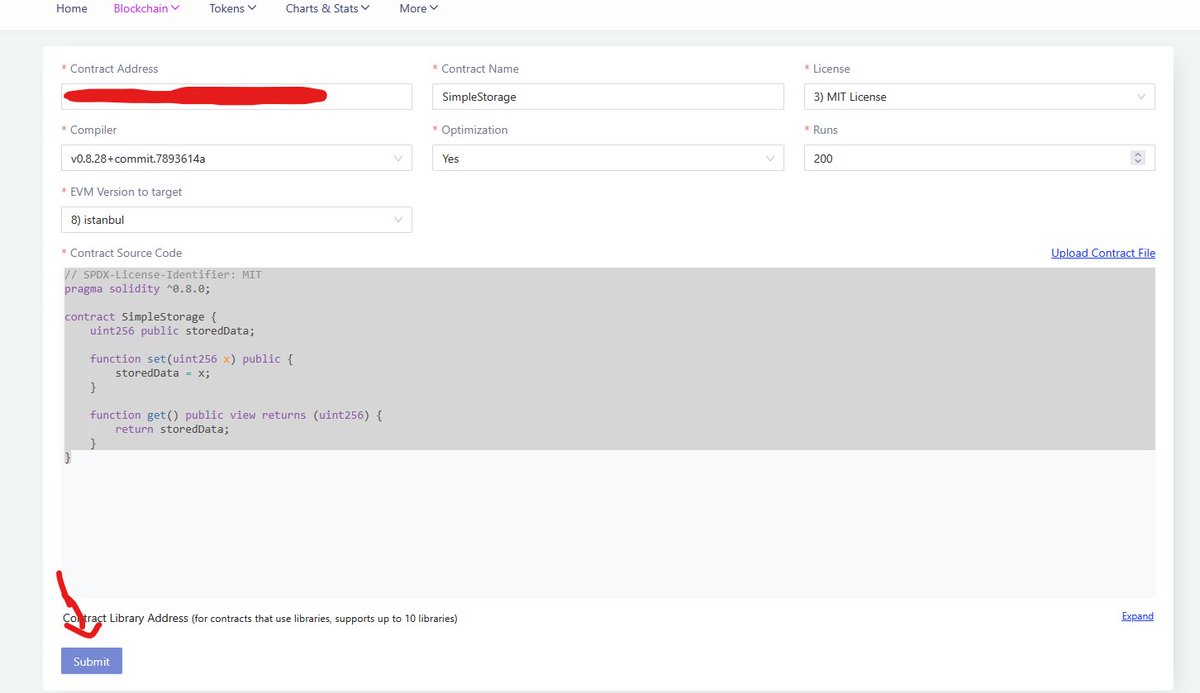
Next, go to the Solidity Compiler tab, enter the settings as shown in the image, and click "Compile"
Keep in mind that the EVM Version should be set to Istanbul.
Then, navigate to the Deploy & Run Transactions section. From the Environment dropdown at the top, select @MetaMask, then click "Deploy" and confirm the transaction.
After that, go to the block explorer and locate the contract you just created. Click on the Contract tab and select the "Verify" option. Fill in the contract details as shown in the image and submit.
Your contract is now deployed, and you can use it to execute various transactions. Keep in mind that the code we used is a very simple contract, so feel free to deploy your own custom contracts.
Please follow me for more advanced tutorials in this area.
40
25
170
13,037

13 Oct 2024
@0xMoei, you forgot to later add quest 6, Gas Consumed task. I tried doing it myself with some help from ChatGPT.
here’s what I came up with re-modifying your code-looping in gas consumption:
// SPDX-License-Identifier: MIT
pragma solidity ^0.8.26;
contract m0h {
uint256 public storedData;
I was able to deploy it with 30000000 gas limit but it did not verify.
please revisit the task, waiting on your response
// Adding a loop to consume more gas
for (uint256 i = 0; i < 1000; i ) {
storedData = i;
}
}
function get() public view returns (uint256) {
return storedData;
}
}
1
212


16 Aug 2024
今天我们将深入探讨Solidity中的状态变量、函数与可见性。理解如何定义和操作状态变量,不同类型的函数,以及可见性如何影响你的智能合约,是掌握Solidity的关键。
1️⃣Solidity中的状态变量
状态变量是永久存储在区块链上的数据,它们代表智能合约的状态。
contract SimpleStorage {
uint public storedData; // 状态变量
}
Public(公开): 为变量创建一个自动生成的getter函数。
Private(私有): 变量只能在合约内部访问。
Internal(内部): 类似于私有,但在派生合约中也可访问。
External(外部): 不适用于状态变量。
2️⃣Solidity中的函数
Solidity中的函数根据其可见性和与区块链的交互方式进行分类。
可见性类型:Public(公开): 可以在合约内部调用,也可以通过交易调用。
Private(私有): 只能在定义它们的合约内部调用。
Internal(内部): 类似于私有,但可以在继承的合约中重用。
External(外部): 只能通过交易调用,不能在合约内部调用。
函数类型:View函数: 不修改状态;用于读取数据。
Pure函数: 不读取或修改状态;用于计算。
Payable函数: 可以接受以太币,允许进行财务交易。
function set(uint x) public {
storedData = x;
}
function get() public view returns (uint) {
return storedData;
}
3️⃣可见性与访问控制
可见性修饰符决定了函数和状态变量如何以及在哪里可以访问。
示例:公开的状态变量: 自动生成一个getter函数。
私有函数: 确保敏感操作仅在合约内部进行。
内部函数: 允许在继承的合约中重用。
外部函数: 当外部调用时优化Gas成本。
contract VisibilityExample {
uint private privateData;
uint public publicData;
function setPrivateData(uint _value) private {
privateData = _value;
}
function setPublicData(uint _value) public {
publicData = _value;
}
function getPrivateData() public view returns (uint) {
return privateData;
}
}
4️⃣示例合约:受控访问存储
这里是一个将状态变量、函数与可见性结合起来的示例,创建一个简单的受控访问存储合约:
// SPDX-License-Identifier: MIT
pragma solidity ^0.8.0;
contract AccessControlledStorage {
address public owner;
uint private storedData;
constructor(uint _initialData) {
owner = msg.sender;
storedData = _initialData;
}
modifier onlyOwner() {
require(msg.sender == owner, "只有所有者才能调用此函数");
_;
}
function setStoredData(uint _data) public onlyOwner {
storedData = _data;
}
function getStoredData() public view returns (uint) {
return storedData;
}
function multiplyStoredData(uint _factor) public view returns (uint) {
return storedData * _factor;
}
}
结论
在本课中,我们介绍了Solidity中状态变量、函数与可见性的基本概念。掌握这些概念对于构建安全高效的智能合约至关重要。通过不断练习,进一步增强你的Solidity技能,迈向更高级的合约编程!
链源科技 @pandaly520 是一家专注于区块链安全的公司。我们的核心工作包括区块链安全研究、链上数据分析,以及资产和合约漏洞救援,已成功为个人和机构追回多起被盗数字资产。同时,我们致力于为行业机构提供项目安全分析报告、链上溯源和技术咨询/支撑服务。
📧有任何安全问题,请联系我们,确保您所持有的加密货币更加安全可靠!
#Programming #Solidity #BTC #SmartContract #PandaLY
2
280
2 Aug 2024
Hi❤️ 又到了我们的每周区块链合约编程课程的时间了!本次我们将探讨Solidity中的基本概念:数据类型和变量。理解这些基础知识对于编写有效的智能合约至关重要。让我们开始吧!
1️⃣Solidity中的基本数据类型
Solidity支持几种基本数据类型,包括:
布尔型:表示真或假。
bool public isActive = true;
整数型:有符号 (int) 和无符号 (uint) 整数。
uint public age = 30;
int public temperature = -5;
地址型:存储以太坊地址。
address public owner = msg.sender;
字符串型:表示文本。
string public greeting = "Hello, Blockchain!";
字节型:定长字节数组。
bytes32 public data = "BlockchainData";
2️⃣变量
Solidity中的变量可以通过三种方式声明:
状态变量:存储在区块链上并且是持久的。
uint public storedData;
局部变量:在函数内部声明,仅在函数执行期间存在。
function setData() public {
uint tempData = 5;
}
全局变量:提供关于区块链的信息,例如 msg.sender 和 block.timestamp。
3️⃣示例合约:简单存储
让我们编写一个简单的合约来演示数据类型和变量的使用:
// SPDX-License-Identifier: MIT
pragma solidity ^0.8.0;
contract SimpleStorage {
uint public data;
bool public isSet;
address public owner;
constructor() {
owner = msg.sender; // 设置合约部署者为所有者
}
function setData(uint _data) public {
data = _data;
isSet = true;
}
function resetData() public {
require(msg.sender == owner, "只有所有者可以重置数据");
data = 0;
isSet = false;
}
function getData() public view returns (uint) {
return data;
}
}
在这个合约中:
我们声明了状态变量 data、isSet 和 owner。
构造函数将 owner 设置为部署合约的地址。
setData 函数设置 data 的值并更新 isSet 为 true。
resetData 函数将 data 重置为 0 并将 isSet 重置为 false,但只有所有者可以调用此函数。
getData 函数返回 data 的值。
总结
理解数据类型和变量是Solidity编程的基础。它们构成了智能合约的基本构建块。通过编写使用不同数据类型和变量的合约来练习,以提高你的编程技能。
关于我们
PandaLY是一支专注于区块链网络安全的团队,致力于为用户提供安全咨询服务、链上溯源数据分析报告、数字资产找回和智能合约漏洞救援等服务,并为行业机构提供区块链技术咨询和支持。
有任何安全问题,请联系我们,确保您所持有的加密货币更加安全可靠!
#Programming #Solidity #BTC #SmartContract #PandaLY
3
142

23 Apr 2024
Why Your Intranet Platform is the Key to Effective Knowledge Management
#knowledgemanagement #companyknowledge #intranetbenefits #intranetstrategy #intranettools #ecosystem #knowledgesharing #businessknowledge #searchcapabilities #storeddata
tycoonstory.com/why-your-int…

ALT Why Your Intranet Platform is the Key to Effective Knowledge Management
1
3
37

部署网站:remix.ethereum.org/
合约代码:
// SPDX-License-Identifier: MIT
pragma solidity >=0.7.0 <0.9.0;
contract 取名 {
uint public storedData;
function pull(uint x) public {
storedData = x;
}
function push() public view returns (uint retVal) {
return storedData;
}
}
1
2
6
3,716

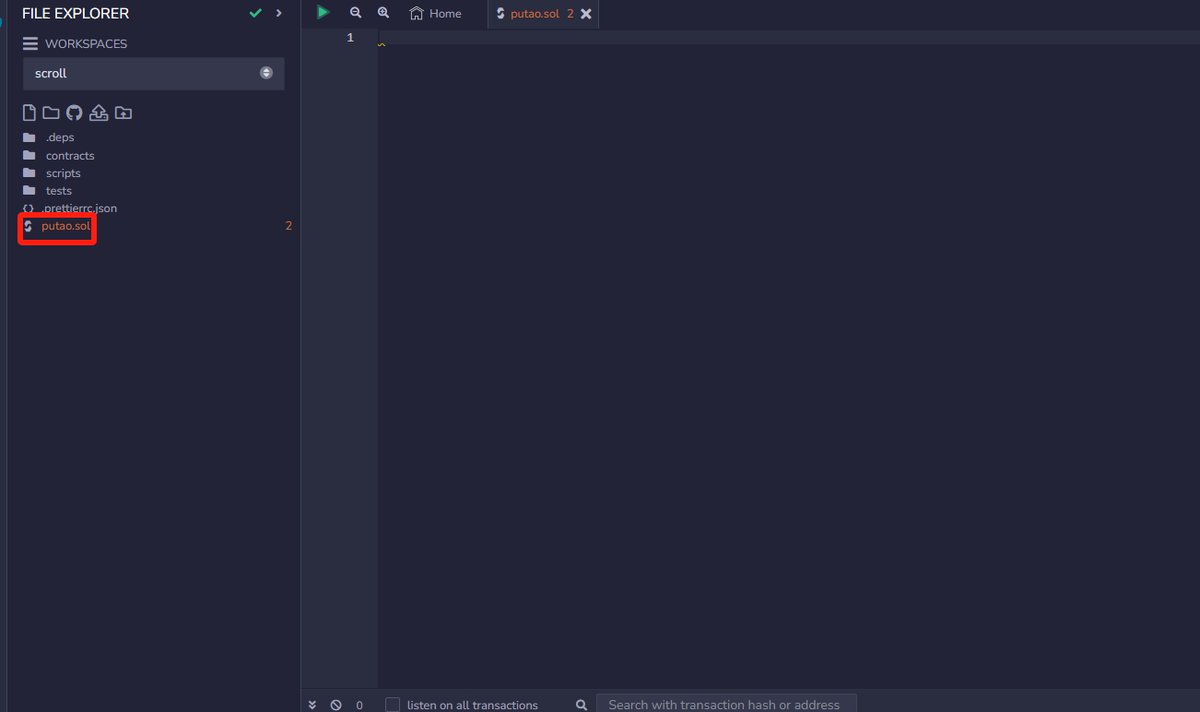
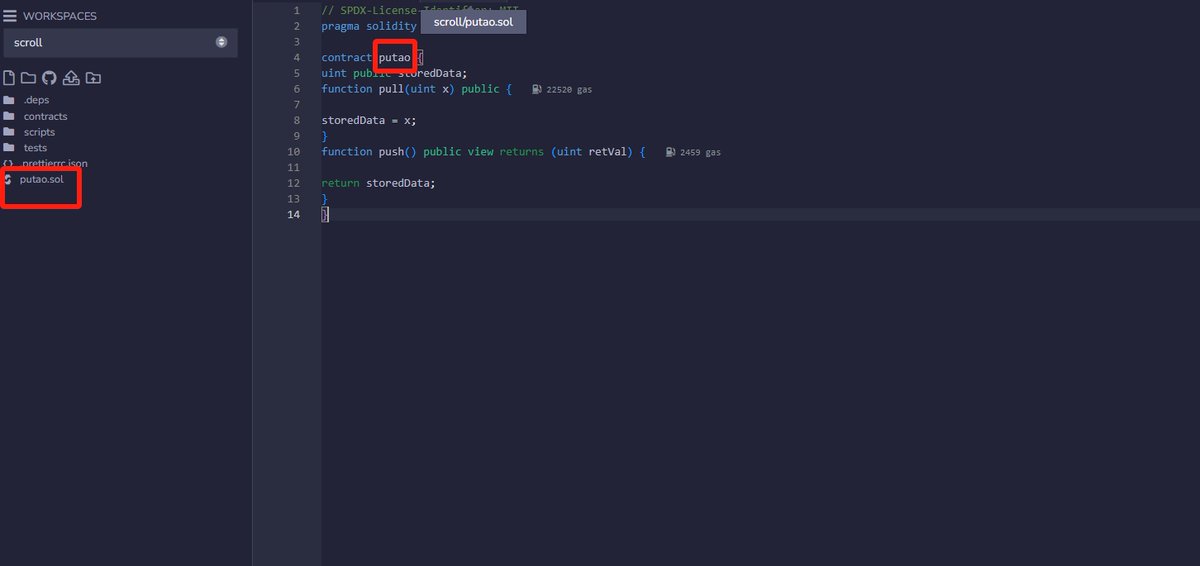
1.到下边的网站,点击新建文件,然后输入名字
remix.ethereum.org/#lang=en&…
2.复制代码进去,记得把代币名字改下
// SPDX-License-Identifier: MIT
pragma solidity >=0.7.0 <0.9.0;
contract putao {
uint public storedData;
function pull(uint x) public {
storedData = x;
}
function push() public view returns (uint retVal)
{ return storedData;
}
}
3
2
2
3,436


20 Apr 2023
This thing?
// SPDX-License-Identifier: MIT
pragma solidity >=0.4.0 <0.7.0;
contract SimpleStorage {
uint storedData;
function set(uint x) public {
storedData = x;
}
function get() public view returns (uint) {
return storedData;
}
}
1
1
2
269

1/ Educational thread:
You might have heard something along the lines of "don't put any #data you don't want to be #public on the #blockchain " before.
So, how hard (or easy?) is it for ANYONE to check #storedData inside a #smartContract on #MultiversX ?
#mx #mvx #mxdev

3
14
61
5,160
1 Mar 2023
The number of potential attack vectors multiplies with every new work location. Your corporate #data is scattered & can be vulnerable if not properly protected. Learn how to #protect the #storeddata on your devices here: netlibsecurity.com/articles/… #infosec #encryption #WFH #hybrid
1
20

23 Jul 2022
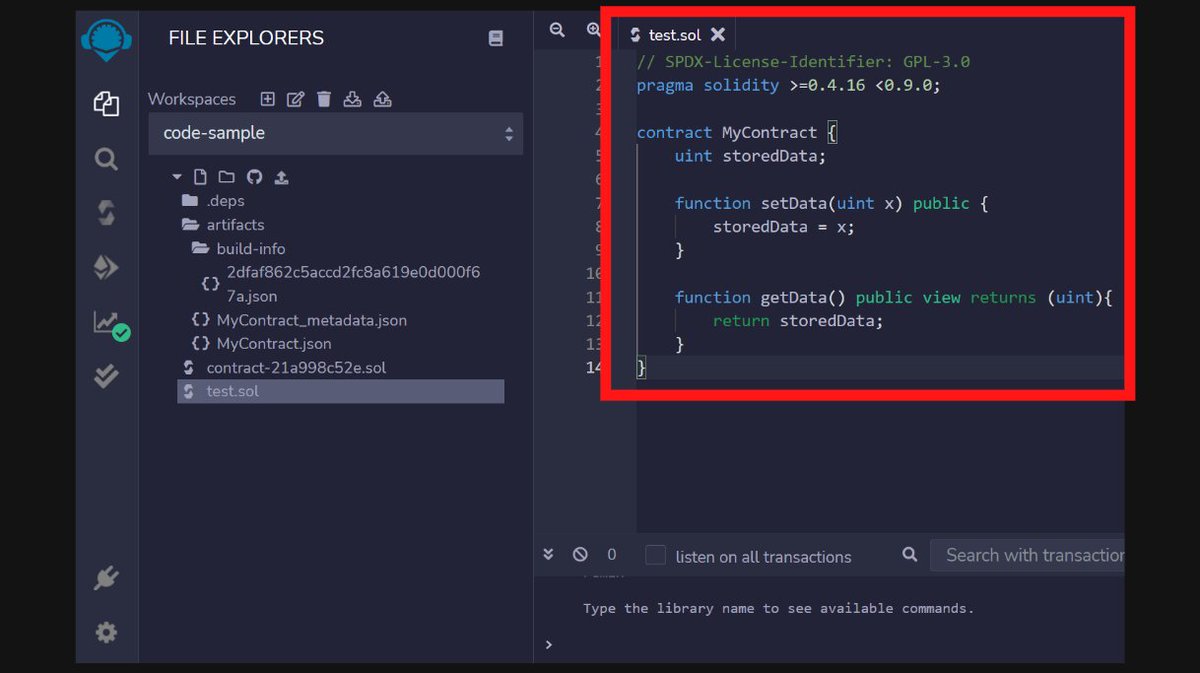
// test.sol
// SPDX-License-Identifier: GPL-3.0
pragma solidity >=0.4.16 <0.9.0;
contract MyContract {
uint storedData;
function setData(uint x) public {
storedData = x;
}
function getData() public view returns (uint){
return storedData;
}
}

1
3

4 Jul 2022
Can a Cloud Security System Give 100% Protection to Your Stored Data?
bit.ly/3NVMSYV
#CloudSecurity #Cloud #Data #CloudStorage #CloudProtection #CloudArchitecture #CloudSecuritySystem #StoredData #AI #AINews #AnalyticsInsight #AnalyticsInsightMagazine

1
15 Apr 2022
// test.sol
// SPDX-License-Identifier: GPL-3.0
pragma solidity >=0.4.16 <0.9.0;
contract MyContract {
uint storedData;
function setData(uint x) public {
storedData = x;
}
function getData() public view returns (uint){
return storedData;
}
}
1
7


12 Aug 2020
#IDC present 5 Factors Driving Enterprise #STaaS Adoption in 2020 - lnkd.in/gtuiEX4
#Zadara #Cloud #CloudComputing #HybridCloud #MultiCloud #StoredData #ITOperations #DataStorage #SoftwareDefined #Containerised #Infrastructure #ITInfrastructure #Storage #IT #Data

1
2