
Flutter/Firebase/React(TypeScript)でアプリ/Web開発してます。 フリーランスになった福岡在住のママさんエンジニアです。(エンジニア歴は15年位。C、PHP、Java等々やってました)まだまだ勉強中!! リモートで仕事!フォロー大歓迎♪
Joined January 2010
- Tweets 1,638
- Following 406
- Followers 369
- Likes 3,541
48 Photos and videos


まるとろ@Flutter&React開発 retweeted

Apr 3
これ、さすがにAnthropicやりすぎじゃない?笑
Claudeを作ってるAnthropicが「公式AIアカデミー」を
完全無料で公開したんだけど、内容が本当にえぐい
AIの超基礎からClaude APIでのアプリ開発
MCPサーバーの構築まで全部タダで学べるの
何十万もするAIスクールとか
Brain・Tips・noteの有料コンテンツ買ってた人
正直これで足りちゃうかも?
しかもコース修了するとAnthropic公式の認定証がもらえて
LinkedInや職務経歴書にも載せられる正式な資格なの
クレカ登録すら不要で0円で取れるのが本当にやばくない?
ChatGPTとGeminiしか触ったことない人、
そろそろ本気でやばいかもしれない
AnthropicのARR(年換算の収益)はすでに2兆円規模を超えてて
OpenAIとの差もどんどん縮まってる。
OpenAI使ってる企業の約8割がAnthropicも併用してる時代になってきてるから
Claudeを使いこなせるかどうかって、これからめちゃくちゃ差がつくと思う。
無料で学べるうちに絶対見ておいて。
URLはリプ欄に貼っておくね↓
28
536
5,860
516,877
まるとろ@Flutter&React開発 retweeted
3
89
1,199
366,421
まるとろ@Flutter&React開発 retweeted

Apr 2
Claude Code研究所さんはガチ勢なので、フォロー必須です。

1
82
1,699
764,071
まるとろ@Flutter&React開発 retweeted

やっと書けた!
僕がClaudeCodeを使いこなすまでに学んだこと、全部詰め込んで初心者向けに落とし込みました。
【超入門】 ClaudeCode始め方!フォルダ設計から任せ方まで、やり方を全部公開
note.com/hituji1234/n/ncbded…
9
115
1,494
343,312
まるとろ@Flutter&React開発 retweeted

Mar 31
📝これ、私含めClaude Codeを使っている人は「もっと早く知りたかったよ~!!」ってなる神記事
正直この記事読み始めたら止まらなくて、最後まで一気に読んでしまいました
「Claudeの制限に引っかかるのは自分のせいだった」という気づきが、すごく刺さって…
自分用メモとして書き出したので共有します
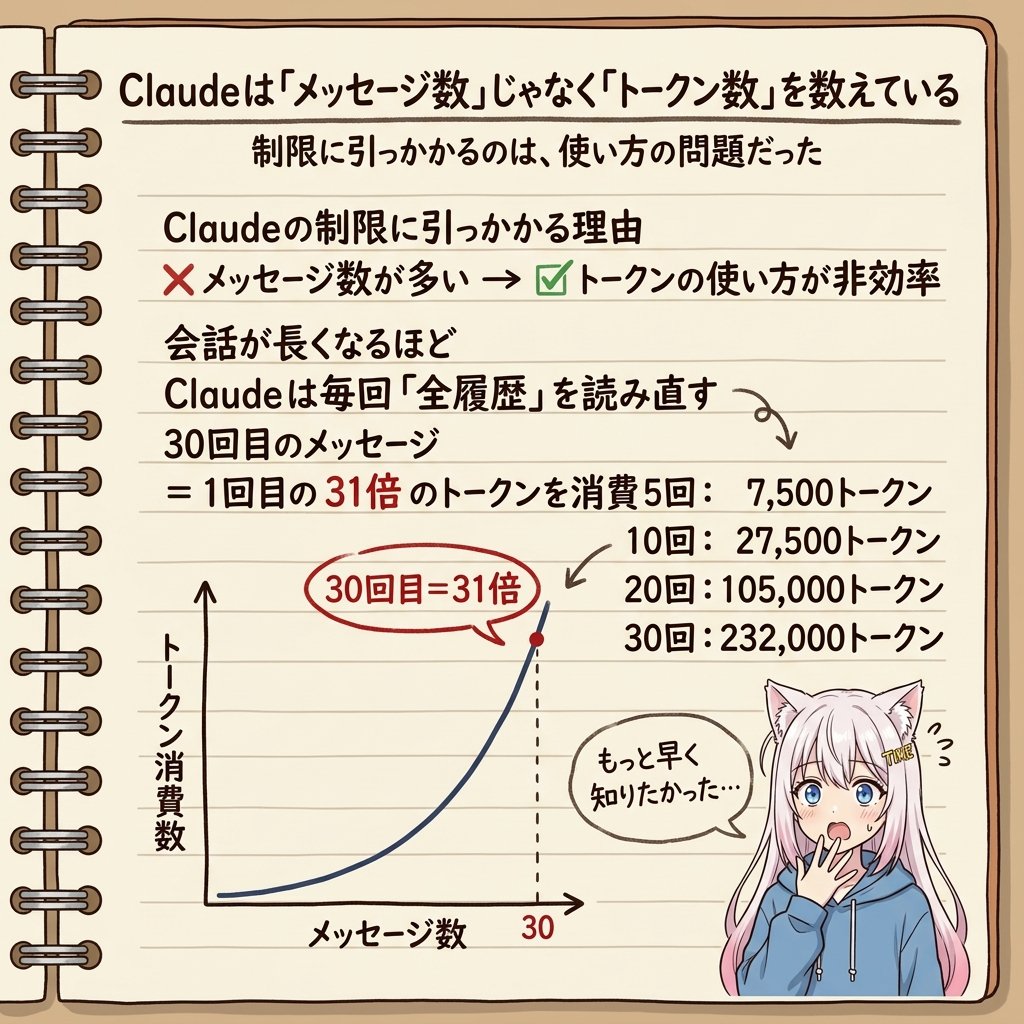
・Claudeはメッセージ数ではなく『トークン数』をカウントしている
・会話が長くなるほど、Claudeは毎回すべての履歴を読み直している
・30回目のメッセージは、1回目の31倍のトークンを消費する
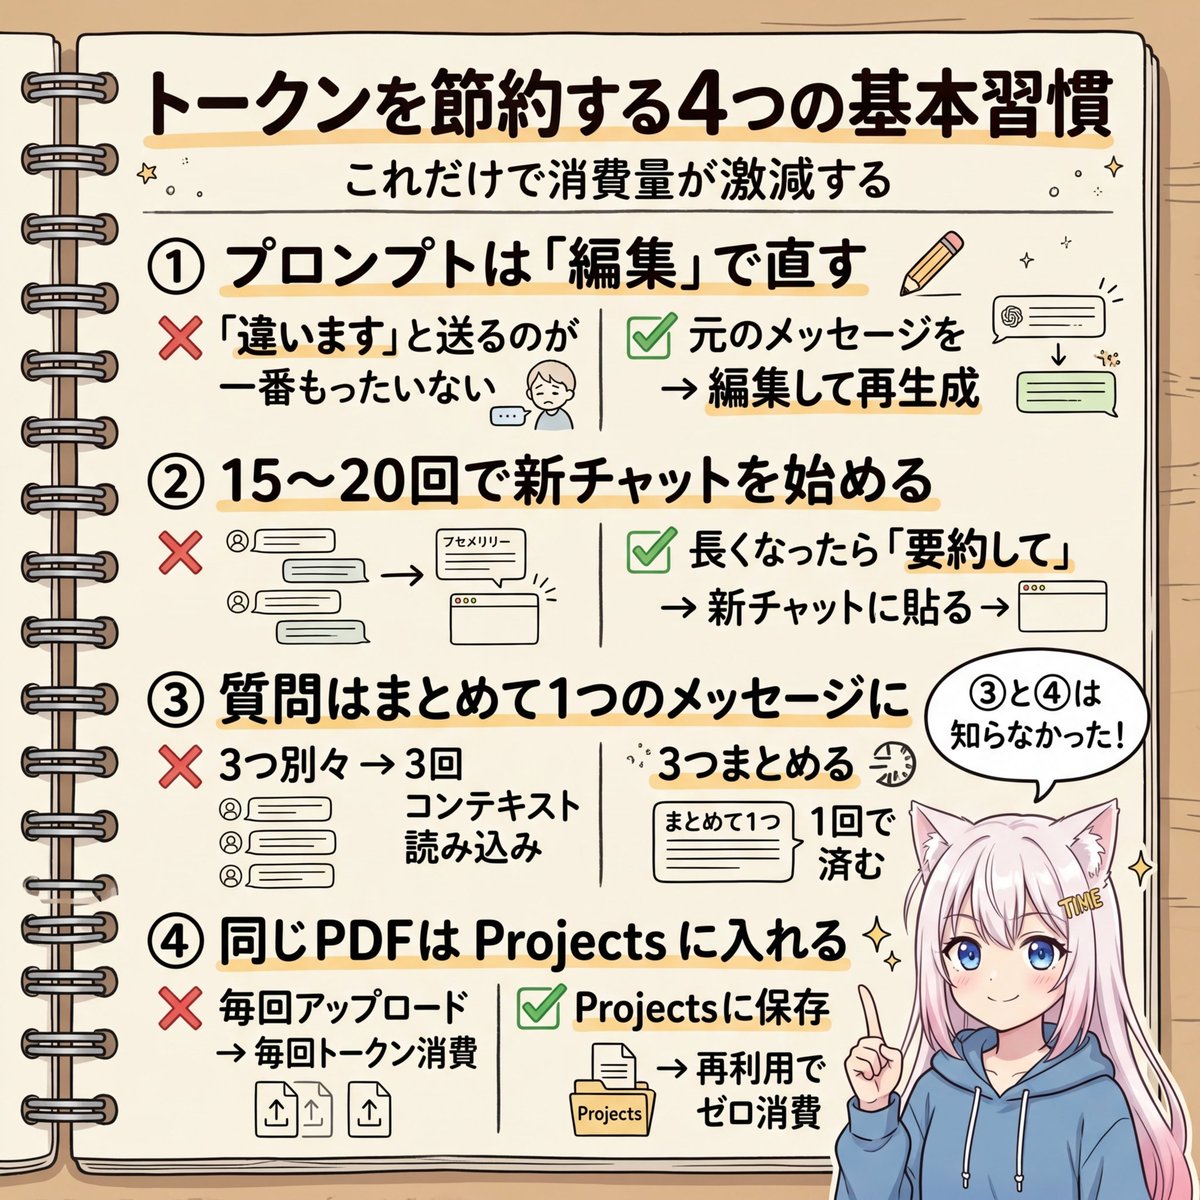
・「違います、そういう意味じゃなくて」と送るのが一番もったいない
・正解は「編集ボタンで元のプロンプトを直して再生成」
・15〜20メッセージごとに新しいチャットを始める
・長くなったら「要約して」→コピー→新チャットに貼り付け
・複数の質問は1つのメッセージにまとめる(コンテキスト読み込みが1回で済む)
・同じPDFを何度もアップロードしない。Projectsに入れれば再トークン化されない
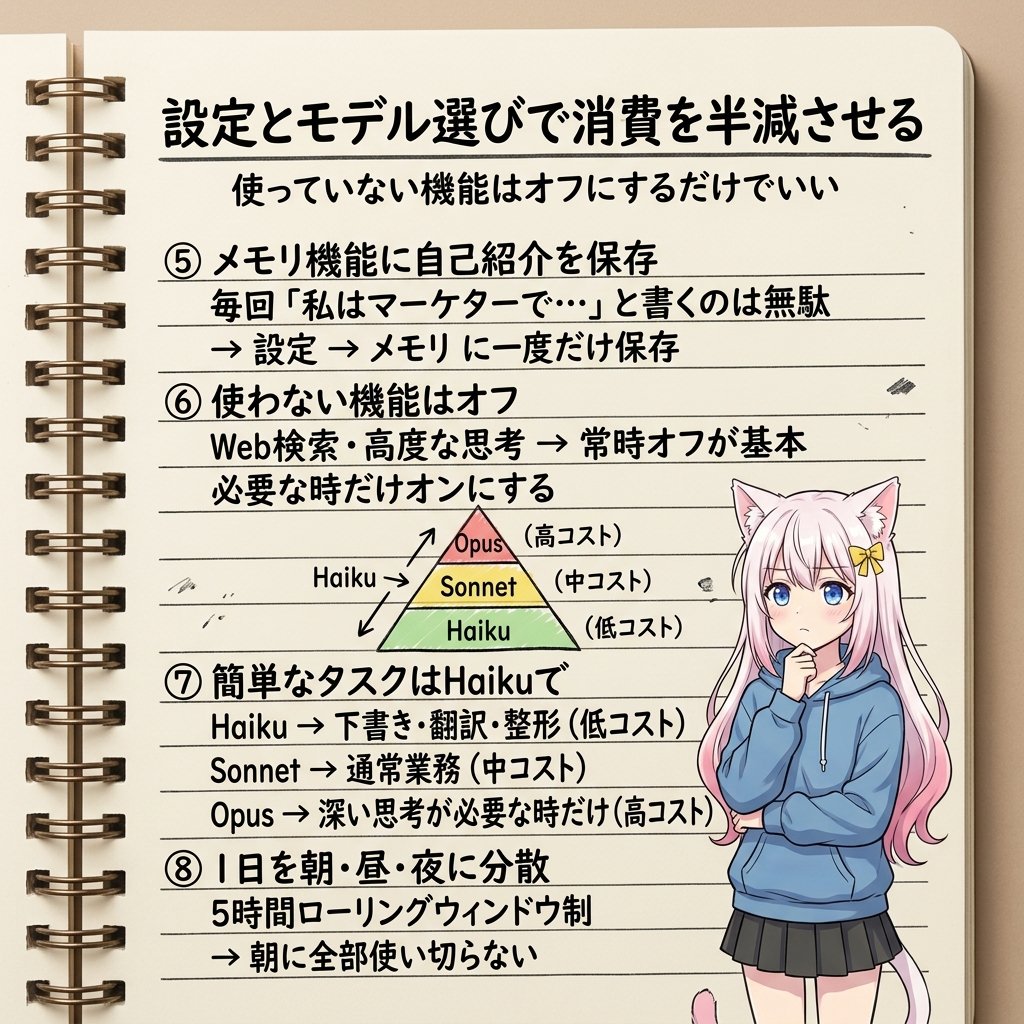
・毎回「私はマーケターで、カジュアルな文体で…」と書くのも無駄。メモリ機能に保存する
・使っていない機能(Web検索・高度な思考)はオフにする
・簡単なタスクはHaikuで十分。Sonnet/Opusは本当に必要な時だけ
・Claudeは5時間のローリングウィンドウ制。深夜0時にリセットではない
・朝に全部使い切らず、朝・昼・夜に分散させる
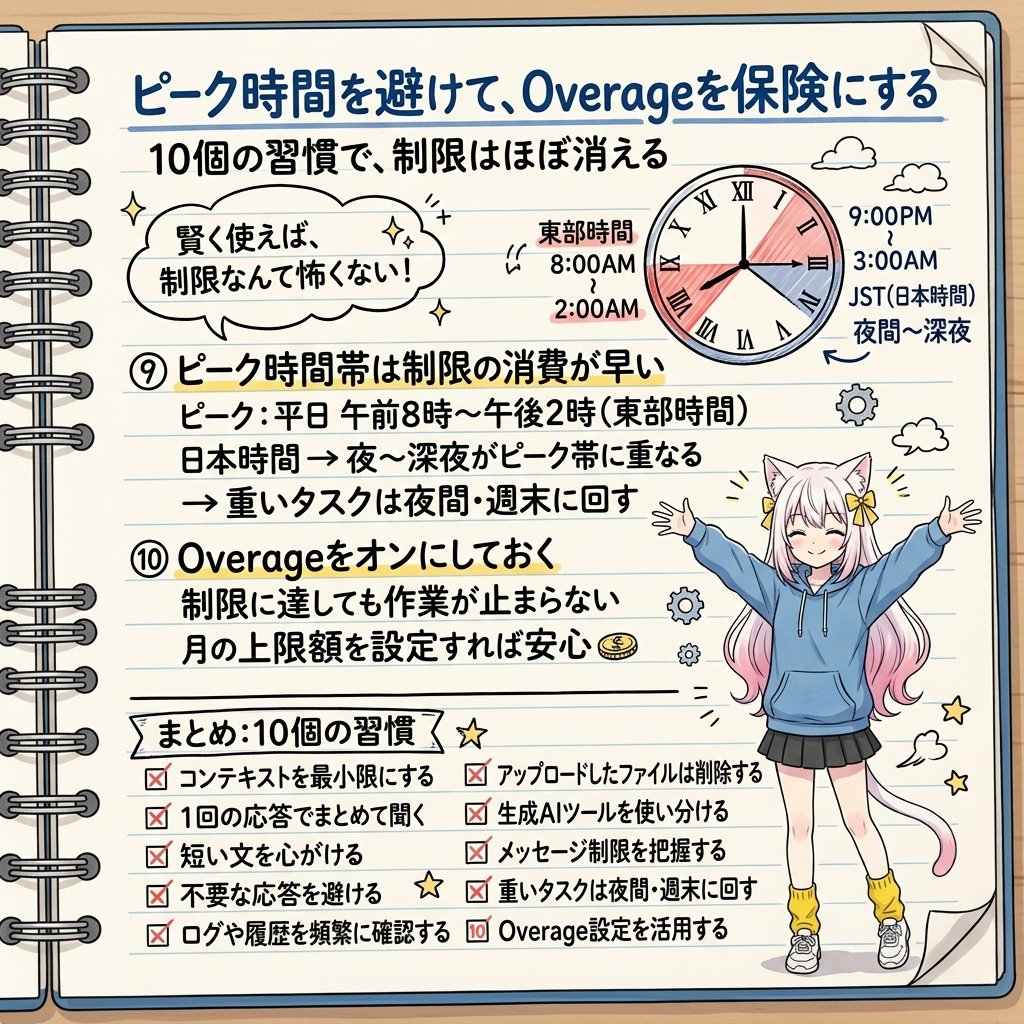
・ピーク時間帯(日本時間の夜〜深夜)は制限の消費が早くなる
・Overageをオンにしておけば、制限に引っかかっても作業が止まらない
この10個を全部やったら、「制限に引っかかった」という体験がほぼなくなるらしい(人による)
Claudeを毎日使っている人には、絶対に読んでほしい内容でした ↓

7
112
803
113,184
まるとろ@Flutter&React開発 retweeted

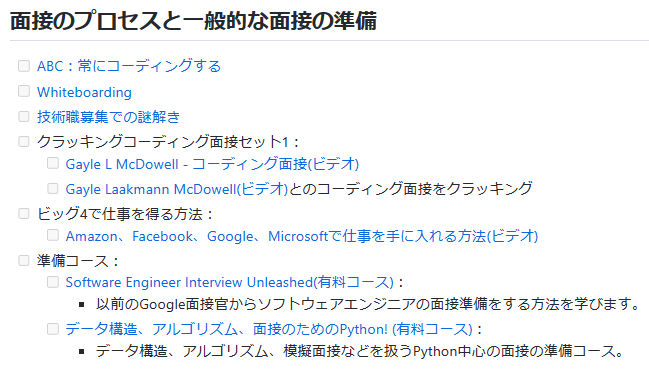
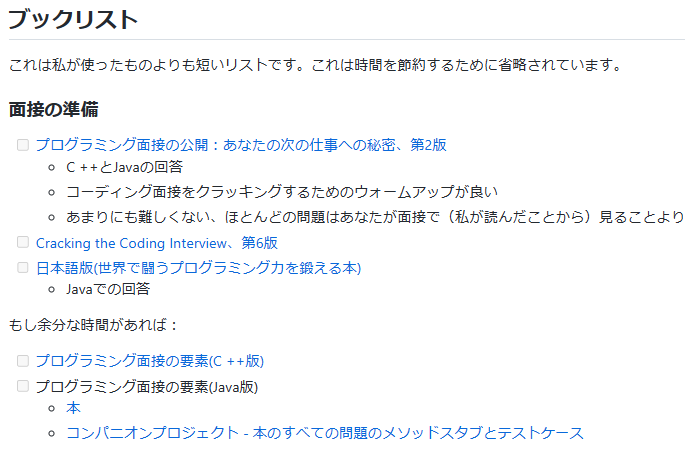
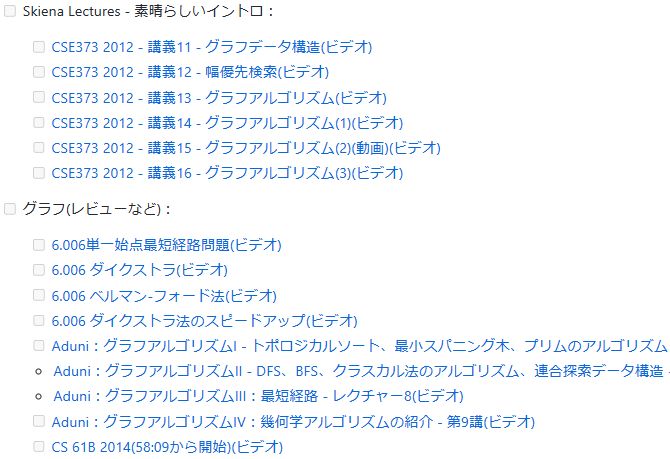
CS学位なしから独学でAmazonのソフトウェアエンジニアになった方が、勉強・就活対策に使った教材を大量にまとめてくれている。網羅的かつ体系的なのでコンピューターサイエンス学習者の地図として使えそう。
・「この勉強法は効率が悪かった」という失敗談
・「この先の内容は時間がある人だけで良い」などの優先順位付け
和訳版
github.com/jwasham/coding-in…
英語版
github.com/jwasham/coding-in…

1
41
540
32,412
まるとろ@Flutter&React開発 retweeted

Mar 26
いよいよ新小6の長男にスマホ持たせるにあたってこういうのないかと探してたの😭LINEのVOOMの制限できるの探してたんだよ😭あぁトトロさんのツイートに出会えて感謝です🙏🙏🙏こんだけの機能あるなら余裕で課金します


101
1,540
12,558
4,817,064
まるとろ@Flutter&React開発 retweeted

Mar 27
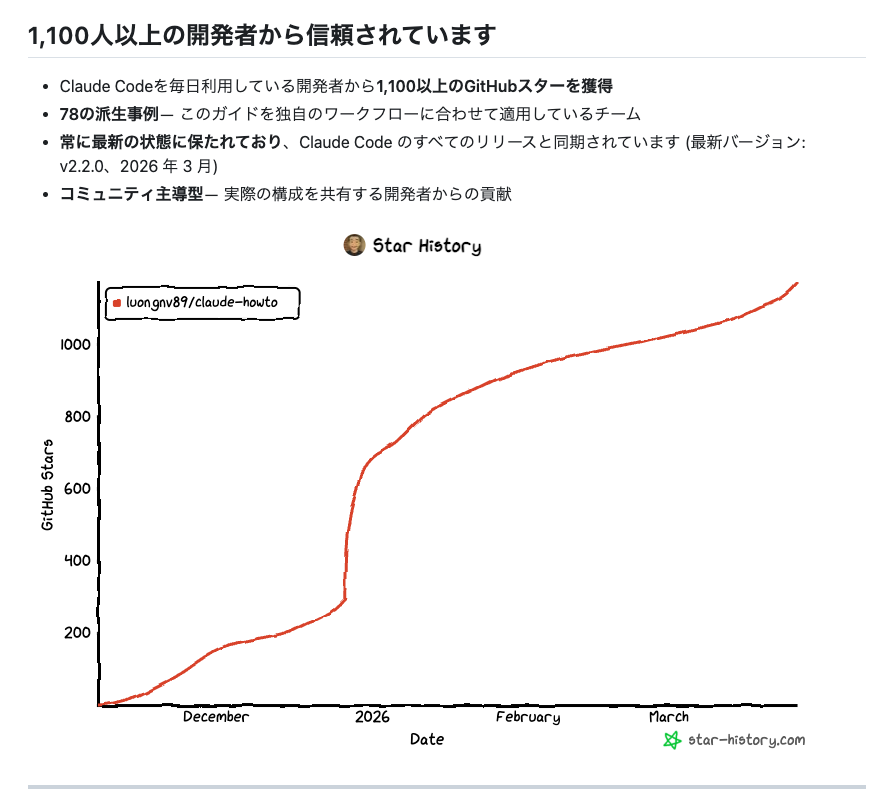
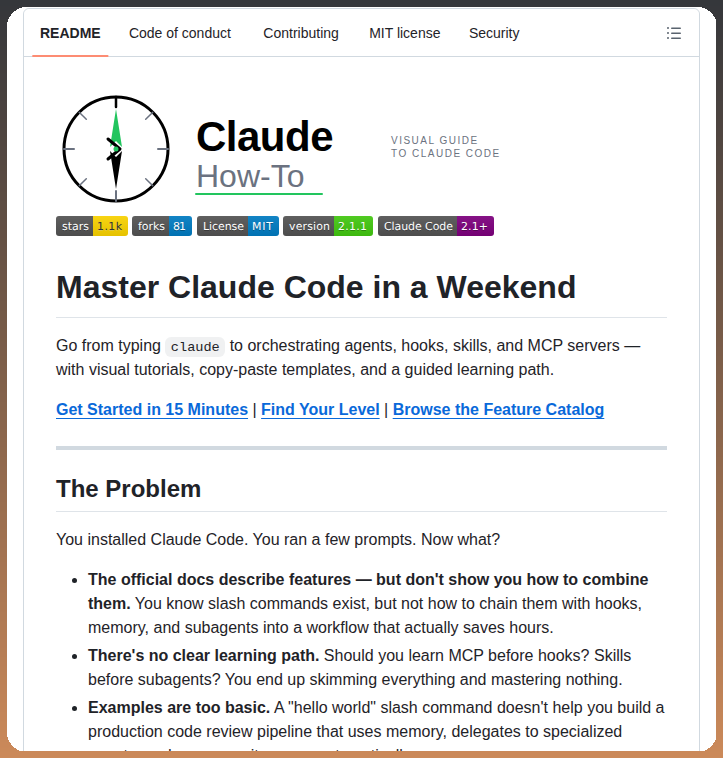
週末、無料でClaude Code学ぶなら
『claude-howto』がお勧め。
初級から上級まで13時間のカリキュラムで、
実例テンプレを元に網羅的に学習できる。
海外の開発者にも人気で信頼性も高く、既にClaude Codeやってる人も知識レベル判定テストがあるので一度受けておくべき。


8
295
3,869
425,479
まるとろ@Flutter&React開発 retweeted

Mar 24
Claude Codeのセットアップ、
99.9%の人が間違えてる。
正解は...
.claude/ フォルダを育てること。
やること順番に↓
①CLAUDE.md → Claudeへの指示書。
②rules/ → ルールが増えたら分割
③commands/ → 繰り返し作業を自動化
④skills/ → 状況に応じて自動で動く
⑤agents/ → 独立して動くサブエージェント
⑥settings.json → 権限を厳格に管理
このフォルダがチームメンバーの代わりになる。
ボクが採用ゼロで
月246万回せてる理由、これです。
.claude/ はインフラ。
インフラとして育ててください。
15
145
2,203
136,637
まるとろ@Flutter&React開発 retweeted

Mar 24
10
258
3,526
722,131
まるとろ@Flutter&React開発 retweeted

Mar 23
Claude Codeで日常業務全部やらせてる方の話、マジで参考になる
本当この作業、AI出来るのでは?と考えるのとそれをきちんと言語化して仕組みにする能力今後大事すぎるよなー
qiita.com/minorun365/items/1…
6
333
3,693
248,147
まるとろ@Flutter&React開発 retweeted
Mar 23
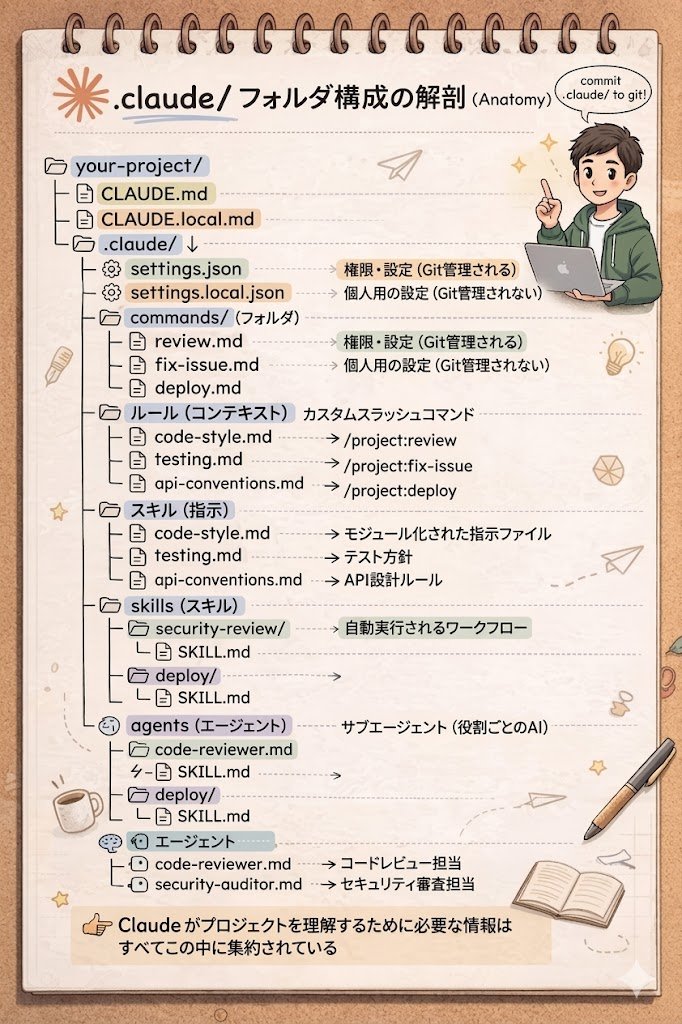
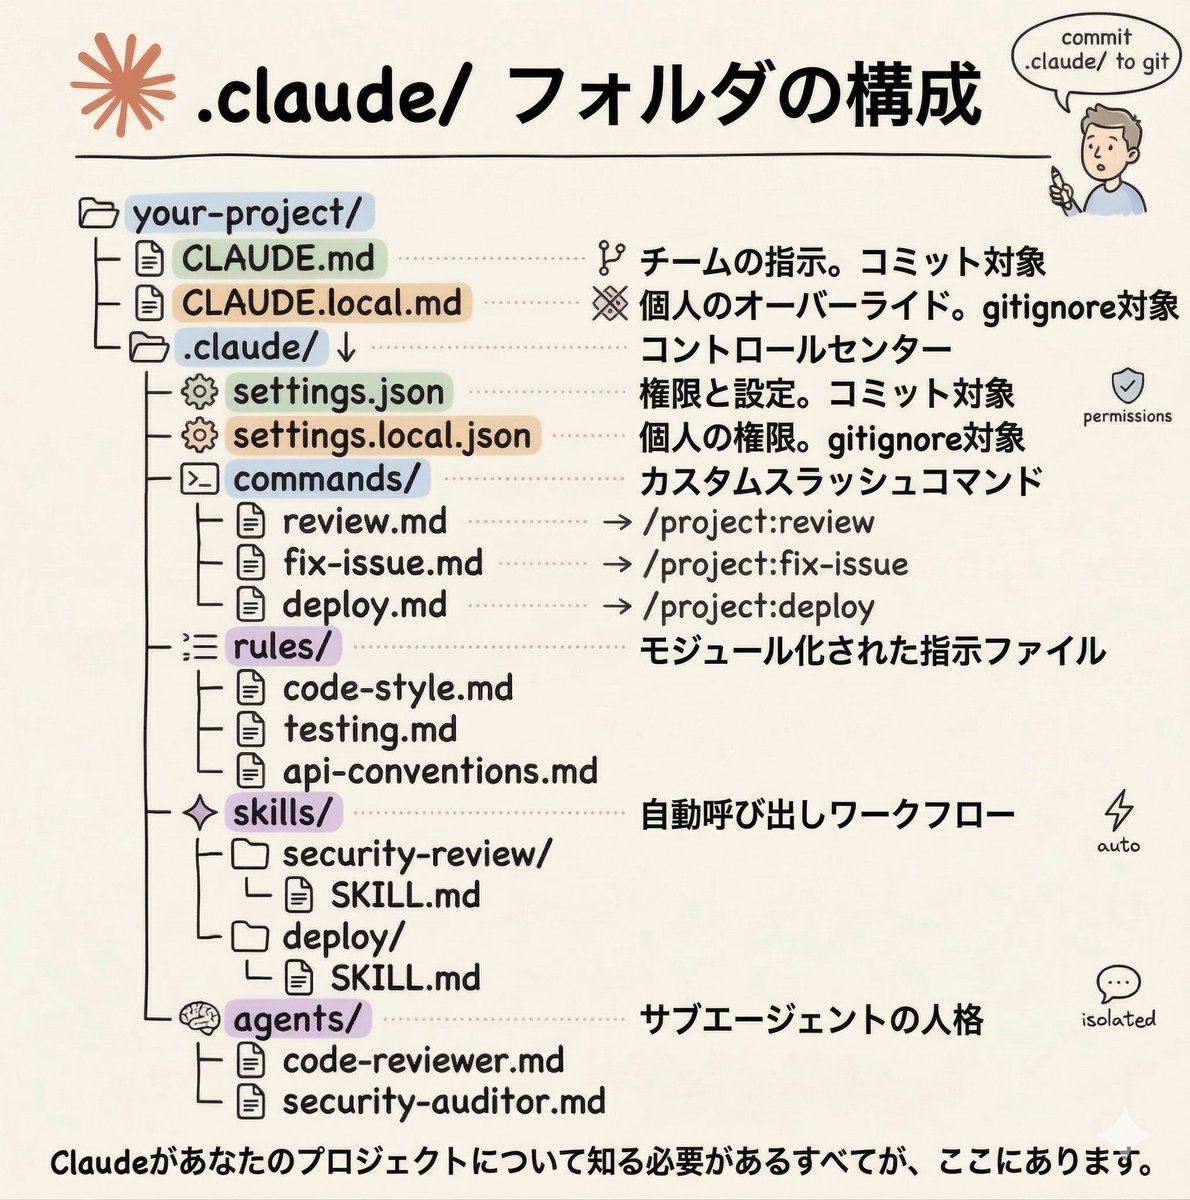
📝これは非エンジニアにも嬉しすぎる!
Claude Codeの.claudeフォルダ、実はこんなことができる
・CLAUDE.md → 「毎回説明しなくていい指示書」を置く場所
・CLAUDE.local.md → 自分だけの個人設定。チームには共有されない
・commands/ → よく使う作業をコマンド1つで呼び出せるショートカット置き場
・rules/ → 指示が増えてきたらカテゴリ別に分けて管理できる
・skills/ → 「セキュリティチェックして」と言うだけで自動で動くワークフロー
・agents/ → 「コードレビュー担当」「セキュリティ担当」など役割ごとのAI人格を定義できる
・settings.json → Claudeに「これだけはやらせない」を設定できるルール帳
エンジニアじゃなくても、CLAUDE.mdと settings.jsonだけ理解すれば、AIの使い方が一段変わる
詳細はリプ欄へ ↓
※画像はNano Bananaで日本語化しました
Mar 22

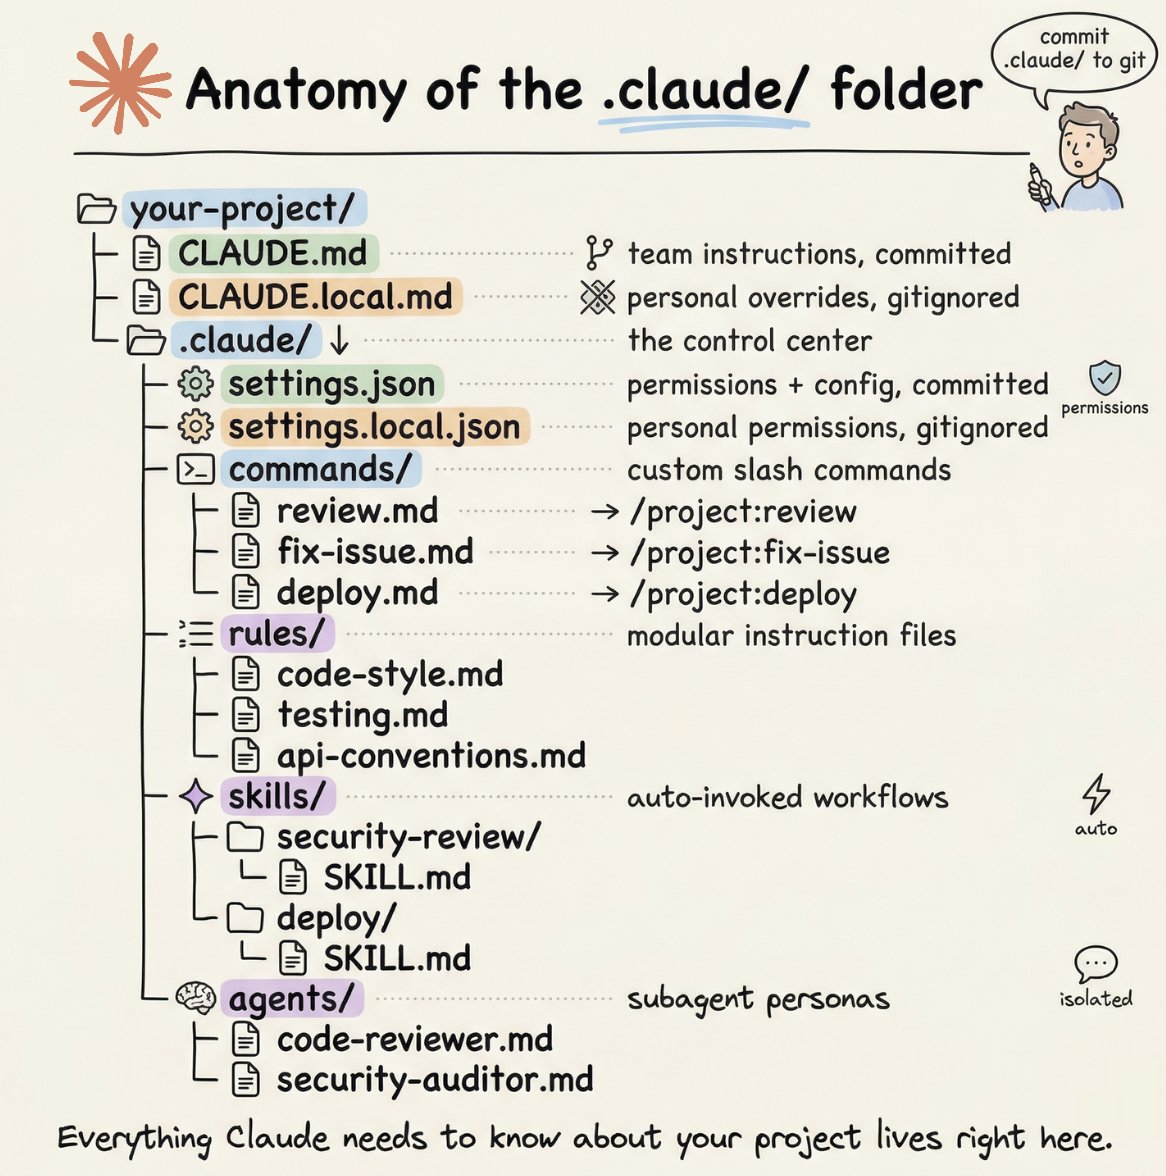
How to setup your Claude code project?
TL;DR
Most developers skip the setup and just start prompting. That's the mistake.
A proper Claude Code project lives inside a .𝗰𝗹𝗮𝘂𝗱𝗲/ folder. Start with 𝗖𝗟𝗔𝗨𝗗𝗘.𝗺𝗱 as Claude's instruction manual. Split it into a 𝗿𝘂𝗹𝗲𝘀/ folder as it grows. Add 𝗰𝗼𝗺𝗺𝗮𝗻𝗱𝘀/ for repeatable workflows, 𝘀𝗸𝗶𝗹𝗹𝘀/ for context-triggered automation, and 𝗮𝗴𝗲𝗻𝘁𝘀/ for isolated subagents. Lock down permissions in 𝘀𝗲𝘁𝘁𝗶𝗻𝗴𝘀.𝗷𝘀𝗼𝗻.
There are two .𝗰𝗹𝗮𝘂𝗱𝗲/ folders: one committed with your repo, one global at ~/.𝗰𝗹𝗮𝘂𝗱𝗲/ for personal preferences and auto-memory across projects.
The .𝗰𝗹𝗮𝘂𝗱𝗲/ folder is infrastructure. Treat it like one.
The article below is a complete guide to 𝗖𝗟𝗔𝗨𝗗𝗘.𝗺𝗱, custom commands, skills, agents, and permissions, and how to set them up properly.
10
134
1,603
208,931
まるとろ@Flutter&React開発 retweeted

Mar 19
非エンジニア向けに業務Skillsのつくりかたを書きました。
できるだけハードルをぐっと下げて書いたつもりです。
結局、業務設計力がすべてです!なにがしたいのか“えがく”ことができればなんだってできる。
note.com/suh_sunaneko/n/n7b2…

3
137
1,458
416,025
まるとろ@Flutter&React開発 retweeted

Mar 20
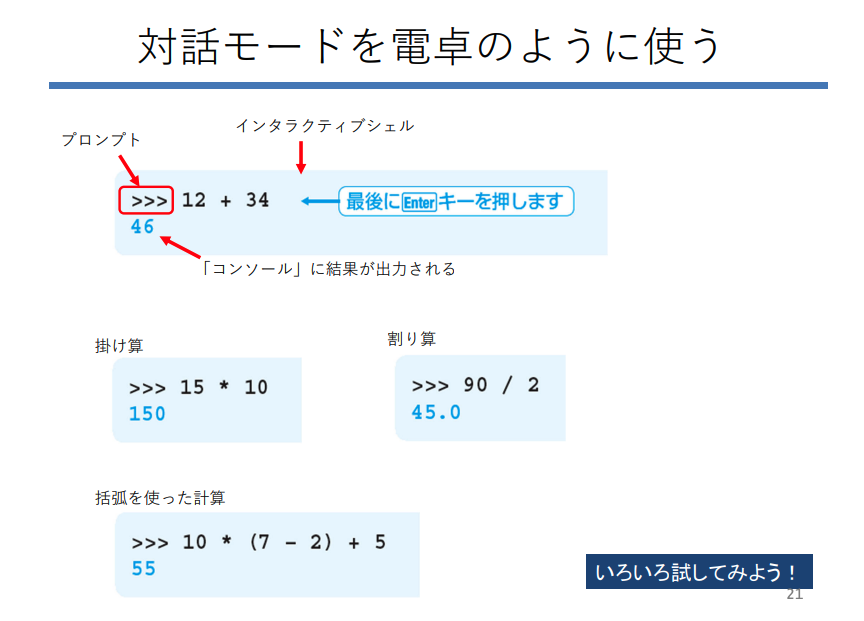
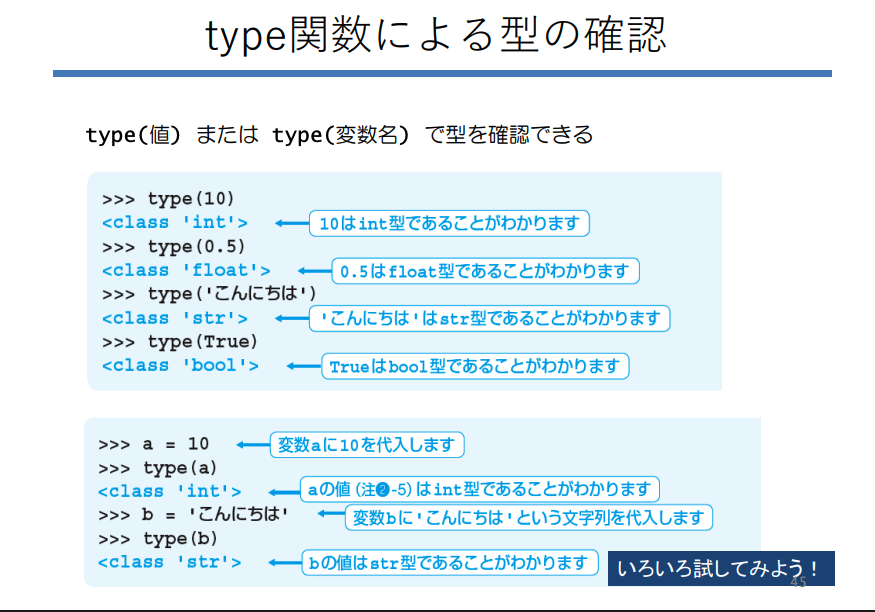
筑波大学が公開した「Python入門」が有益すぎる。
全300ページ超の圧倒的ボリュームで、基本文法からクラス、オブジェクト指向の概念まで徹底解説。単にコードをなぞるのではなく、プログラミングの本質的な考え方が身につく構成。最高のバイブル。
こちら👉
mitani.cs.tsukuba.ac.jp/book…


13
235
1,856
152,480

ClaudeCodeを無料で学習できるサイトが公開されてた。
非エンジニアの人には少し難易度高いかもだけど、かなり内容いいぞ...!?
learn-claude-agents.vercel.a…
5
414
4,604
694,251
まるとろ@Flutter&React開発 retweeted

Mar 6
ぶっちゃけますが、転職活動でAIを使わないと大損します。
① 自己分析 → ChatGPT
② 強み整理 → Claude
③ 職務経歴書 → Claude
④ 履歴書 → Gemini
⑤ 企業研究 → NotebookLM
⑥ 業界リサーチ → Perplexity
⑦ 志望動機 → Claude
⑧ 想定質問 → ChatGPT
⑨ 面接練習 → ChatGPT
使い方↓
29
454
4,862
295,089

なんか褒められたようで嬉しいです^ ^
ありがとうございます!

1
1
86
まるとろ@Flutter&React開発 retweeted

Feb 20
3
69
753
72,741
まるとろ@Flutter&React開発 retweeted

Feb 17
3
41
287
63,784