
Jun 13
🚀 Day 31 - Restarting My Full-Stack Journey
Today was one of the most exciting milestones in my backend journey so far.
Instead of learning isolated concepts, I built a complete backend project and connected multiple technologies together to create a real-world API.
🛠️ Project Built:
📇 Contact Manager API
Built using:
* Node.js
* Express.js
* MongoDB
* Mongoose
* JWT Authentication
* bcrypt
📚 What I learned today:
✅ Express Project Structure
* Routes
* Controllers
* Models
* Middleware
* Config Files
✅ MVC Architecture
* Separating business logic from routes
* Writing cleaner and scalable code
✅ MongoDB & Mongoose
* Creating Schemas
* Creating Models
* Performing CRUD Operations
* Database Relationships using ObjectId references
✅ User Authentication
* User Registration
* User Login
* Password Hashing with bcrypt
* JWT Token Generation
✅ Authorization
* Protected Routes
* Token Validation Middleware
* Accessing authenticated user information
✅ Custom Middleware
* Authentication Middleware
* Centralized Error Handling Middleware
✅ Environment Variables
* Storing secrets securely
* Database connection strings
* JWT secret keys
🛠️ Features Implemented:
✅ Register User
✅ Login User
✅ Generate JWT Token
✅ Create Contact
✅ Get All Contacts
✅ Get Single Contact
✅ Update Contact
✅ Delete Contact
✅ Protected API Routes
💡 Biggest takeaway:
Today was the first time I felt like I was building a real backend application instead of just experimenting with APIs.
Understanding how authentication, databases, middleware, controllers, and routes work together gave me a much clearer picture of how modern backend systems are structured.
From simple Express servers to a complete authenticated CRUD API , the journey is getting more exciting every day 🚀
#100DaysOfCode #FullStackDevelopment #BackendDevelopment #NodeJS #ExpressJS #MongoDB #Mongoose #JWT #WebDevelopment #LearningInPublic #ChaiCode
@Hiteshdotcom @piyushgarg_dev @yntpdotme @surajtwt_ @ChaiCodeHQ @nirudhuuu

Jun 12

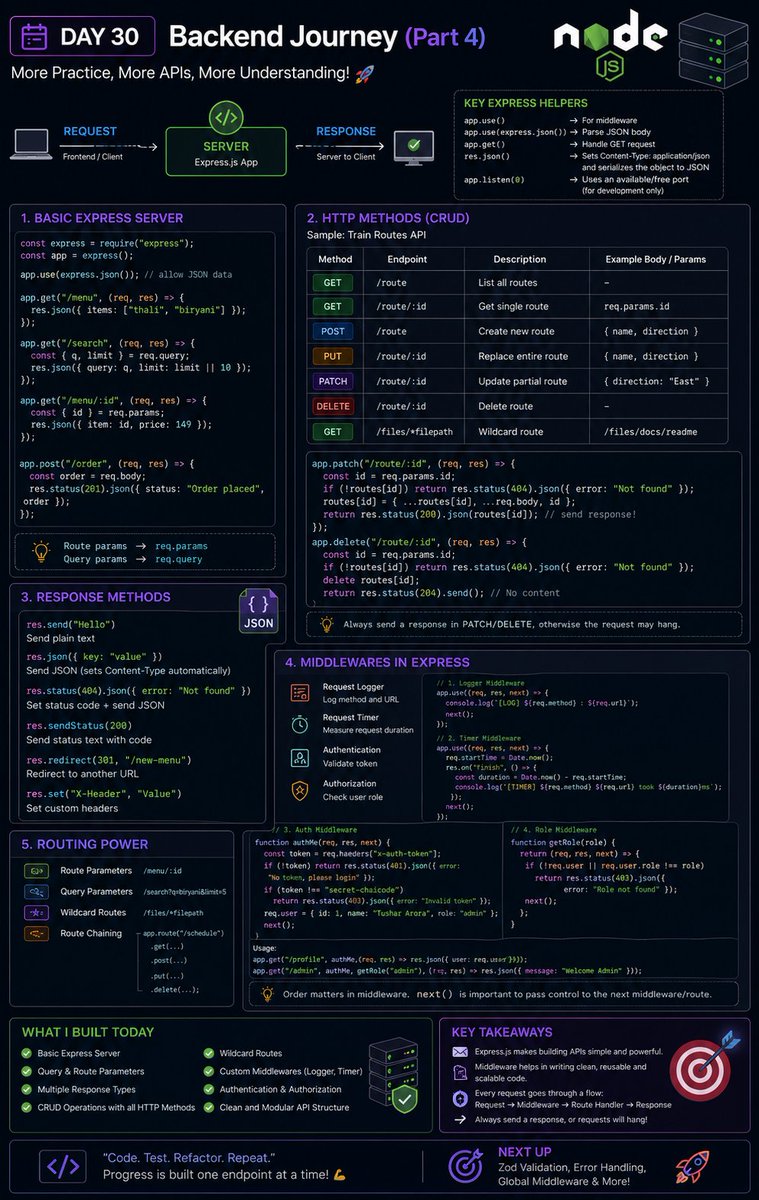
🚀 Day 30 - Restarting My Full-Stack Journey
Today was a very practical backend development day.
Instead of focusing only on theory, I spent most of my time building APIs with Express.js and understanding how routing and middleware work behind the scenes.
This was one of those days where concepts started feeling much more real because I could actually see requests moving through my application.
📚 What I learned today:
✅ Express Fundamentals
* Creating Express applications
* Understanding request and response objects
* Working with JSON data using:
app.use(express.json())
* Sending responses using:
* `res.send()`
* `res.json()`
* `res.status()`
* `res.redirect()`
* `res.sendStatus()`
✅ Route Parameters & Query Parameters
Worked with:
/menu/:id
and
/search?q=biryani
Understanding the difference between:
* `req.params`
* `req.query`
✅ HTTP Methods in Express
Implemented:
* GET
* POST
* PUT
* PATCH
* DELETE
Built CRUD-style APIs and understood where each method should be used.
✅ Express Routing
* Route handlers
* Dynamic routes
* Wildcard routes
* Route chaining using:
app.route()
✅ Middleware Deep Dive
Learned how middleware works in Express:
* Request logging middleware
* Timing middleware
* Authentication middleware
* Authorization middleware
Understanding:
next()
and why forgetting it can cause requests to hang forever.
✅ Authentication & Authorization
Built custom middleware for:
* Token validation
* User identification
* Role-based access control
Understanding the difference between:
* Authentication → Who are you?
* Authorization → What are you allowed to do?
🛠️ Practical Work
Built multiple Express applications that included:
✅ Basic Express Server
✅ Route Parameters
✅ Query Parameters
✅ CRUD Operations
✅ Request Logging
✅ Authentication Middleware
✅ Role-Based Authorization
✅ Custom Response Handling
💡 Biggest takeaway:
Today made me realize that middleware is one of the most powerful concepts in backend development.
Instead of writing the same code in every route, middleware allows us to handle logging, authentication, validation, and many other concerns in a clean and reusable way.
Backend development is starting to feel much more structured and scalable now 🚀
#100DaysOfCode #FullStackDevelopment #BackendDevelopment #NodeJS #ExpressJS #JavaScript #APIs #Middleware #LearningInPublic #ChaiCode #DAY1 #DAY30 #100DaysOfSilence
@Hiteshdotcom @piyushgarg_dev @yntpdotme @surajtwt_ @ChaiCodeHQ
1
25

Jun 12
Today I learned Mongoose Relationships 🔗
✅ One-to-Many Relationships
✅ Referencing documents with ObjectId
✅ Using ref to connect collections
✅ Fetching related data with populate()
#MongoDB #Mongoose #NodeJS #ExpressJS #WebDevelopment #100DaysOfCode

1
1
17


Jun 9
🚨 CYBER INTELLIGENCE ALERT: 🇫🇷 [UNCONFIRMED] ALLEGED API KEY COMPROMISE — LEGALPLACE.FR
[STATUS: UNCONFIRMED / THREAT ACTIVITY / CREDENTIAL EXPOSURE]
A post on a specialized forum has been identified by the threat actors "Morphyne" and "Pwn2dd," belonging to the "LunarisSec" group, who claim to have obtained a Metabase SETUP token linked to the LegalPlace.fr platform.
Threat Actors: Morphyne, Pwn2dd (LunarisSec Group)
Declared Scope: Potentially extensive access to sensitive files using the Metabase SETUP token.
Evidence of Access: The publication includes a sample data exhibiting a JSON response structure, containing object identifiers (objectId), usernames (admin), associated emails, and active session tokens.
⚠️ Security Considerations
Intrusion Risk: Access to a Metabase configuration could allow unauthorized attackers to query connected databases, view business intelligence dashboards, and extract confidential corporate information or customer personal data.
Impact of Credentials: Exposure of session tokens and setup tokens is critical, as these can be used to bypass authentication controls and gain persistent access to company systems.
VECERT TOOLS
Strategic Monitoring Tools & Intelligence Platform:
🌐 analyzer.vecert.io
Security Verification & Monitoring:
🛡️ monitor.vecert.io
#CyberSecurity 🔐 #France 🇫🇷 #LegalPlace #DataBreach 📁 #Metabase #CredentialLeak #ThreatIntelligence 📊 #VECERT 🏢 #UnderInvestigation ⚠️

7
9
1,802

study Map<ObjectID, Object>
#Sui
Jun 4

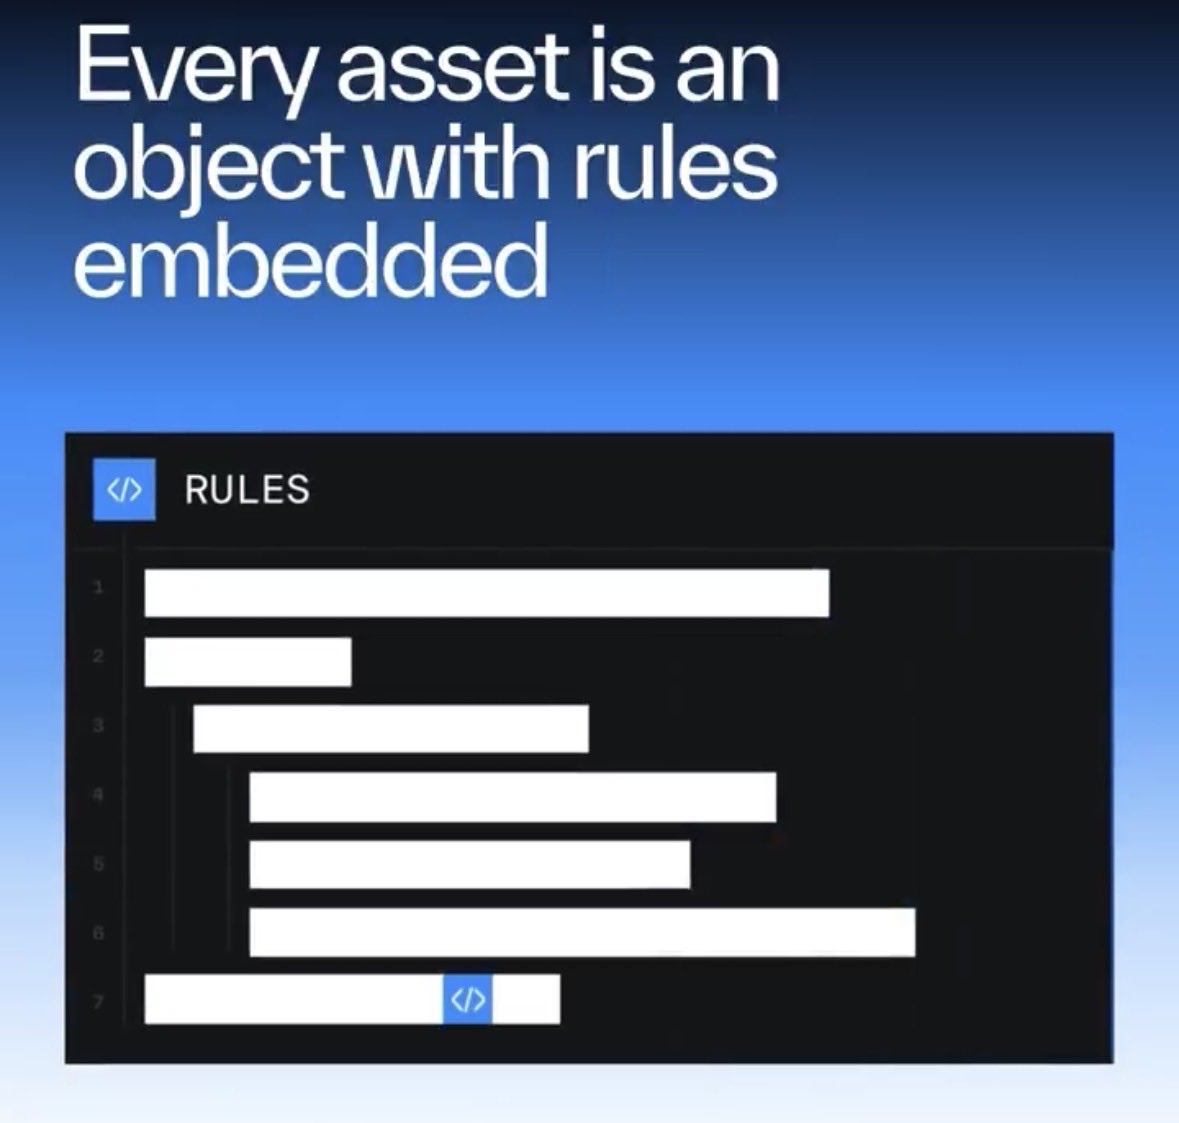
$25B assets tokenized. Trillions waiting.
The gap isn't demand; it's infrastructure.
On Sui, every asset is a programmable object, and complex activity settles in under a second.
2
2
167

Jun 4
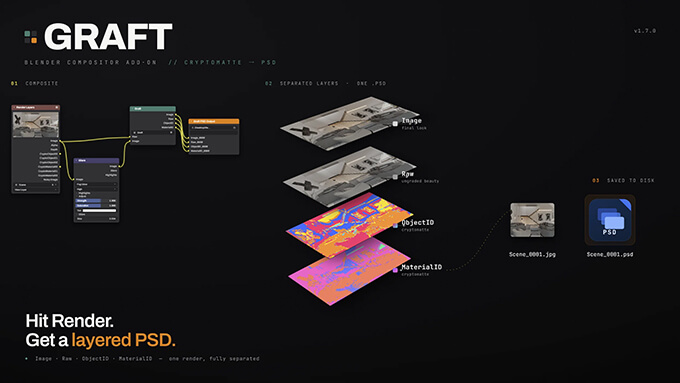
Graft-Blenderでレンダリングすると自動的にBeauty、Raw、ObjectID、MaterialIDの入ったPSDデータを作成してくれるアドオン
modelinghappy.com/archives/6…
定価25ドルですが最初の50ダウンロードはクーポンコード「RAIHBETA」を入力すると無料ダウンロードする事が出来ます。
#b3d #Blender3d
14
4,235

Jun 2
📚 今日の学び
Mongooseのリレーションを学習。
✅ ObjectId で他のデータを参照
✅ ref で参照先のモデルを指定
✅ populate() で関連データを取得
例)posts: [{ type: Schema.Types.ObjectId, ref: 'Post' }]
「IDでデータ同士を繋ぐ仕組み」と考えると理解しやすかった。😊
2
112

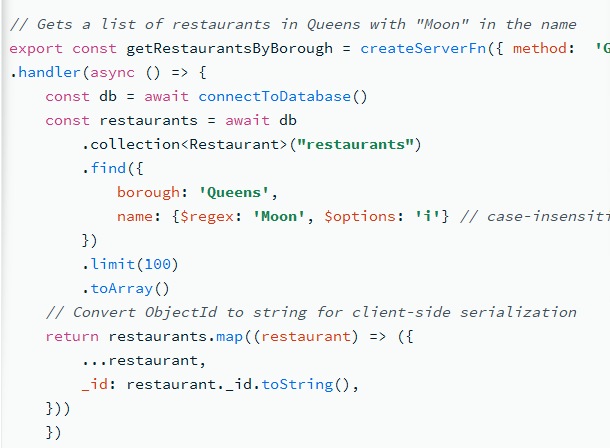
I checked the MongoDB docs for TanStack and noticed they manually convert ObjectId values to strings for client-side serialization. Is there a workaround for this, or is manual serialization currently the recommended approach?
@schanuelmiller @tannerlinsley
1
4
969

May 30
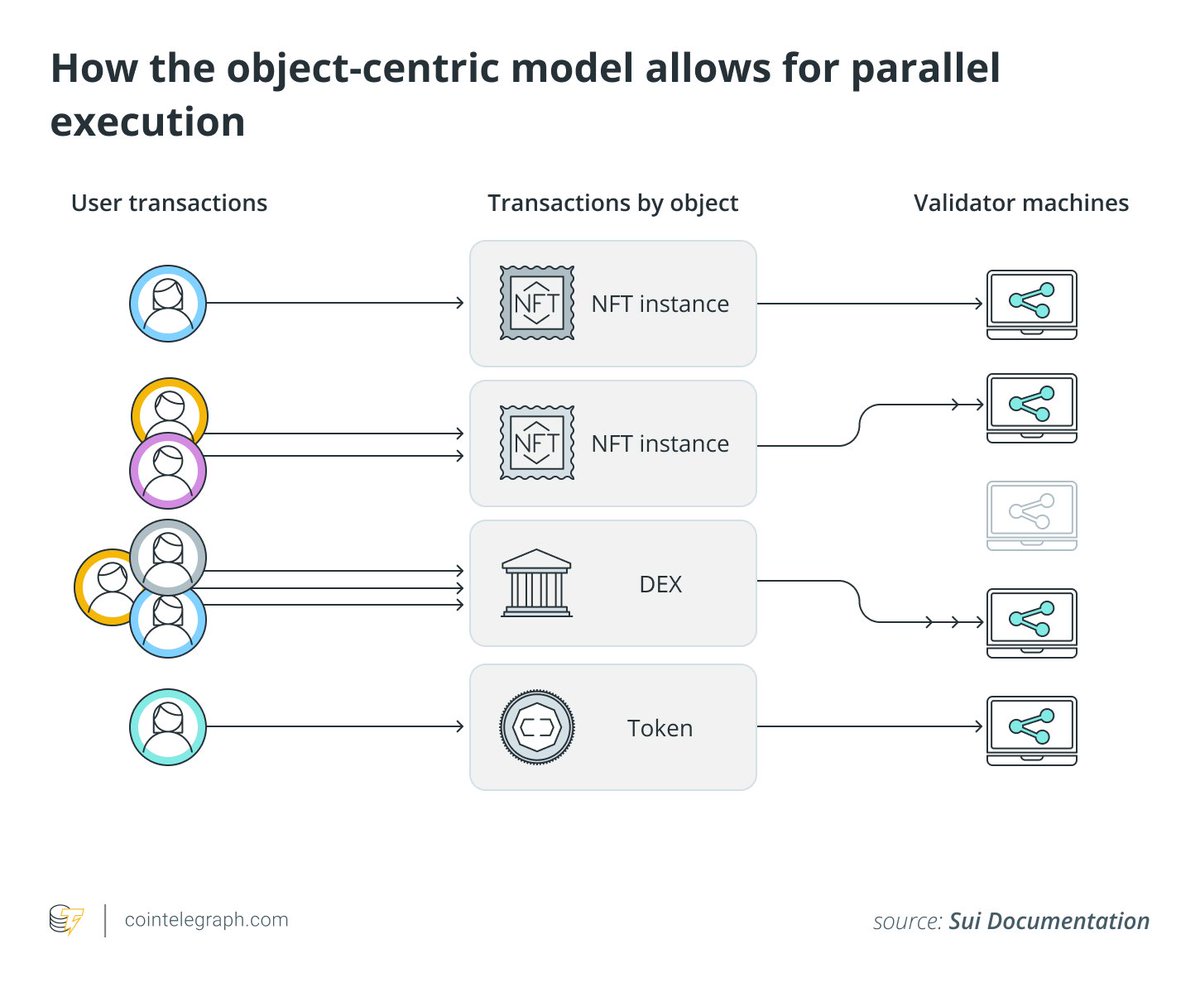
the core unit of data are objects at the protocol-level:
◼️ complex modeling
◼️ dynamic
◼️ composable
◼️ truely ownable
it's all Map<ObjectID, Object> as the secret sauce of the protocol and also leads to true deterministic parallelism and horizontal scalability (across nodes)
1
1
6
411

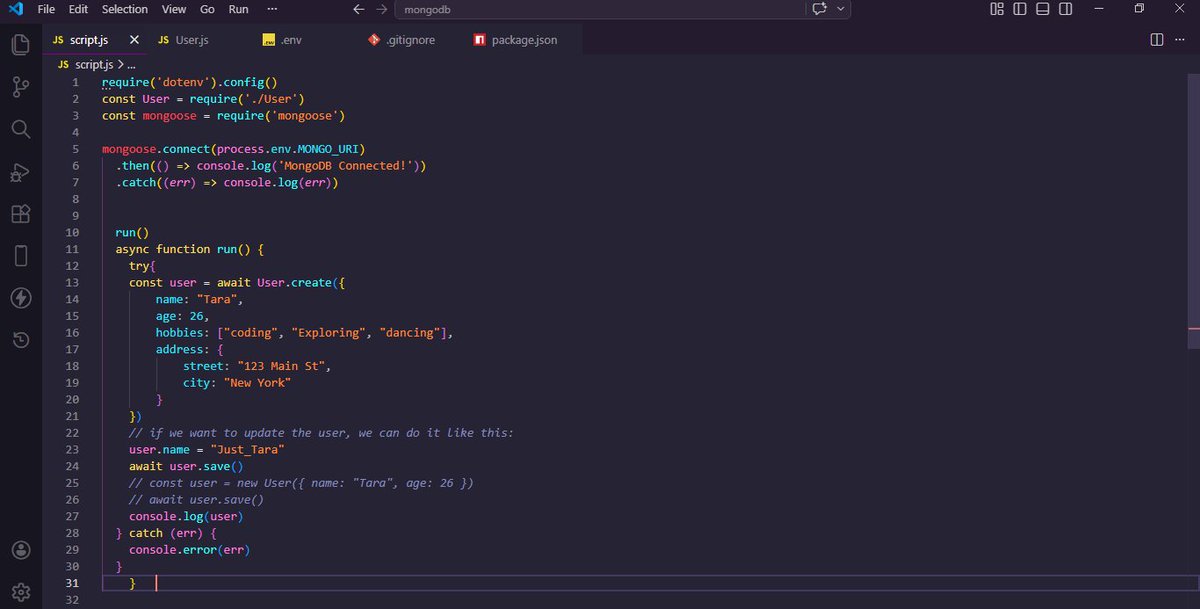
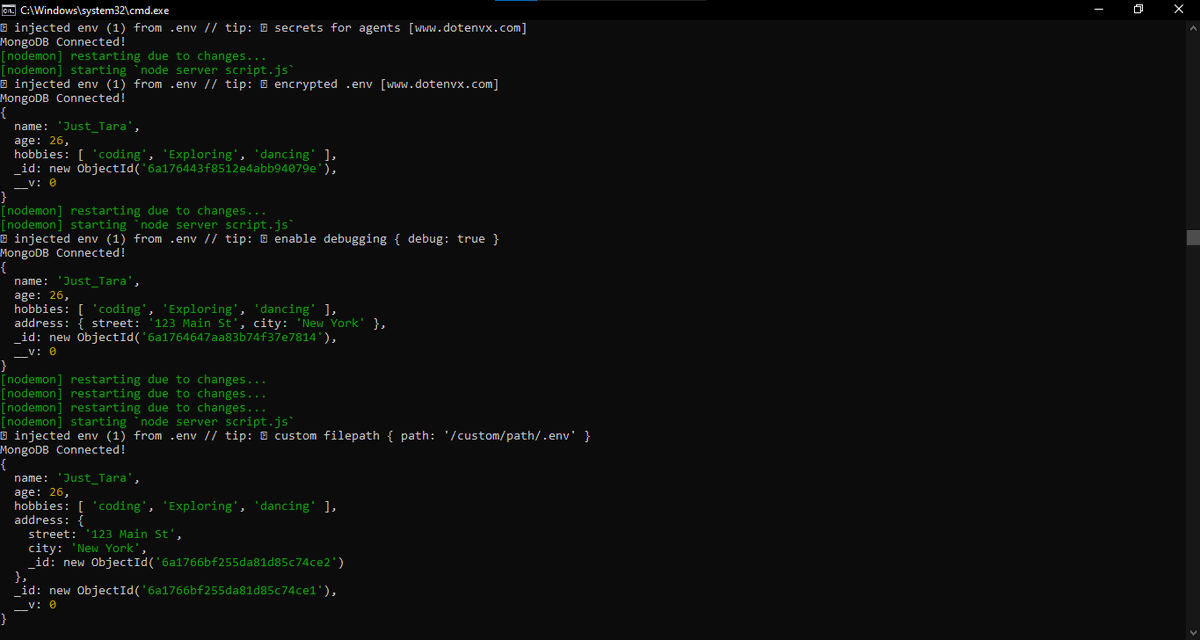
Day 39 of Learning Backend
MongoDB is finally working... Tears of joy!
I learnt about:
– Creating a Mongoose schema with nested schemas
– Different data types in a schema (String, Number, Date, ObjectId, Array)
– Using User.create() to insert data into MongoDB Atlas

11
6
61
852


May 24
إنشاء سكربت إرفاق الصور بالمعالم الجغرافية داخل جدول البيانات الوصفية
GIS Feature Photo Attachment Script Prompt
وظيفة البرومبت
هذا البرومبت يطلب من الذكاء الاصطناعي إنشاء سكربت احترافي يقوم بإضافة الصور وربطها بالمعالم الجغرافية داخل طبقة GIS، بحيث تصبح كل صورة مرتبطة بسجل محدد في جدول البيانات الوصفية، مع دعم الصور المتعددة لكل معلم، وفحص الأخطاء، وإنشاء تقرير نهائي بالصور التي تم ربطها والصور التي فشل ربطها.
المنصة الأنسب للاستخدام
الأفضل استخدام ChatGPT Codex أو ChatGPT لتوليد السكربت؛ لأن المطلوب كود Python تشغيلي.
ثم يُنفذ الناتج داخل ArcGIS Pro إذا كان المطلوب مرفقات محفوظة فعليًا داخل قاعدة البيانات الجغرافية، أو داخل QGIS إذا كان المطلوب ربط الصور عبر مسارات الملفات وعرضها في نموذج المعلم.
طريقة الاستخدام
انسخ البرومبت الكامل في ChatGPT أو Codex، ثم حدد البرنامج المطلوب: ArcGIS Pro أو QGIS. بعد ذلك زوّد النموذج بمسار الطبقة، واسم حقل المعرف الفريد، ومجلد الصور، وطريقة المطابقة بين الصور والمعالم، مثل أن يكون اسم الصورة مطابقًا لقيمة الحقل، أو أن يوجد ملف CSV يحتوي على رقم المعلم ومسار الصورة. بعد الحصول على السكربت، شغّله داخل Python Window أو Script Tool في ArcGIS Pro، أو داخل Python Console / Processing Script في QGIS.
تنبيه مهم
لضمان أعلى درجة ممكنة من الدقة وصحة الإخراج، يجب تزويد الذكاء الاصطناعي يدويًا بكل البيانات الموثقة المتاحة لديك قبل تنفيذ البرومبت أو ضمن نصه نفسه؛ لأن جودة المخرجات ترتبط مباشرة بجودة المدخلات، فالذكاء الاصطناعي — كأي نظام تحليلي أو برمجي — إذا بُنِي على بيانات صحيحة وموثقة ومنظمة، كانت نتائجه أقرب إلى الصحة والدقة والاعتمادية، أما إذا كانت البيانات ناقصة أو غير دقيقة أو غير موثقة، فإن المخرجات ستتأثر بذلك مهما كانت قوة النموذج.
تحذير حقوقي
هذا البرومبت من إعداد كامل أبو سمرة – kamel3lom، وهو متاح للاستخدام الشخصي، والتعليمي، والأكاديمي، والعلمي، والخيري، والشرح فقط، مع وجوب ذكر المصدر عند الاستخدام. ويُمنع استخدامه تجاريًا أو ربحيًا، أو إعادة نشره بصياغة جديدة، أو بيعه، أو استخدامه لكسب المتابعين، أو إنهاء أعمال مهنية للغير إلا بعد شرائه، والشراء متوفر حاليًا في المملكة العربية السعودية فقط.
ضع لايك / إعجاب وتعليق ومتابعة
البرومبت الكامل الجاهز للنسخ واللصق
اسم البرومبت:
برومبت إنشاء سكربت إرفاق الصور بالمعالم الجغرافية داخل جدول البيانات الوصفية
GIS Feature Photo Attachment Script Prompt
إعداد: كامل أبو سمرة – kamel3lom
أنت خبير GIS Automation ومبرمج Python متخصص في ArcGIS Pro / ArcPy وQGIS / PyQGIS.
مطلوب منك إنشاء سكربت احترافي كامل يقوم بإضافة وإرفاق وربط الصور بالمعالم الجغرافية داخل طبقة GIS، بحيث تصبح الصور مرتبطة بسجلات جدول البيانات الوصفية Attribute Table، ويمكن فتحها أو عرضها عند اختيار المعلم الجغرافي.
دقة قبل الجمال، تحقق قبل الاستنتاج، تفصيل قبل الاختصار، إخراج نهائي قبل الشرح.
أولًا: اسألني في البداية عن البرنامج المطلوب استخدامه، واختر مسار التنفيذ بناءً على إجابتي:
1. ArcGIS Pro / ArcPy
2. QGIS / PyQGIS
ثانيًا: اجعل السكربت يقبل المدخلات التالية:
- مسار الطبقة الجغرافية Feature Class / Shapefile / GeoPackage Layer.
- اسم حقل المعرف الفريد للمعالم، مثل: OBJECTID أو ID أو Parcel_ID أو Feature_ID.
- مسار مجلد الصور.
- طريقة مطابقة الصور بالمعالم:
أ. مطابقة اسم الصورة مع قيمة حقل المعرف الفريد.
ب. أو استخدام ملف CSV يحتوي على عمود معرف المعلم وعمود مسار الصورة.
- السماح بوجود أكثر من صورة للمعلم الواحد.
- تحديد امتدادات الصور المسموحة: JPG, JPEG, PNG, TIFF, WEBP.
- تحديد مجلد إخراج لتقرير النتائج.
- خيار نسخ الصور إلى مجلد منظم جديد أو استخدام مساراتها الأصلية.
- خيار حفظ سجل Log كامل لعملية التنفيذ.
ثالثًا: في حالة اختيار ArcGIS Pro / ArcPy:
أنشئ سكربت Python يستخدم مكتبة arcpy، ويقوم بالآتي:
1. التحقق من أن الطبقة داخل File Geodatabase أو Enterprise Geodatabase؛ لأن نظام المرفقات الحقيقي في ArcGIS Pro يعمل داخل Geodatabase.
2. فحص وجود حقل المعرف الفريد.
3. تفعيل المرفقات على الطبقة باستخدام Enable Attachments إذا لم تكن مفعّلة مسبقًا.
4. إنشاء Match Table مؤقت أو دائم يحتوي على:
- حقل معرف المعلم.
- حقل مسار الصورة.
5. فحص الصور الموجودة داخل مجلد الصور ومطابقتها مع قيم حقل المعرف.
6. دعم حالة وجود أكثر من صورة للمعلم الواحد، مثل:
ID_1.jpg
ID_2.jpg
ID_photoA.png
7. استخدام Add Attachments لإضافة الصور كمرفقات فعلية مرتبطة بسجلات الطبقة.
8. إنشاء تقرير CSV نهائي يحتوي على:
- معرف المعلم.
- اسم الصورة.
- مسار الصورة.
- حالة الربط: ناجح / فشل.
- سبب الفشل إن وجد.
9. طباعة رسائل واضحة للمستخدم أثناء التشغيل.
10. إضافة معالجة أخطاء احترافية try/except.
11. جعل السكربت صالحًا للعمل كـ Standalone Python Script وكـ ArcGIS Pro Script Tool.
12. في نهاية الإجابة، اشرح لي باختصار أين أضع السكربت داخل ArcGIS Pro وكيف أحوله إلى Script Tool، مع ذكر أسماء Parameters المقترحة وترتيبها.
رابعًا: في حالة اختيار QGIS / PyQGIS:
أنشئ سكربت Python يستخدم PyQGIS، ويقوم بالآتي:
1. قراءة الطبقة النشطة أو طبقة يتم تحديد مسارها يدويًا.
2. فحص وجود حقل المعرف الفريد.
3. إنشاء حقل جديد باسم photo_path إذا لم يكن موجودًا.
4. ربط كل معلم بالصورة المناسبة عبر تخزين مسار الصورة في حقل photo_path.
5. دعم وجود أكثر من صورة للمعلم الواحد بإحدى طريقتين:
أ. إنشاء حقول متعددة مثل photo_1, photo_2, photo_3.
ب. أو إنشاء جدول صور منفصل photos_table يحتوي على:
- feature_id
- photo_path
- photo_name
- photo_order
ثم إنشاء علاقة منطقية بين الطبقة وجدول الصور.
6. ضبط إعدادات النموذج Attribute Form بحيث يظهر حقل الصورة كـ Attachment / External Resource Widget عندما يكون ذلك ممكنًا.
7. جعل الصور قابلة للفتح من داخل QGIS عبر Action أو Form Widget.
8. إنشاء تقرير CSV نهائي يوضح:
- معرف المعلم.
- الصور التي تم ربطها.
- الصور غير المطابقة.
- المعالم التي لم يُعثر لها على صورة.
9. حفظ التعديلات على الطبقة بأمان.
10. إضافة رسائل تقدم واضحة داخل QGIS Message Log أو Console.
11. إضافة معالجة أخطاء احترافية.
12. جعل السكربت صالحًا للعمل داخل QGIS Python Console أو كـ Processing Script.
13. في نهاية الإجابة، اشرح لي باختصار أين أضع السكربت داخل QGIS وكيف أشغله خطوة بخطوة.
خامسًا: قواعد المطابقة بين الصور والمعالم:
- يجب أن تبحث عن الصور داخل المجلد المحدد والمجلدات الفرعية.
- يجب تجاهل اختلاف حالة الأحرف في الامتداد.
- يجب السماح بالمطابقة حسب:
أ. الاسم الكامل للصورة يساوي قيمة المعرف.
ب. أو اسم الصورة يبدأ بقيمة المعرف متبوعًا بشرطة أو underscore.
ج. أو ملف CSV خارجي يحدد الربط بدقة.
- لا تحذف أي صورة أصلية.
- لا تعدّل أسماء الصور الأصلية إلا إذا طلب المستخدم ذلك صراحة.
- لا تربط صورة بمعلم إلا عند وجود تطابق واضح.
- إذا كان التطابق غير مؤكد، ضعها في تقرير الصور غير المطابقة بدل ربطها عشوائيًا.
سادسًا: مواصفات الكود:
- اكتب الكود كاملًا وقابلًا للتشغيل.
- ضع تعليقات عربية واضحة داخل الكود.
- استخدم أسماء متغيرات مفهومة.
- افصل الوظائف إلى دوال منظمة:
validate_inputs()
scan_images()
build_match_table()
attach_or_link_photos()
write_report()
main()
- اجعل الكود يتحقق من وجود الملفات والمجلدات قبل التشغيل.
- اجعل الكود يطبع ملخصًا نهائيًا:
عدد المعالم الكلي.
عدد الصور الكلي.
عدد الصور التي تم ربطها.
عدد الصور غير المطابقة.
عدد المعالم التي لا تملك صورًا.
مسار تقرير النتائج.
سابعًا: صيغة الإخراج المطلوبة:
أخرج النتيجة بالترتيب التالي:
1. عنوان السكربت.
2. المتطلبات الفنية.
3. شرح مختصر لفكرة العمل.
4. الكود الكامل.
5. طريقة التشغيل داخل البرنامج المختار.
6. طريقة تحويله إلى أداة Script Tool أو Processing Script.
7. ملاحظات مهمة لتجنب الأخطاء.
8. مثال عملي على أسماء الصور الصحيحة.
9. تقرير متوقع لشكل النتائج.
ثامنًا: قيود صارمة:
- لا تكتب سكربتًا نظريًا أو ناقصًا.
- لا تستخدم مكتبات غير ضرورية.
- لا تفترض أن الصور كلها صحيحة.
- لا تربط الصور عشوائيًا.
- لا تخلط بين نظام ArcGIS Pro للمرفقات الحقيقية ونظام QGIS القائم غالبًا على مسارات الصور وواجهات العرض.
- وضّح الفرق بين التخزين الحقيقي للمرفقات داخل Geodatabase في ArcGIS Pro، وبين الربط عبر مسار ملف أو جدول صور في QGIS.
- إذا كانت هناك أكثر من طريقة، اختر الطريقة الأكثر استقرارًا ووضح سبب اختيارها.
- لا تكتفِ بالشرح؛ المطلوب كود كامل قابل للتنفيذ.
بياناتي التي سأزودك بها بعد ذلك:
- البرنامج المطلوب: [ArcGIS Pro أو QGIS]
- مسار الطبقة:
- اسم حقل المعرف الفريد:
- مسار مجلد الصور:
- هل أسماء الصور مطابقة للمعرف؟ [نعم/لا]
- هل يوجد CSV للربط؟ [نعم/لا]
- هل يوجد أكثر من صورة لكل معلم؟ [نعم/لا]
- مسار مجلد الإخراج:
التوقيع النصي داخل السكربت والتقرير:
Created for Kamel Abu Samra – kamel3lom
ابدأ الآن بإنشاء السكربت الكامل بعد تحديد البرنامج المطلوب.

2
10
885

May 21
🧿 $IOTA Ecosystem Update:
🟦 2.4B @iota staked
🟦 $248M total market cap
🟦 56M total transactions
🟦 11M NFTs minted
🟦 5M total accounts
📰 Ecosystem News:
✅ Salus brings insured on-chain settlements to trade finance
✅ ObjectID launches decentralized oracle network on IOTA Testnet
✅ Turing Certs scales sovereign digital trust infrastructure
🔐 Secured by validators including
@encapHQ | @staketab | @dlt_green | @TokenLabsX | @staking4all | @StakinOfficial | @luganodes | @sentioxyz | @lavender_five 58 more securing the network ⚡
@salusplatform | @ObjectID_io | @turing_certs

2
14
31
937

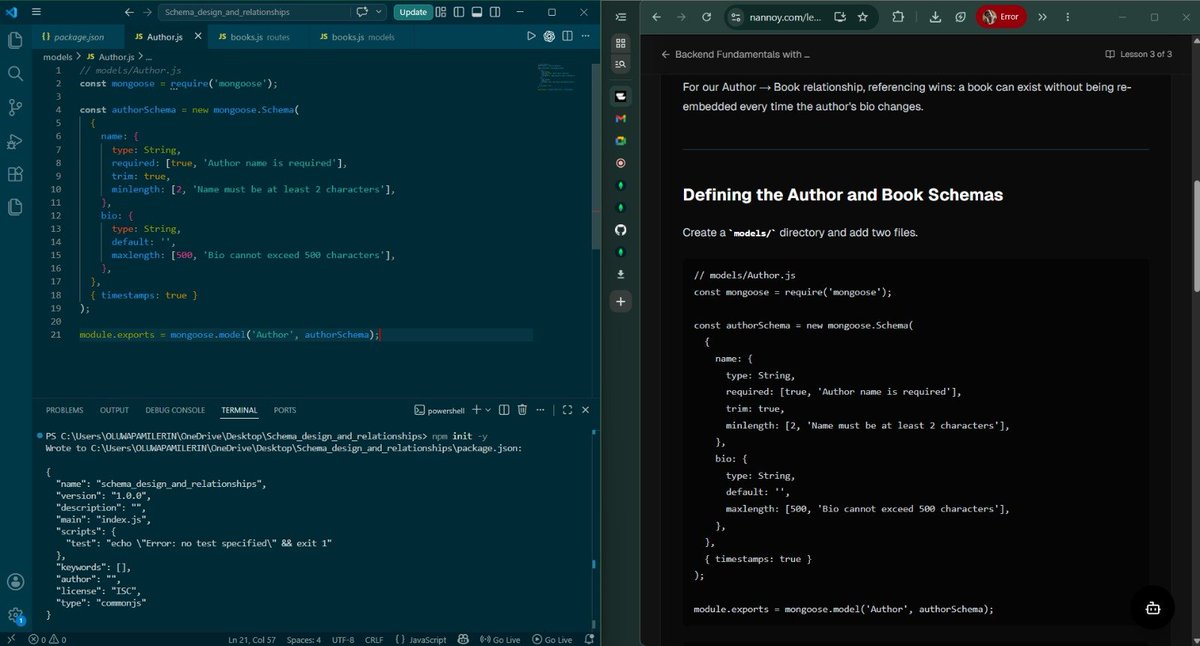
May 15
DAY 11 OF MY BACKEND JOURNEY
Today, I mastered Schema Design and Relationships with Mongoose.
Learning how to structure data properly and connect collections without duplication.
Learning with @Nannoyapp
● I learned why schema design matters in MongoDB, even though it's schema-less at the database level, Mongoose enforces structure to keep data valid and queries predictable.
● I discovered the power of referencing over embedding, when entities like Authors and Books have independent lifecycles, referencing prevents data duplication and makes updates cleaner.
● I understood how to use populate() to replace ObjectId references with full documents, making API responses rich without storing redundant data.
● I learned that populate() issues a second query, so projecting only needed fields keeps latency low and performance high.
● I troubleshot a MongoDB connection issue when testing locally and realized I needed to ensure my database was actually running before starting the server.
● I now know that good schema design is foundational, it prevents bugs, keeps data consistent, and makes building scalable APIs possible.

May 14

DAY 10 OF MY BACKEND JOURNEY
Today, I mastered CRUD Operations with Mongoose.
The core pattern that powers every REST API by exposing create, read, update, and delete operations over HTTP.
Learning with @Nannoyapp
● I learned that CRUD reduces every backend feature user accounts, blog posts, orders to four fundamental operations that map directly to HTTP methods: POST, GET, PUT, and DELETE.
● I discovered that Product.create() is shorthand for saving new documents, Product.find() retrieves all documents, and Product.findById() retrieves one specific document by ID.
● I understood the importance of always checking if (!product) before using query results, because Mongoose returns null instead of throwing an error when no document is found, requiring explicit 404 handling.
● I learned that findByIdAndUpdate() requires { new: true } to return the updated document and runValidators: true to enforce schema validation on updates, preventing invalid data from bypassing rules.
● I discovered the complete CRUD-to-HTTP mapping: POST creates (201), GET reads (200), PUT updates (200), and DELETE removes (200), with proper status codes signaling operation success to clients.
● I understood that testing each CRUD operation in order POST first to create data, then GET, PUT, DELETE builds confidence and confirms data actually persists in MongoDB.
● I troubleshot MongoDB connection issues with VPN and learned that network restrictions require proper configuration before the API can communicate with the database.
● I now know that mastering this five-handler pattern makes building any resource API repeatable and scalable swap the model name and you have a complete REST API in under 50 lines of code.


5
4
33
1,468


All Important Projects and Integrations After Rebased
Technology and Protocol
- IOTA Rebased Mainnet
- Starfish Consensus
- IOTA Identity
- IOTA Notarization
- IOTA Hierarchies
- IOTA Gas Station
- IOTA Tokenization
- IOTA Names
- Account Abstraction
- Validator Reputation Score
- FastCommitSyncer
- Indexer and gRPC upgrades
- IOTA EVM Bridge
- IOTA EVM Explorer
- Legacy Token Migration
Global Trade and Supply Chains
- TWIN
- TLIP
- ADAPT
- UK Cabinet Office Border Trade Demonstrations
- Teesside Port Information Sharing Network
- RESULD
- Virtual Watch Tower
- IOTA Expert Advisory Board
- TWIN Foundation
- VeriPura
- Kalalohko
- Salus
Digital Identity, Legal Identity, and Trust Infrastructure
- GLEIF
- Legal Entity Identifier
- Verifiable Legal Entity Identity
- IOTA Identity
- IOTA Trust Framework
- IOTA Notarization
- IOTA Hierarchies
- Turing Space
- Turing Certs
- W3C Verifiable Credentials
Business Innovation and Real-World Projects
- Impierce Technologies
- Orobo
- ObjectID
- Turing Certs
- Kalalohko
- VeriPura
- Salus
Digital Product Passports and Sustainability
- Orobo
- Digital Product Passports
- ReUse Properties
- Moovwave
- Metafarms
- Battery Passports
- Textile DPPs
- Construction DPPs
- Seafood traceability
RealFi, Mobility, and Physical Infrastructure
- Bolt.Earth
- Tokenized EV charging infrastructure
- EV charging stations
- Green asset tokenization
- Real-world infrastructure on-chain
- Malaysia and UK pilot references
Institutional Infrastructure
- BitGo
- Bullish
- Turnkey
- LayerZero
- Stargate
- Uphold
DeFi and Ecosystem
- Swirl
- Virtue
- Pools Finance
- Liquidlink
- CyberPerp
- Switchboard Oracles
- MasterZ × IOTA Hackathon
- Build Now Contest
- IOTA Hackathon Malaysia
- Moveathon
- Ambassador Program
- GiveRep
Digital Product Passports, Industry, and Circular Economy
- Siemens Smart Infrastructure
- SIRIUS 3RW5-Z R11 refurbished soft starter
- Asset Administration Shell, AAS
- DLT:IOTA
- Industrial Digital Product Passports
- Circular economy product data
- ID Link / QR-based product identity
- EU ESPR lifecycle compliance
1
3
120

📢 Felicitó al Grupo de Perú... #PeruLibre
🏮🏮🏮🇵🇪. Open Election Perú, @opene_election REVELA el esquema técnico del fraude electoral digital ya habría quedado al descubierto. Todo por un error insólito: a la ONPE se le olvidó ocultar un código interno de 24 caracteres. Abro hilo para entenderlo
Qué pasó?
Cuando consultas un acta en su web, ves los votos. Pero por descuido, la ONPE dejó visible en su código público el "ObjectId" (ej. 60a7b5d7b614...). Es como si al darte un recibo de compra, te dieran también el número de serie de la caja registradora.
Los auditores tomaron las actas públicas e hicieron "ingeniería inversa" a ese código. Descubrieron que esos números escondían la huella de la máquina exacta que procesó el acta. Así mapearon que la ONPE usaba 9 servidores para repartirse el trabajo.
Aquí viene lo grave, en un sistema transparente, los 9 servidores se dividen el trabajo por igual (balanceo de cargas). Pero los datos revelan que casi 20,000 actas pasaron en un 96.4% por UN SOLO servidor, el identificado como "d7b614". Un canal VIP escondido. 🚨📉
De dónde venían esas actas del canal VIP? El 70% eran de zonas rurales extremas (VRAEM, Loreto). Zonas donde el acta de papel tarda DÍAS en llegar. Sin embargo, en el sistema, estas actas tenían la huella digital de haber sido procesadas al instante en Lima.
El esquema del presunto fraude
Mientras el acta física real viajaba en canoa por el río durante días (el apagón informativo), un operador en Lima habría usado ese servidor "d7b614" para inyectar actas digitales prefabricadas directo a la base de datos.
No necesitaron hackear a la ONPE. Fue un error básico de los programadores (Fuga de Información en la API) lo que dejó expuesto el plano de su bóveda. El rastro matemático no miente y la ONPE está obligada a dar explicaciones técnicas.
Fuente: Open Election Perú
35
395
757
12,359

2/7 ¿Qué pasó?
Cuando consultas un acta en su web, ves los votos. Pero por descuido, la ONPE dejó visible en su código público el "ObjectId" (ej. 60a7b5d7b614...). Es como si al darte un recibo de compra, te dieran también el número de serie de la caja registradora. 📄🔍
1
20
44
922