
20 packages. Current versions. The kind of stack thousands of teams are running right now.
Next.js 14. React 18. Express. Django. Spring. axios. jsonwebtoken. OpenSSL 3.1.4.
146 known vulnerabilities found. Live from OSV NVD GHSA.
SHA-384 Merkle commitment. RS256 signed. Bitcoin-anchored. Independently verifiable.
The tool doesn't have an opinion. It just shows you what's there.
Free trial — no account needed:
#SupplyChainSecurity #SBOM #AppSec #DevSecOps #CycloneDX #NextJS #Django @nextjs @django @webpack @expressjs @SpringFramework @SocketSecurity @anchore #CycloneDX

1
20

Jun 7
📚 Learning Notes: Creating JWT Access Tokens with RS256
While learning authentication systems, I finally moved from dummy tokens to generating real JWT access tokens.
One thing that surprised me:
Generating a JWT is easy.
Generating one securely is where the real learning begins.
🔹 What is an Access Token?
An access token is a signed piece of data that proves a user's identity and permissions.
Instead of querying the database on every request, APIs can validate the token and trust the information inside it.
A typical flow looks like:
User Login
↓
Generate JWT
↓
Store in HTTP-only Cookie
↓
Send with Requests
↓
Verify JWT
↓
Access Protected Resources
🔹 Using jsonwebtoken
To generate JWTs in Node.js:
npm install jsonwebtoken
The library provides:
• Token Creation (sign)
• Token Verification (verify)
• Support for multiple algorithms
🔹 Building the JWT Payload
The payload contains information about the authenticated user.
Example claims:
{
"sub": "1",
"role": "customer"
}
Common claims include:
✅ sub → User ID
✅ role → User Role
✅ iat → Issued At
✅ exp → Expiration Time
⚠️ Important Lesson
JWT payloads are encoded, not encrypted.
Never store:
❌ Passwords
❌ Secrets
❌ Sensitive personal data
Anyone with the token can decode the payload.
🔹 Why RS256 Instead of HS256?
Earlier I learned about two popular signing algorithms:
HS256
One Secret Key
↓
Sign Verify
RS256
Private Key
↓
Sign
Public Key
↓
Verify
RS256 uses asymmetric cryptography.
Benefits:
✅ Better for microservices
✅ Easier key rotation
✅ Public key can be shared safely
✅ Verification without exposing signing secrets
This is why many production systems prefer RS256.
🔹 Generating RSA Keys
The authentication service generates:
🔒 Private Key
Used only for signing tokens.
🔓 Public Key
Shared with other services to verify tokens.
Key generation can be automated using Node's built-in crypto module.
A good practice is keeping keys inside:
certs/
├── private.pem
└── public.pem
and excluding them from version control.
🔹 Signing the Access Token
The token was configured with:
✓ RS256 Algorithm
✓ 1 Hour Expiration
✓ Issuer Information
✓ User Claims
Result:
HEADER.PAYLOAD.SIGNATURE
A fully signed JWT ready for authentication.
🔹 Inspecting the Token
After generating the token, decoding it revealed:
Header:
{
"alg": "RS256",
"typ": "JWT"
}
Payload:
{
"sub": "1",
"role": "customer",
"iss": "auth service"
}
Seeing the actual structure helped connect the theory behind JWTs with a real implementation.
💡 Biggest takeaway
JWTs are more than just random strings.
They're cryptographically signed documents that allow systems to verify identity without storing session state.
Understanding payloads, claims, signing algorithms, and key management is just as important as generating the token itself.
@codersGyan
#JWT #Authentication #NodeJS #TypeScript #BackendDevelopment #SoftwareEngineering #WebSecurity #Microservices #LearningInPublic #RS256 #jsonwebtoken #WebDevelopment

Jun 3

📚 Day 3 of Building a Microservices-Based Project
Over the past few days, I've been working on the Authentication Service and learning more about how authentication and session management are handled in backend systems.
Today's focus was on stateless vs stateful authentication, JWTs, Access Tokens, Refresh Tokens, and token persistence.
Some of the things I explored:
🔹 Understanding the difference between stateless and stateful authentication
🔹 Learning how JWT-based authentication enables stateless authorization
🔹 Understanding the difference between Access Tokens and Refresh Tokens
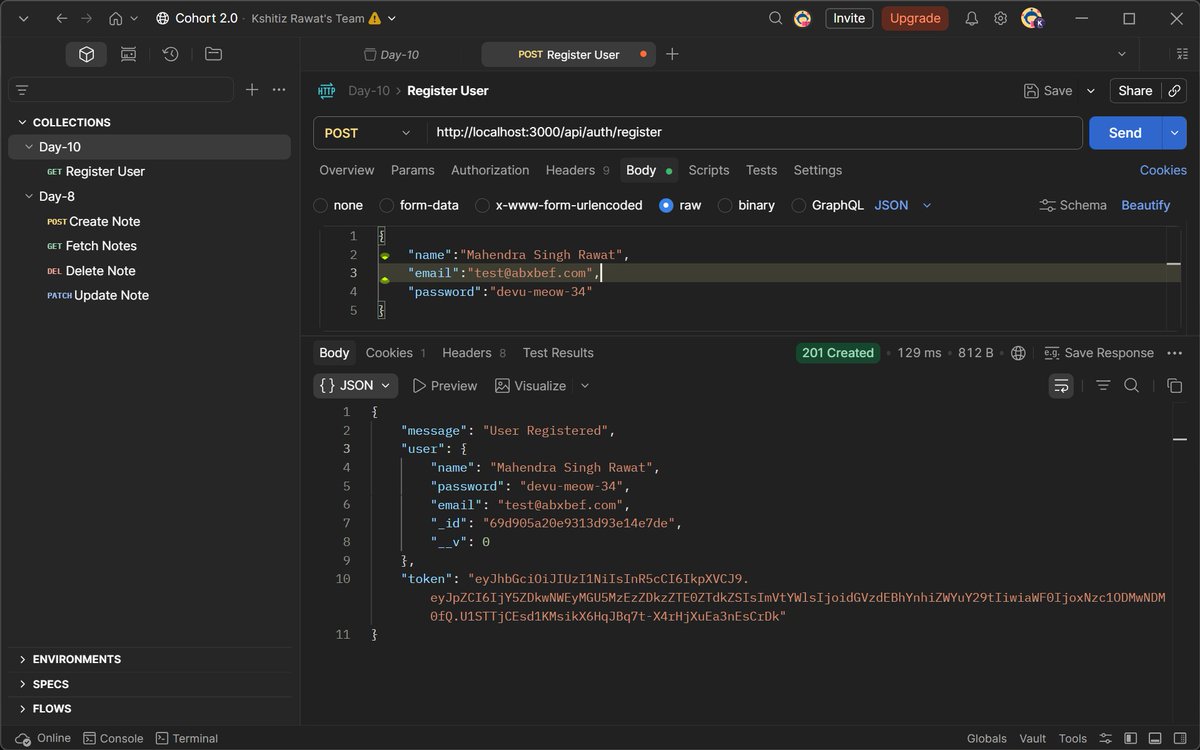
🔹 Generating JWTs and storing them securely in cookies
🔹 Creating a dedicated Refresh Token entity in PostgreSQL using TypeORM
🔹 Persisting refresh tokens in the database instead of relying solely on stateless JWTs
🔹 Learning how JWT IDs can be be used to link tokens with database records
🔹 Updating integration tests to verify refresh token persistence during user registration
One thing I found particularly interesting was the distinction between stateless and stateful authentication.
With stateless authentication, all the information needed to validate a user is contained within the token itself, allowing services to verify requests without querying a database. This can improve scalability and simplify distributed systems.
With stateful authentication, session information is stored on the server side, making it easier to manage active sessions, revoke access, and enforce security policies. By storing refresh tokens in the database, we introduce a stateful component that enables features such as session management, token revocation, and token rotation.
Another valuable lesson was seeing how quickly controllers can become overloaded with responsibilities and how moving logic into dedicated services makes the codebase easier to maintain and test.
Still learning a lot about authentication, security, and microservice architecture, but each step is helping me better understand how production-ready systems are designed.
@codersGyan
#Microservices #BackendDevelopment #NodeJS #TypeScript #JWT #Authentication #PostgreSQL #TypeORM #SoftwareEngineering #LearningInPublic #WebDevelopment


1
91

May 24
your question is broken. when you say key, which key? private or public?
also, jsonwebtoken defaults to HS256, which is symmetric.
you randomly jumped to RS256 without even knowing which algorithm was used for signing.
this attack only works if:
- signing uses RS256 or similar
- the public key is used in verify and no explicit algorithm is enforced
otherwise this whole discussion is just slop.
1
18
4,214

May 24
The documentation for jsonwebtoken directly contradict what you just said.
This reads like AI slop and I saw similar replies from other people on that thread that turned out to be AI bots.
1
1
66
5,562


May 15
Learn with Youtube clone
Chapter 1: Setting up
The first thing everyone does when they start a project is environment setup....
for frontend its, usually:
-> npx create-next-app@latest .
-> npm i axios motion zustand
for backend its, usually:
-> npm i express prisma dotenv nodemon jsonwebtoken
its all good for local, you npm run dev it... and enjoy running on local
But, what if you want to deploy it for production over
(server, cloud, render, railway, vps) etc...
how do you pack them all together and upload it together, such that they work there like, they are working in your device....
(dear vibecoders, dont't say vercel handles it for me)
(what are you even doing here, go to back to prompting, your ai must have responded by now.)
Here, comes docker....
for newbies, think its a box, where you keep all you app files, dependencies, services together...
and whenever you want to run it, you just plug the box in and taddaaaaaa!!!
it works just like it worked in your local machine
if (yk docker) goto nextpost
else youtube.com/results?search_q…
cout << "Thank you" << endl;
return;

2
8
885


May 8
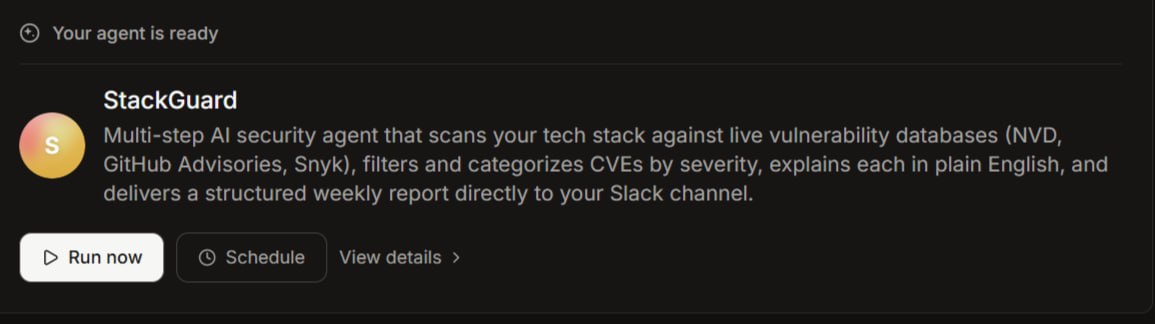
Most developers don't know their stack is vulnerable until something breaks in production.
By then, it's too late.
I built an AI agent that scans your entire tech stack for known vulnerabilities every week and drops the report straight into your Slack.
It's called StackGuard. Here's how it works 👇
✅
You fill out one form.
Your frontend, backend, languages, databases, packages, infrastructure, and version numbers.
That's it.
You never touch the agent again.
🛡️
StackGuard stores your stack in memory and takes it from there every single week.
🌐
Every Monday, it fires up a cloud browser and hits three sources back to back:
✳️NVD (National Vulnerability Database)
✳️GitHub Security Advisories
✳️Snyk Vulnerability Database
It searches your exact stack, not generic security news.
Your technologies.
Your versions.
Your risk.
Then it filters, deduplicates, and categorizes every finding into four tiers:
🔴 Critical (CVSS 9.0 ) — act today
🟠 High (7.0 to 8.9) — fix this week
🟡 Medium (4.0 to 6.9) — monitor and plan
🔵 Low (below 4.0) — worth noting
No noise.
Just what matters for your stack specifically.
For every vulnerability found, it writes a plain-English breakdown.
Not the raw CVE description that reads like a legal document.
What the vulnerability is.
What an attacker can do with it.
Which part of your stack is exposed.
Exactly what to upgrade to.
This was built for developers.
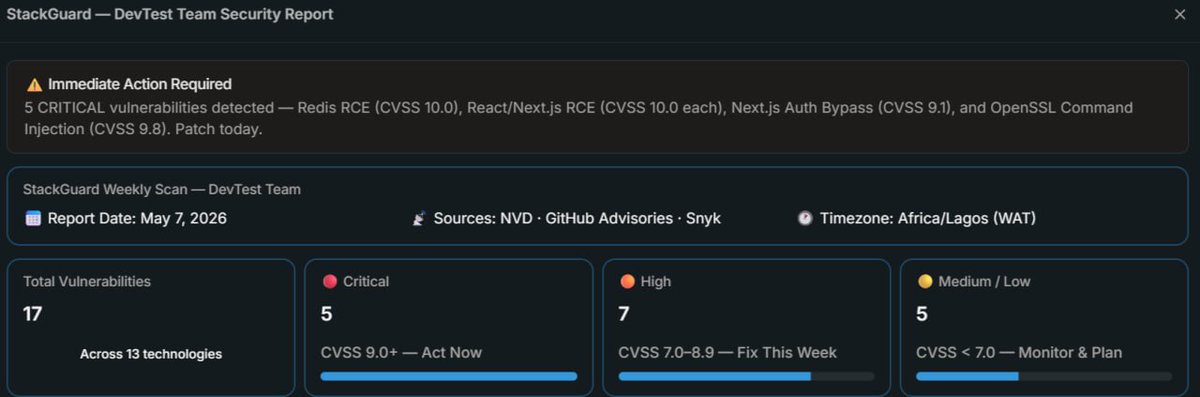
I tested it on a real stack:
React 18.2, Next.js 14.1, Node.js 20.11, PostgreSQL 15, Redis 7.0, Lodash 4.17.15, Axios 1.6.0, OpenSSL 3.0.2, Docker 24.0, Nginx 1.25
The agent came back with 17 vulnerabilities across 13 technologies.
5 of them critical. CVSS scores of 10.0.
The full report landed in a dedicated Slack channel, formatted cleanly with:
severity sections,
CVE IDs,
affected technologies,
CVSS scores,
and one-line fix actions.
Python 3.11, jsonwebtoken 9.0.0, Docker 24.0, and JavaScript came back clean.
That distinction alone builds trust in the output.
✅
This is the kind of agent that used to require a dedicated security engineer, a subscription to a paid vulnerability tool, and a custom Slack integration.
Now it's one form, one agent, one weekly report.
Built entirely on CREAO AI.
Introducing StackGuard.
Real-time vulnerability intelligence for your dev stack.
Scans three sources. Filters by severity. Delivers to Slack. Runs itself.
If you're a developer or building for one, this is the kind of automation that actually protects your work.
Built with @CreaoAI
@CreaoBuilds @CreaoAI #Creaocontest #buildwithCreao


May 1

CREAO Builds Contest is live
💰$250 total prize pool
📆 From May 1 → May 8, 10:00 AM UTC
This time, we're not only asking what you built. We also want to know what the building experience actually felt like: what worked, what was confusing, what saved you time, and what could be better.
Honest, specific feedback matters here as much as the build itself.
To participate:
1. Follow @CreaoBuilds on X
2. Build an agent in CREAO
3. Publicly share your build (X post, thread, or demo video)
4. Submit in our Discord and include a short write-up about your experience
5. Quote this post with your agent name/title
Build something useful. Tell us what the process felt like.
Help shape the next version of CREAO.
More details in Discord.
discord.gg/creao-ai

6
4
20
572

May 6
Day84 Of #100DaysOfCode
>I learned how JWTs handle stateless authentication
>Created Stateless Authentication Using JsonWebToken(JWT)
#ExpressJs #Docker #Backend


11
142

Give your AI Agents the power of jwt.io. 🔐🤖
You can now natively decode, encode, and validate JSON Web Tokens right inside your favorite agentic coding harness. Plug and play token management for your autonomous workflows.
Add it to your workspace:
npx skills add jsonwebtoken/jwt-skills
Check out the demo below to see how it works 👇
5
4
851

Apr 28
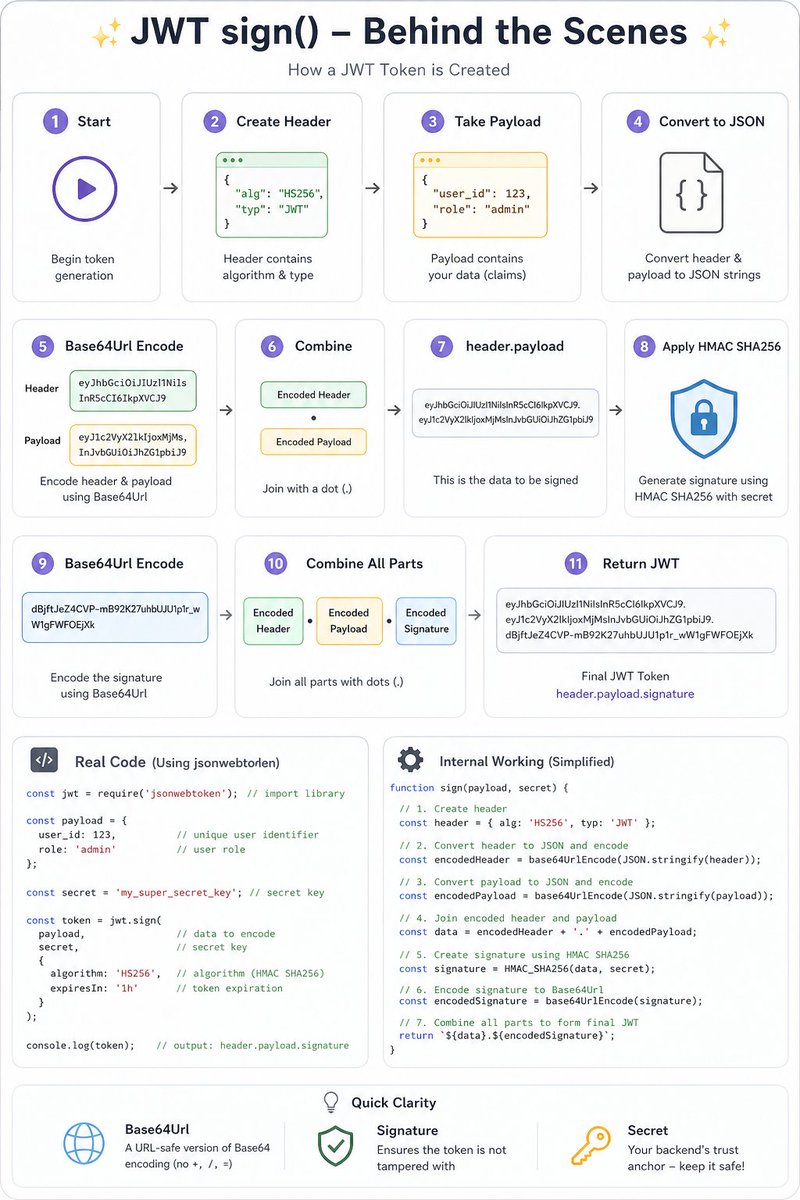
Step by step guide of how JWT sign() works behind the scene
#jwt #jsonwebtoken
3
25
165
4,630

Apr 26
completed making a simple todo application, nothing fancy and i observed the following things coming from the express ecosystem
- hono's built in logger feels barebones after being used to morgan's logs
- built in zod validation. i didn't have to use my own custom middleware to validate bodies, params or queries along with the type inference
- it doesn't lean towards controller based architecture. it can bridge the gap using createFactory but adapting to it feels different
- love not having to install cookie-parser or jsonwebtoken because hono comes with batteries included


8
1
32
476

Apr 20
- use bcrypt to hash passwords
- use jsonwebtoken for creating JWT tokens
- JWT has 3 parts: header, payload, and signature
- use Mongoose pre hooks to run logic before saving (e.g., hashing passwords)
1
3
32


Apr 10
🚀 Backend Class #11 - @ankurdotio
• Implemented full Authentication system🔐
• Handled existing users gracefully✅
• Organized APIs using Express Router📁
• Created tokens & stored them in cookies using cookie-parser & jsonwebtoken🪙
#BackendDevelopment #Authentication


3
21

Apr 9
The thing come dey sound like jsonwebtoken

“MMIWG2SLGBTQQIA ”
The Canadian government just dropped this absolute monstrosity (and no, it isn’t satire).
1
2
129


Apr 6
HTTP is stateless so the server forgets you everytime, so we use JsonWebToken method
A client(user) sends a request to the server first time(it's when you create a new account in some website), it sends clients details like username, email, password to the server(backend).
1
2
7

Apr 4
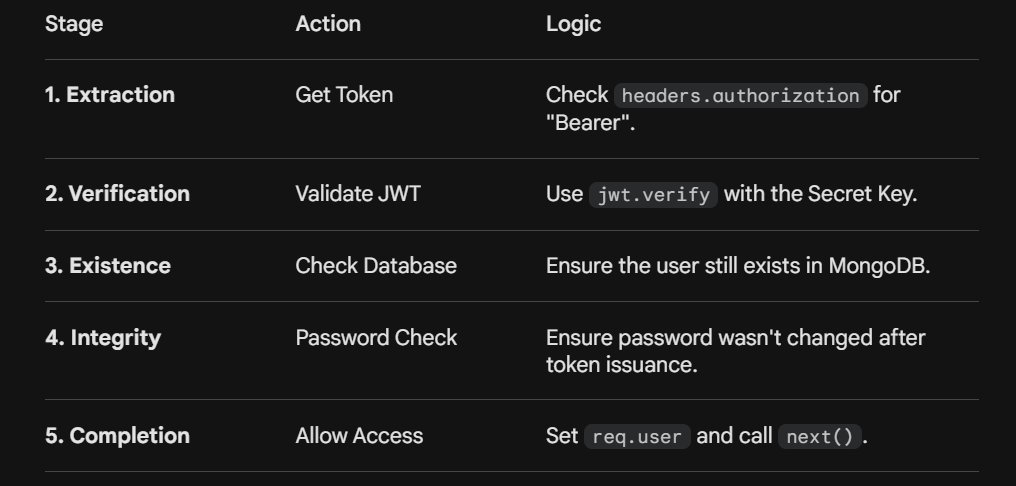
Day 61 of backend
Protecting routes
This is the first part where we create a middleware function called protect. This function acts as a "gatekeeper" that every request to a protected route must pass through.
Step 1: Getting the Token
The server needs to find the token sent by the client and there are two common ways to send this
- Authorization Header: The most standard way. The client sends a header like
- Cookies: Storing the token directly in the browser.
The code checks req.headers.authorization, If no token is found its returns 401 error
Step 2: Token Verification
Once the server has the token, it must prove it is legitimate. This is done using the jwt.verify method from the jsonwebtoken library
Step 2: User Validation
This is a crucial security step where we check if users still exists and check if password was changed
Step 4: Granting Access
If all the above checks pass, The current user data is stored and the next() function is called

Apr 3

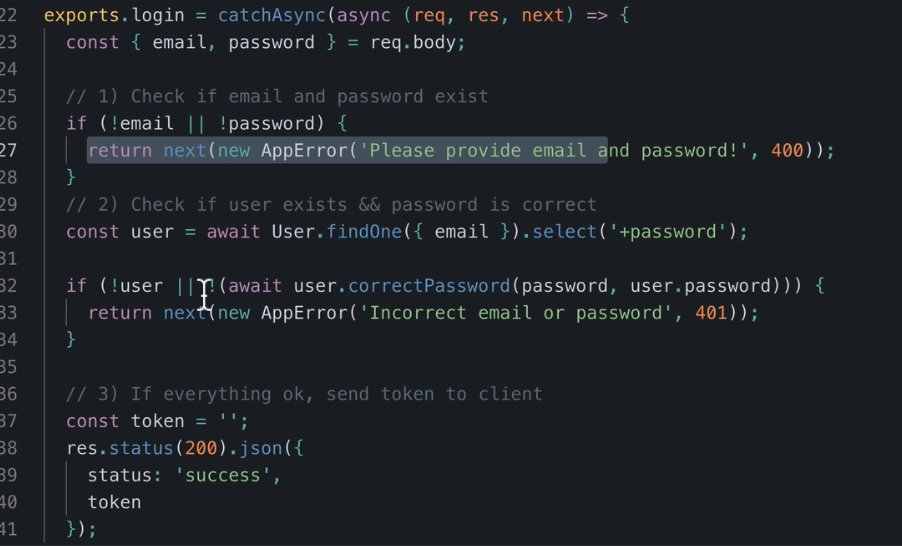
Day 60 of backend
2months and counting And I thought I could speedrun this shii🫠
Logging in users. Well this was a long topic today
It was divided into 3 steps
1) Basic Validation and User Retrieval
2) Password Verification
3) Token Generation and Response
In step 1, The first goal is to ensure the request actually contains the necessary credentials.
The req.body is destructured to pull the email and password directly. The code uses User.findOne({ email }) then a simple if statement checks if both values exist.
In step 2. Since passwords are stored as hashes (using bcrypt), you cannot simply compare two strings using "===" so we create an instance method and use bcrypt. compare(candidatePassword, userPassword)
In step 3. Once the user is verified, the server needs to provide them with the JWT so they don't have to log in again for every request.
I need to practice all these things. A lot of security risks involved
#webdev #backend #learninpublic #nodejs
6
143